True Craftsmanship: Pneumatic Powered Drone Wasn’t Made To Fly

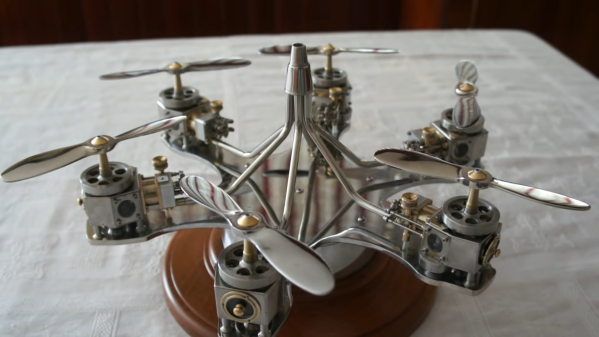
From time to time it’s good to be reminded that mechanical engineering can also be art. [José Manuel Hermo Barreiro], also known as [Patelo], is a retired naval mechanic with a love for scale model engines. Using only basic tools and a lathe, he has built a non-flying hexacopter display model, each propeller turned by a tiny single cylinder motor that runs on compressed air. From the tiny components of the valve systems, the brass framed acrylic windows into the crankcases, and the persistence of vision disc on the exhaust, the attention to detail is breathtaking.
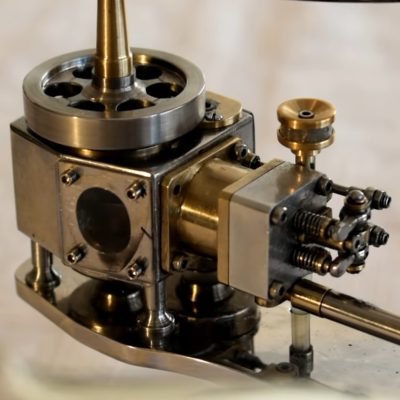
One of the six hand crafted pneumatic motors

[Patelo] started the project on paper, and created a set of detailed hand-drawn blueprints to work from. Sadly a large part of the build took place during lockdown, and was not filmed, but we still get to see some work on a crankcase, connecting rod, camshaft, propellers, flywheel, and exhaust tubes. It is very clear that [Patelo] knows his way around his lathe very well, and is very creative with custom tools and jigs. The beautiful machine took approximately 1,560 hours to build, consists of 265 individually made parts held together with 362 screws.

We previously featured tiny V-12 engine that [Patelo] built around 2012. At that time he was 72 years of age, which means he should be around 80 now. We can only hope to come to emulate him one day, and that we get to see more of what comes out of his workshop. Hats off to you, sir.

A Tongue Operated Human Machine Interface

For interfacing with machines, most of us use our hands and fingers. When you don’t have use of your hands (permanently or temporarily), there are limited alternatives. [Dorothee Clasen] has added one more option, [In]Brace, which is basically a small slide switch that you can operate with your tongue.

[In]Brace consists of a custom moulded retainer for the roof of your mouth, on which is a small ball with an embedded magnet, that slides long wire tracks. Above the track is a set of three magnetic sensors, that can detect the position of the ball. On the prototype, a wire from the three sensors run out of the corner of the users mouth, to a wireless microcontroller (Which looks to us like a ESP8266) hooked behind the user’s ear. In a final product, it would obviously be preferable if everything were sealed in the retainer. We think there is even more potential if one of the many 3-axis hall effect sensors are used, with a small joystick of rolling ball. The device could be used by disabled persons, for physical therapy, or just for cases where a person’s hands are otherwise occupied. [Dorothy] created a simple demonstration, where she plays Pong, or Tong in this case, using only the [In]Brace. Hygiene and making sure that it doesn’t somehow become a choke hazard will be very important if this ever became a product, but we think there is some potential.

[Kristina Panos] did a very interesting deep dive into the tongue as an HMI device a while ago, so this isn’t a new idea, but the actual implementations differ quite a lot. Apparently it’s also possible to use your ear muscles as an interface!

Thanks for the tip [Itay]!

A Wood Gas Powered Lawn Mower

When mowing the lawn, you generally have a choice of pushing power, electric or gasoline. Thanks to the nutty inventor [Colin Furze], you can now add wood gas to the list, as long as you don’t mind some inconvenience. He built a wood gas generator on top of a formerly gasoline powered lawn mower, so he can now run his lawn mower on wood chips.

Wood gas generators have been used with internal combustion engines for a very long time, reaching their peak in the later parts of WW2 when fuel shortages plagued Europe. When wood is burned at high temperature but with limited oxygen, it produces a combustible gas mix that can be fed into an internal combustion engine. [Colin]’s generator went through a number of iterations, and the problem-solving that goes into a project like this is always interesting to watch. We would not recommend running tests like these indoors, but we suppose no [Colin Furze] video would be complete without a bit of danger.

On his first version he had an extraction fan that was too close to the outlet of the burn chamber, so it melted very quickly. The combustion temperature was also not high enough, which required some changes to the chamber geometry. The main problem that plagued the project was filtering out the moisture and tar. [Colin] did eventually get the lawn mower to run on wood gas, but tar was still getting into the engine, which prevented it from starting the second time. The filtering system will need some refinement, which [Colin] will address in his next video, which he also hints will involve some sort of diabolical swing set. Continue reading “A Wood Gas Powered Lawn Mower”

Little Jumping Bot Can Now Stick The Perfect Landing

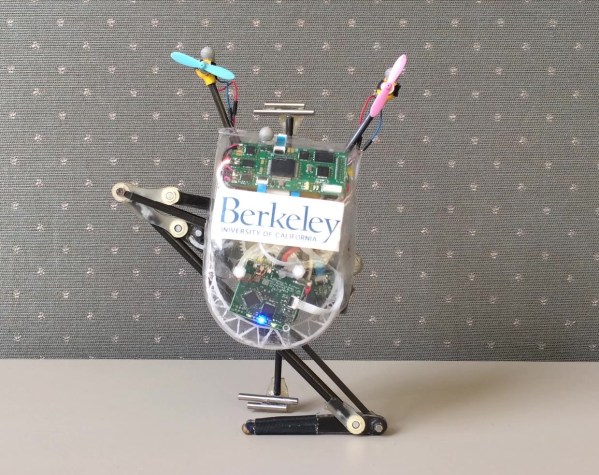
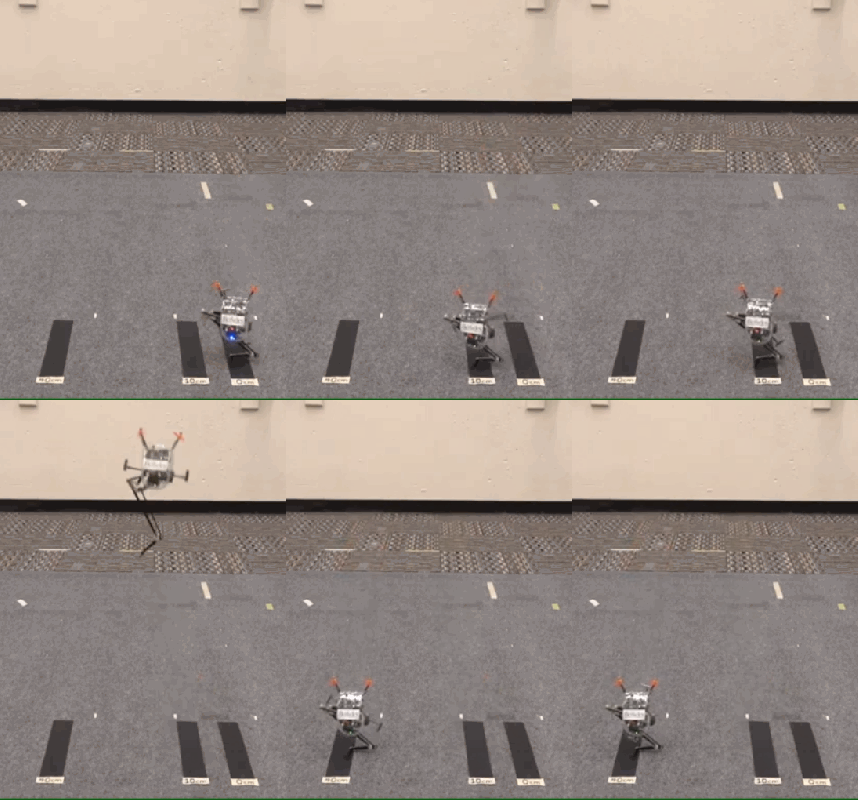
Sticking the perfect landing can take years of practice for a human gymnast, and it seems the same is true for little monopedal jumping robots. Salto-1P, an old acquaintance here on Hackaday, always needed to keep jumping to stay upright. With some clever control software improvements, it can now land reliably on an area the size of a coin, and then stay there. (Video after the break)

[Justin Yim] from the UC Berkeley’s Biomimetics Lab has been working on Salto for the past four years, and we’ve covered it twice before. Attitude control is handles by a combination of propeller thrusters for roll and yaw, and a reaction wheel for pitch.While it was already impressive before, it had a predictable landing area about the size of a dinner plate.

The trick to the perfect landing is a combination of landing angle, angular velocity and angular momentum. Salto can only correct for ±2.3° of landing angle error, because it doesn’t have a second foot to catch itself when something goes wrong. Ideally the robot’s angular velocity and momentum should be as close as possible to 0 at takeoff, which gives the reaction wheel maximum control authority in flight, as well as on landing.  Basically a well executed takeoff directly influences the chances of a good landing.  [Justin] does an excellent job explaining all this and more on the project’s presentation video. Continue reading “Little Jumping Bot Can Now Stick The Perfect Landing”

Electric Skateboard With Tank Tracks, From A Big 3D Printer

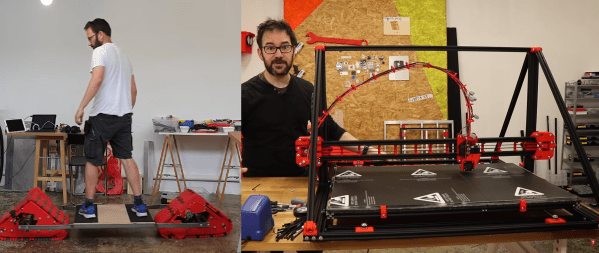
One of the basic truths of ground vehicles is that they are always cooler with tank tracks. Maybe not better, but definitely cooler. [Ivan Miranda] takes this to heart, and is arguably the king of 3D printed tank projects on YouTube. He has built a giant 3D printed electric skateboard with tank tracks with the latest version of his giant 3D printer. Videos after the break.

The skateboard consists of a large steel frame, with tracked bogies on either end. Most of the bogie components are 3D printed, including the wheels and tracks, and each bogie is driven by a brushless motor via a belt. Some bends were added to the steel frame with just 3D printed inserts for his bench vice. The bogies are mounted to the frame with a standard skateboard truck, which allows it to steer like a normal skateboard, by tilting the deck. It looks as though this works well on a smooth concrete floor, but we suspect that turning will be harder on rough surface where the tracks can’t slide. We’ll have to wait for the next video for a full field test.

The large components for this skateboard were printed on [Ivan]’s MK3 version of his giant 3D printer. Although it’s very similar to the previous version, improvements were made in key areas. The sliding bed frame’s weight was reduced by almost 50%, and the wheels were rotated, so they ride on top of the extrusion below it, instead of on it’s side, which helps the longevity of the wheels. This also allows bed levelling to be done by turning the eccentric spacers on each of the wheels. The rigidity of base frame and x-axis beam were increased by adding more aluminium extrusions. Although he doesn’t explicitly mention the print volume, it looks to be the same as the previous version, which was 800x500x500. For materials other than PLA, we suspect a heated build chamber will be required have any chance of making big prints without excessive warping.

[Ivan] really likes big prints, with a number of 3D printed tanks, a giant nerf gun, and a sand drawing bot. Continue reading “Electric Skateboard With Tank Tracks, From A Big 3D Printer”

Transform Kicad Design To Patchwork For Isolation Routing

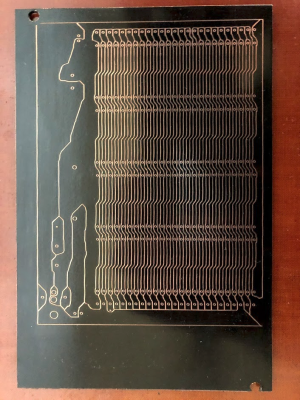
Tuning a desktop router and your board designs for isolation routing can be a bit tricky, with thin traces usually being the first victim. For simple prototype boards you usually don’t need tightly packed traces, you just want to isolate the nets. To do this with a minimum amount of routing, [Michael Schembri] created kicad-laser-min, a command-line utility that takes a Kicad PCB design and expands all the tracks and pads to their maximum possible width.

Laser scribed PCB with maximum track widths

The software takes one layer of the PCB layout, converts it to black and white, and then runs a C++ Voronoi algorithm on it to dilate each track and pad until it meets another expanding region. Each region is colourised, and OpenCV edge detection is used to produce the contours that need to be milled or etched. A contour following algorithm is then used to create the G-code. The header image shows the output of each step.

Full source code is available on GitHub. [Michael] has had good results with his own boards, which are scribed using a laser cutter before etching, but welcomes testing and feedback from other users. He has found that OpenCV doesn’t always completely close all the contours, but the gaps are usually smaller than the engraving width of his laser, so no shorts are created.

This is basically “Scribble style” prototyping with CAD and CNC tools. If you prefer scribe and etch, you might consider building a simple PCB shaker for faster etching. If you have a router but want to avoid the dust, you can use a carbide scribe to scratch out the tracks without needing to etch.

Slothbot Lives Up To Its Name

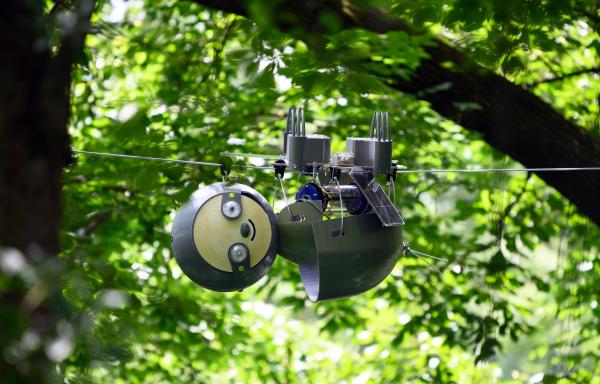
For moving about in the real world, robots can crawl along the ground or take to the sky. Both options have disadvantages, with obstacles being a problem on the ground and flying being very energy intensive. What we don’t often see are robots that move along aerial cables, which can offer the best of both worlds for certain use cases. Taking inspiration from a sloth’s slow and efficient movement through the trees, researchers from Georgia Tech created a robot to crawl slowly along a cable network and monitor the world around it, and of course named it Slothbot.

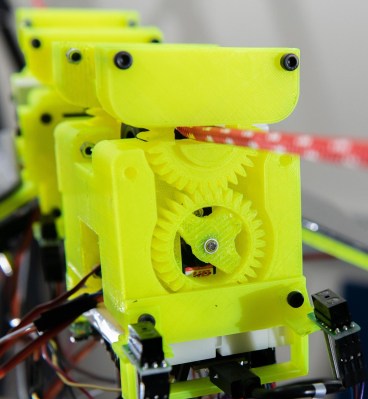
The cable switching mechanism

Slothbot trades speed for efficiency, letting it operate for very long periods on solar power alone. It does require the set up and maintenance of a cable network, but that brings the advantage of no obstacles, and the ability to stop and recharge. To us the most interesting feature is the cable switching mechanism, that allows it to navigate its way along a web of interconnected cables.

Ring gears with a section removed hold the upper part of the pulley mechanism, but can rotate it’s opening to the left or right to allow an interconnecting cable to pass through,  The body is in two pieces, with an actuated hinge in the middle to allow it to turn onto a different cable section. Each section of the body also has a powered wheel which pushes up against the cable and moves the robot along slowly. Not surprisingly, researchers say that making the cable switching mechanism reliable is the biggest challenge. It does look like the current design would not work well with thicker cable joints. Watch the video after the break for a better look at the mechanism Continue reading “Slothbot Lives Up To Its Name”