Giant 3D Printer For Giant Projects

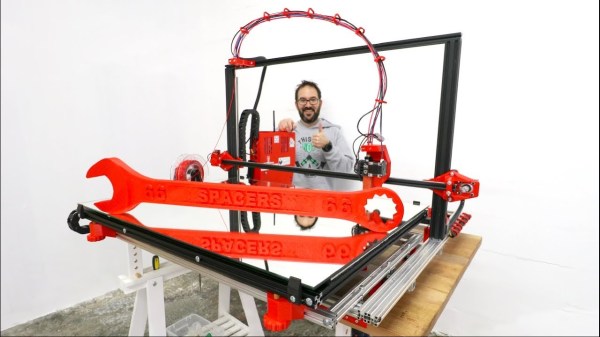
Established FDM 3D printers designs generally lead themselves well to being scaled up, as long as you keep frame stiffness, alignment and movement in mind. [Ivan Miranda] needed a big printer for his big projects (videos below), so he built his own i3 style printer with a 800 mm × 500 mm usable print bed and about 500 mm vertical print height.

The frame of the new machine is built using 20×20 and 20×40 aluminium V-slot extrusions with some square tubing for reinforcement. To move all the weight, all 3 axes are driven by double NEMA17 steppers, via a DUET3D board with an expansion board for the extra motors. The extruder is the new E3D Hemera with a 0.8 mm nozzle. The print bed is a mirror, on top of the aluminium plate, headed by a large silicone heat pad. The first bed version used a smaller heat pad directly on the back of the mirror, but it heated up unevenly and the mirror ended up cracking. Look out for the ingeniously lightweight and simple cable management to the extruder. When all was said and done he printed a 800 mm long size 66 wrench as a test piece with zero warp, which is pretty good even for PLA. This project is also a perfect example of the power of 3D printing for rapid iterative development, as lot of the printed fittings went through multiple versions.

Although [Ivan] received most of the components for free, a printer like this is still within reach of the rest of us. We look forward to a lot of big prints by [Ivan] in his signature red, like a massive nerf gun and the ridable tank he is currently working on. Continue reading “Giant 3D Printer For Giant Projects”

Humongous 3D Printer Produces Boat And Challenges

We’ve seen some pretty big polymer 3D printers, but nothing quite as big as the University of Maine’s 3D printer with a 22,000 ft³  (623 m³) build volume. It holds the Guinness World Record for the largest polymer 3D printer, and with that size comes some interesting challenges and advantages.

You might have already seen the video of it printing an entire patrol boat hull in a single piece, and would have noticed how it printed at a 45° angle. Due to the sheer weight and thermal mass of the print bead, it cannot bridge more than an inch, since it’ll just sag. A 45° overhang angle is about all it can manage, but since the layers can be tilted at that angle, it ends up being able to print horizontal roofs with no support. A 10 mm nozzle is used and the extruded line ends up being 12.5 mm in diameter with a 5 mm layer height. The boat mentioned above was printed with carbon ABS, but it can reportedly use almost any thermoplastic. It looks like the extruder is a screw extruder from an injection moulding machine, and is likely fed with pellets, which is a lot more practical than filament at this scale. Check out the video below by [Paul Bussiere] who works in the Advanced Structures & Composites Center at the University. He also does a very interesting interview with his boss, [James M. Anderson].

The 45° layer angle is very similar to how some infinite build volume 3D printers work. For something more within the reach of the average hacker, check out the tool changing Jubilee.
Continue reading “Humongous 3D Printer Produces Boat And Challenges”

Feeding Both Filament And Electrons Through A Custom D-Sub Connector

We sometimes forget that 3D printers are just CNC platforms with a hotend attached, and there a whole range of alternative tool heads to use. [Jón Schone] has been doing exactly that, and needed a way to quickly disconnect his hotend completely from his printer, so he 3D printed his own custom D-sub connector for both filament and wires. (Video, embedded below.)

[Jon] has added a number of upgrades for his Creality CR10 3D printer, including a quick change tool mount to allow him to also use a laser engraver and even a small spindle. When the hotend is removed there’s no way to quickly disconnect the wiring , so the print head is usually left connected and placed to one side of the printer. For a quick detach solution for both wiring and the Bowden tube, he first modified an off-the-shelf D-sub connector. The connector was relatively expensive, and the tube had a tendency to pop out, which led to some failed prints.

[Jon] wanted to use proper Bowden tube fittings inside the connector, so he designed and printed his own D-sub connector and bought loose contacts. Pushing the contacts into the housing turned out to be quite difficult to do without breaking them, so he’s working on making that process simpler. This is just one of many examples of 3D printing 3D printer upgrades, which has been a core feature of the RepRap project right from the beginning. Check out the video after the break

We have no shortage of 3D printer hacks and there will be many more to come. Some cool recent ones includes the Jubilee CNC that was built from the start with automatic tool changing in mind, and a printer that fits in your backpack. Continue reading “Feeding Both Filament And Electrons Through A Custom D-Sub Connector”

Testing Carbon Fibre Reinforced Filament By Building An Over-Engineered Skateboard

Advances in filaments for FDM 3D printers have come in leaps and bounds over the past few years, and carbon fibre (CF) reinforced filament is becoming a common sight. Robotics extraordinaire [James Bruton] got his hands on some CF reinforced PLA, and ended up building a completely over-engineered 3D printed skateboard. (Video, embedded below.)

[James] started by printing some test pieces with a 0.5 mm and a big 1.2 mm nozzle with and without the CF, which he subjected to cantilever deflection tests. The piece with CF was 20% stiffer than without.

[James] then built an extremely strong and cool looking skateboard deck with alternating section of the CF PLA and toughened PLA, totalling 2.7 kg of filament. It was extremely strong, so after bolting on a set of trucks and wheels, he did some mild riding at a local skate park, where it survived without any problems. He admits it was completely over-engineered, but points out in that the internal cavities in the deck is the perfect place for batteries on an electric long board.

Designing something from the ground up with the strength and weaknesses 3D printing in mind, leads to some very interesting and innovative designs, of which this is a perfect example, and we hope to see many more like it. We’ve featured a number of [James]’ project, including the remote controlled bowling ball he built for [Mark Rober] and his impressive OpenDog and Start Wars robots.

Continue reading “Testing Carbon Fibre Reinforced Filament By Building An Over-Engineered Skateboard”

Quick And Dirty: Operate An Intercom Via Telegram

Never underestimate the quick and dirty hack. It’s very satisfying to rapidly solve a real problem with whatever you have on hand, and helps to keep your hacking skills sharp for those big beautifully engineered projects. [Guillaume M] needed a way to remotely open his apartment building door for deliveries, so he hacked the ancient intercom to be operated via Telegram, to allow packages to be deposited safely inside his mailbox inside the building’s front too.

[Guillaume] needed to complete the hack in a way that would allow him to return the intercom to its original state when he moves out. Opening the 30-year-old unit, he probed a row of screw terminals and identified a 13V supply, ground, and the connection to the buildings’ door lock. He connected the lock terminals to a relay, which is controlled by a Raspberry Pi Zero W that waits for the “open” command to be sent to a custom Telegram Bot.

To power the Pi, [Guillaume] connected it to the 13V supply on the intercom via a voltage divider circuit. Voltage dividers usually make lousy power supplies, since the output voltage will fluctuate as the load changes, but it looks as though it worked well enough for [Guillaume]. The intercom had a lot of empty space inside, so after testing everything was packed inside the housing.

If you want to achieve the same with an ESP8266, there’s a library for that. Just keep in mind that being dependent on web servers to open critical doors might get you locked out.

Cheating At Bowling, The Hacker Way

Anyone who has ever gone to a bowling alley will know the preferred (but ineffective) technique to telepathically control a bowling ball. [Mark Rober] and [James Bruton] decided to change that and hacked a bowling ball that can be steered remotely (and discreetly), simply by leaning your body.

They started with a standard bowling ball, that was cut in half and hollowed out on a lathe. A beam sits on the centre line of the ball, mounted on a bearing in each half to allow the ball to spin around it. Steering done by shifting the centre of mass, by moving a steel pendulum that hangs below the beam side to side with heavy-duty servo. The servo is controlled with an Arduino, and an IMU to detects the balls orientation. Power is provided by and RC Lipo battery. The wireless controller is a sneaky little device that is taped to [Mark]’s back and covered with clothing, and steers the ball by detecting how far he leans with an IMU module. The brain is an Arduino Mini and an NRF24L01 provides the RF link.

While it’s not an easy build, it’s a fairly simple system electronically, with off the shelf electronics modules and perfboard. The genius is in the implementation and its entertainment value. The look on the kids faces when [Mark] “telepathically” controls the ball, after showing off the fact that he has zero natural ability, is absolutely priceless. [Mark Rober], a former NASA engineer, has made a name for himself with viral Youtube videos on cool projects like a glitter booby trap for package thieves and a liquid sand hot tub. [James Bruton], a former toy designer is known for his robotics prowess that he has put on display with OpenDog and functional Star Wars robots.

For us this hack is a perfect example of one that entertains and inspires, a powerful combination for young and old alike. Check out the awesome video after the break. Continue reading “Cheating At Bowling, The Hacker Way”

Electric Longboard Quick Build Using Off-The-Shelf Components.

Building cool things completely from scratch is undeniably satisfying and makes for excellent Hackaday posts, but usually involve a few unexpected speed humps, which often causes projects to be abandoned. If you just want to get something working, using off-the-shelf modules can drastically reduce frustration and increase the odds of the project being completed. This is exactly the approach that [GreatScott!] used to build the 3rd version of his electric longboard, and in the process created an excellent guide on how to design the system and selecting components.

Previous versions of his board were relatively complicated scratch built affairs. V2 even had a strain gauge build into the deck to detect when the rider falls off. This time almost everything, excluding the battery pack, was plug-and-play, or at least solder-and-play. The rear trucks have built in hub motors, the speed controllers are FSESC’s (VESC software compatible) and the remote control system is also an off the shelf system. All the electronics were housed in 3D printed PETG housing, and the battery pack is removable for charging. We just hope the velcro holding on the battery pack doesn’t decide to disengage mid-ride.

The beauty of this video lies in the simplicity and how [GreatScott!] covers the components selection and design calculations in detail. Sometimes we to step back from a project and ask ourselves if reinventing is the wheel is really necessary, or just an excuse to do some yak shaving. Electric long boards are extremely popular at the moment, you can even make a deck from cardboard or make a collapsible version if you’re a frequent flyer.