Sega Master System On A STM32 Development Board

Sega on STM32

Some hackers have managed to convert an STM32 development into a Sega Master System emulator. This means Sonic the Hedgehog running on an ARM Cortex-M4.

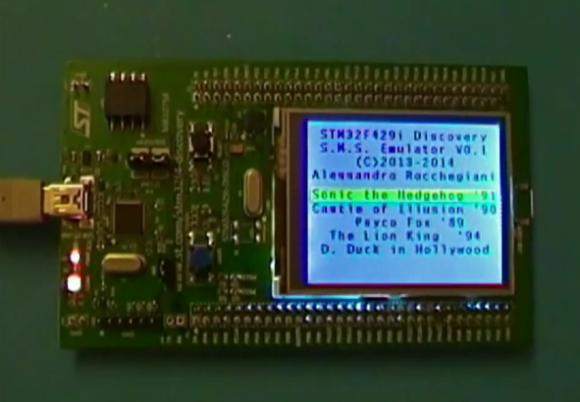
This hack has a number of parts. First, [Alessandro Rocchegiani] showed off a video of his Sega Master System emulator running on the STM32F429 Discovery development board. This first version used the on board 2.4″ TFT LCD screen.

[Fabrice] was working with this STM32 Discovery board already. He had developed an expansion board that added a number of features to the development kit, including an R-2R DAC for video output. When [Fabrice] found out about the Sega Master System emulator, he worked with [Alessandro] and his son [Fabrizio] to get VGA output working. They also added support for the Wii controller using [Fabrice]’s Wii library. The result is a Sega Master System emulator with VGA output at 640 x 480, with 16 bit color and Wii controller support.

You can watch a video of both the LCD and VGA versions of the hack after the break.

Continue reading “Sega Master System On A STM32 Development Board”

An Arduino Library For The PS4

PS4 Controller

Looking to interface your Arduino with the PS4 controller? [Kristian] has updated his USB host library with support for the controller. The library makes it easy to read most of the inputs from the controller. Currently the buttons and joysticks work, and support for the light sensor, rumble, and touchpad is on the way.

To get this working, you will need the USB Host Shield for the Arduino and a Bluetooth dongle. Once you have the hardware setup, you can use the library to pair with the controller. When connected, simple function calls will let you read the state of the device.

While this does require some additional hardware to connect, all of the code is open source. If you’re looking to experiment with the PS4 controller yourself, [Kristian]’s work could be a helpful starting point. Of course, all of the source is available on Github, and the example sketch shows how easy it is to roll the PS4 controller into your own Arduino project.

Software Half Duplex UART For AVRs

If you have worked with very low cost microcontroller in the past, such as the ATtiny series from AVR, you’ve probably been stuck without a UART peripheral. The usual answer to this problem is to implement the UART in software. It’s not fast, but it works.

Lets say you’re even more limited on resources, and only have a single pin for UART. [Ralph] created a software library and a small circuit that enables half duplex UART using only one pin. With the above circuit, and a 62 byte Arduino compatible library, you can add UART to the tiniest of ATtinys.

In this circuit, the Tx/Rx pin is on the AVR, and the Tx and Rx pins are another device. The circuit relies on the idle state of UART being a logic high signal. When the Tx pin is idle, the transistor stays on. This allows the Tx/Rx pin to pull Rx low when the AVR sends a 0. When the Tx pin sends a 0, the Tx/Rx pin gets pulled low through the diode.

It’s a clever hack, and could definitely help add communication to your next tiny project.

From EPaper Badge To Weather Station

ePaper Weather Station

[Jeremy Blum] converted his 2013 Open Hardware Summit badge, also known as the BADGEr, into an ePaper weather station. We’ve looked at the 2013 OHS badge in the past, and the included open source RePaper display makes it an interesting platform to hack.

To fetch weather data, the badge is connected to a Raspberry Pi using an FTDI cable. A Python script uses the Python Weather API to poll for weather data. It then sends a series of commands to the BADGEr using pySerial which selects the correct image, and inserts the current weather data. Finally, a cronjob is used to run the script periodically, providing regular weather updates.

If you happen to have one of the badges, [Jeremy] has provided all of the files you’ll need to build your own weather station on Github. Otherwise, you can take a look at the RePaper project and WyoLum’s eReader Arduino Library to build your own ePaper project.

Overhauling An IC Programmer

Willem IC Programmer

[NeXT] needed an EPROM programmer to work with chips from vintage computers. Starting with a low cost programmer, he built this custom IC programmer to handle all of his programming needs.

The device is based on the Willem 5.0e programmer. [NeXT] was not satisfied with the device, noting that it had to be carefully isolated from metal surfaces during use and required setting many annoying jumpers.

To solve these problems, he started off by dismantling the programmer. The IC sockets were moved to a daughter board, which could be mounted cleanly into the metal enclosure. Replacing the jumpers was a bit more complicated, a combination of toggle and rotary switches were chosen to make changing settings easier.

Soldering the boards together looks like it was not an easy task, with 200 solder joints needed to connect the sockets and switches. After debugging some shorts and dead connections, [NeXT] managed to finish the 1.5 year project right before his Christmas deadline.

Automatic Antenna Tuner

Automatic Antenna Tuner

To get the best power transfer into an antenna, tuning is required. This process uses a load to match the transmission line to the antenna, which controls the standing wave ratio (SWR).

[k3ng] built his own automatic antenna tuner. First, it measures the SWR of the line by using a tandem match coupler. This device allows the forward and reflected signals on the line to be extracted. They are buffered and fed into an Arduino for sampling. Using this data, the device can calculate the SWR. The RF signal is also divided and sampled to measure frequency.

To automate tuning, an Arduino switches a bank of capacitors and inductors in and out of the circuit. By varying the load, it can find the ideal matching for the given antenna and frequency. Once it does, the settings are stored in EEPROM so that they can be recalled later.

After the break, check out a video of the tuner clicking its relays and matching a load.

Continue reading “Automatic Antenna Tuner”

A FPGA Controlled Reflow Oven

For Christmas, [Hamster]’s wife gave him a mini-oven. Later that day, he tore it apart and built this FPGA controlled reflow oven.

We’ve seen plenty of reflow oven builds in the past. Most of those projects use a microcontroller to do closed loop control, sensing the temperature and toggling the heating element to hit a set point. This build uses the Papilo One FPGA development board as a controller. It implements a state machine that meets the reflow profile of the solder paste, ensuring SMD components are soldered properly.

The oven uses a MAX31855 to read temperature from a thermocouple. This device provides amplification, cold junction compensation, and analog to digital conversion which spits out the temperature over SPI. To control the heater, a 40A solid state relay is used.

The VHDL code that drives this oven is linked in the writeup, and has some interesting bits for those looking to experiment with FPGAs. It includes an SPI interface, display driver, and the temperature state machine logic.