From Z80 To EZ80: Porting 8-bit Sonic 2 To The TI-84+ CE

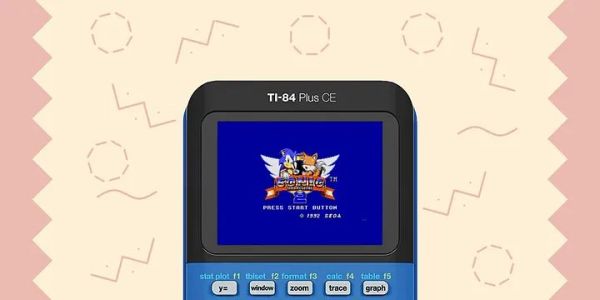
An unwritten rule is that if two systems runs even roughly the same CPU, you are obligated to port software between them, or at least give it a fair shake. This led [grubbycoder] down the path of porting Sonic 2 for the Sega Master System (to the eZ80-based Ti 84+ CE. Selecting this particular graphing calculator came down to the raw specs matching up the best, as although the eZ80 in the Ti 84+ runs at 48 MHz, it’s got wait states that cripple its actual performance. Since the calculator also lacks the Video Display Processor (VDP) and a few other bits of hardware, those extra cycles are crucial to compensate.

Sonic 2 on the Ti 84+ CE, courtesy of [grubbycoder]
Getting the disassembled version of the game was easy enough, as the [Sonic Retro] team has already done the heavy lifting there. The only snag there was that this was in WLA-DX assembler format, which is great if you just want to create a ROM for a Z80 system, but for the eZ80 you need a different assembler. Here SPASM-ng came to the rescue, as it targets both Z80 and eZ80-based Ti calculators in particular.

With those ducks aligned, the next task was to address the hardware differences. The calculator has no sound, so those routines had to go, and the color palettes of the Master System had to be mapped to that of the calculator. Since it’s a calculator, there were plenty of buttons for input, but ROM banking – which isn’t a thing on the Ti calculator – and the background and sprite rendering posed some issues. With that sorted, anyone with this calculator can now rejoice at having something better to play on their calculators than Snake in between heavy linear algebra sessions.

Run Your Favorite 8-bit Games On An ESP32

Here at Hackaday HQ we’re no strangers to vintage game emulation. New versions of old consoles and arcade cabinets frequently make excellent fodder for clever hacks to cram as much functionality as possible into tiny modern microcontrollers. We’ve covered [rossumur]’s hacks before, but the ESP_8-bit is a milestone in comprehensive capability. This time, he’s topped himself.

There isn’t much the ESP 8-bit won’t do. It can emulate three popular consoles, complete with ROM selection menus (with menu bloops). Don’t worry about building a controller, just connect any old (HID compliant) Bluetooth Classic keyboard or WiiMote you have at hand. Or if that doesn’t do it, a selection of IR devices ranging from joysticks from the Atari Flashback 4 to Apple TV remotes are compatible. Connect analog audio and composite video and the device is ready to go.

The system provides this impressive capability with an absolute minimum of components. Often a schematic is too complex to fit into a short post, but we’ll reproduce this one here to give you a sense for what we’re talking about. Come back when you’ve refreshed your Art of Electronics and have a complete understanding of the hardware at work. We never cease to be amazed at the amount of capability available in modern “hobbyist” components. With such a short BOM this thing can be put together by anyone with an ESP-32-anything.

There’s one more hack worth noting; the clever way [rossumur] gets full color NTSC composite video from a very busy microcontroller. They note that NTSC can be finicky and requires an extremely stable high speed reference clock as a foundation. [rossumur] discovered that the ESP-32 includes a PLL designed for audio work (the “APLL”) which conveniently supports fractional components, allowing it to be trimmed to within an inch of the desired frequency. The full description is included in the GitHub page for the project and includes detailed background of various efforts to get color NTSC video (including the names of a couple hackers you might recognize from these pages).

Continue reading “Run Your Favorite 8-bit Games On An ESP32”

Eight SEGAs Singing

Way back in the dark ages, before the average computer could play back high quality recorded audio, things were done differently. Music and sounds were stored as instructions to be played back on audio synthesis chips, built into the computers and consoles of the 80s and 90s. These chips and their unique voices hold a special nostalgia that’s key to this era, making them popular to experiment with today. To that end, [little-scale] decided to wire up eight chips from the SEGA Master System to please your ears.

The chips, laid out on a breadboard with a Teensy LC running the show.

The chip in question is the SN76489, which we’ve also noted is used in the Sega Genesis as well. It packs 3 square wave tone generators, and a noise channel as well. With eight of these to play with, that’s 32 total channels. To drive these, [little-scale] decided to go the MIDI route. To get around the MIDI limit of 16 channels, he decided to split the frequency range in half. Each MIDI channel addresses two SN76489 channels, the top pitches being used for one, the lower pitches being used for the other. All this MIDI data is passed to a Teensy LC, which handles transposition of the note data to get everything back in tune, and addresses the eight chips to create a beautiful square wave symphony.

It’s a great way to create a cacophony of sound in a delightful vintage way, and code is available if you’d like to recreate the feat. What we’d like to know is this – what’s your favourite sound chip from yesteryear, and how badly do you want eight of them to sing in glorious harmony? Continue reading “Eight SEGAs Singing”

Sega Master System On A STM32 Development Board

Sega on STM32

Some hackers have managed to convert an STM32 development into a Sega Master System emulator. This means Sonic the Hedgehog running on an ARM Cortex-M4.

This hack has a number of parts. First, [Alessandro Rocchegiani] showed off a video of his Sega Master System emulator running on the STM32F429 Discovery development board. This first version used the on board 2.4″ TFT LCD screen.

[Fabrice] was working with this STM32 Discovery board already. He had developed an expansion board that added a number of features to the development kit, including an R-2R DAC for video output. When [Fabrice] found out about the Sega Master System emulator, he worked with [Alessandro] and his son [Fabrizio] to get VGA output working. They also added support for the Wii controller using [Fabrice]’s Wii library. The result is a Sega Master System emulator with VGA output at 640 x 480, with 16 bit color and Wii controller support.

You can watch a video of both the LCD and VGA versions of the hack after the break.

Continue reading “Sega Master System On A STM32 Development Board”

Hackaday Links: January 5, 2014

hackaday-links-chain

While we can’t condone the actual use of this device, [Husam]’s portable WiFi jammer is actually pretty cool. It uses a Raspberry Pi and an Aircrack-ng compatible dongle to spam the airwaves with deauth packets. The entire device is packaged in a neat box with an Arduino-controlled LCD and RGB LEDs. Check out an imgur gallery here.

You can pick up a wireless phone charger real cheap from any of the usual internet outlets, but try finding one that’s also a phone stand. [Malcolm] created his own. He used a Qi charger from DealExtreme and attached it to a 3D printed phone stand.

A while back, [John] noticed an old tube radio in an antique store. No, he didn’t replace the guts with a Raspberry Pi and an SD card full of MP3s. He just brought it back to working condition. After fixing the wiring (no ground cord on these old things), repairing the speaker cone, putting some new twine on the tuner and replacing the caps, [John] has himself a new old radio. Here’s a video of the complete refurbishment.

Here’s a Sega Master System (pretty much a Game Gear) running on an STM32 dev board. Also included are some ROMs for some classic games – Sonic the Hedgehog, Castle of Illusion, and The Lion King. If you have this STM Discovery board you can grab the emulator right here.

[Spencer] wanted a longer battery life in his iPhone, so he did what any engineering student would do: he put another battery in parallel.

Breadboarding something with an AVR or MAX232? Print out some of these stickers and make sure you get the pinouts right. Thanks, [Marius].