The Predictability Problem With Self-Driving Cars

A law professor and an engineering professor walk into a bar. What comes out is a nuanced article on a downside of autonomous cars, and how to deal with it. The short version of their paper: self-driving cars need to be more predictable to humans in order to coexist.

We share living space with a lot of machines. A good number of them are mobile and dangerous but under complete human control: the car, for instance. When we want to know what another car at an intersection is going to do, we think about the driver of the car, and maybe even make eye contact to see that they see us. We then think about what we’d do in their place, and the traffic situation gets negotiated accordingly.

When its self-driving car got into an accident in February, Google replied that “our test driver believed the bus was going to slow or stop to allow us to merge into the traffic, and that there would be sufficient space to do that.” Apparently, so did the car, right before it drove out in front of an oncoming bus. The bus driver didn’t expect the car to pull (slowly) into its lane, either.

All of the other self-driving car accidents to date have been the fault of other drivers, and the authors think this is telling. If you unexpectedly brake all the time, you can probably expect to eventually get hit from behind. If people can’t read your car’s AI’s mind, you’re gonna get your fender bent.

The paper’s solution is to make autonomous vehicles more predictable, and they mention a number of obvious solutions, from “I-sense-you” lights to inter-car communication. But then there are aspects we hadn’t thought about: specific markings that indicate the AIs capabilities, for instance. A cyclist signalling a left turn would really like to know if the car behind has the new bicyclist-handsignal-recognition upgrade before entering the lane. The ability to put your mind into the mind of the other car is crucial, and requires tons of information about the driver.

All of this may require and involve legislation. Intent and what all parties to an accident “should have known” are used in court to apportion blame in addition to the black-and-white of the law. When one of the parties is an AI, this gets murkier. How should you know what the algorithm should have been thinking? This is far from a solved problem, and it’s becoming more relevant.

We’ve written on the ethics of self-driving cars before, but simply in terms of their decision-making ability. This paper brings home the idea that we also need to be able to understand what they’re thinking, which is as much a human-interaction and legal problem as it is technological.

[Headline image: Google Self-Driving Car Project]

Sciencing DVD-RW Laser Diodes

If you’ve played around with laser diodes that you’ve scavenged from old equipment, you know that it can be a hit-or-miss proposition. (And if you haven’t, what are you waiting for?) Besides the real risk of killing the diode on extraction by either overheating it or zapping it with static electricity, there’s always the question of how much current to put into the thing.

[DeepSOIC] decided to answer the latter question — with science! — for a DVD-burner laser that he’s got. His apparatus is both low-tech and absolutely brilliant, and it looks like he’s getting good data. So let’s have a peek.

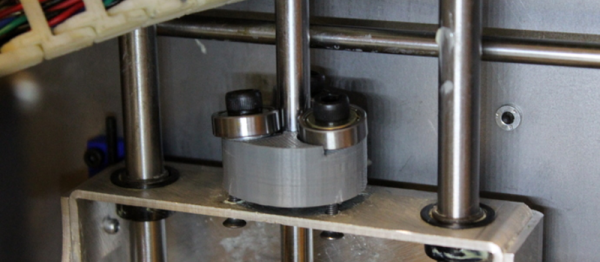
Laser Detector on 3D Printer Scrap

First up is the detector, which is nothing more than a photodiode, 100k ohm load resistor, and a big capacitor for a power supply. We’d use a coin-cell battery, but given how low the discharge currents are, the cap makes a great rechargeable alternative. The output of the photo diode goes straight into the scope probe.

He then points the photodiode at the laser spot (on a keyboard?) and pulses the laser by charging up a capacitor and discharging it through the laser and a resistor to limit total current. The instantaneous current through the laser diode is also measured on the scope. Plotting both the current drawn and the measured brightness from the photodiode gives him an L/I curve — “lumens” versus current.

laser_curve

Look on the curve for where it stops being a straight line, slightly before the wiggles set in. That’s about the maximum continuous operating current. It’s good practice to de-rate that to 90% just to be on the safe side. Here it looks like the maximum current is 280 mA, so you probably shouldn’t run above 250 mA for a long time. If the diode’s body gets hot, heatsink it.

If you want to know everything about lasers in general, and diode lasers in particular, you can’t beat Sam’s Laser FAQ. We love [DeepSOIC]’s testing rig, though, and would love to see the schematic of his test driver. We’ve used “Sam’s Laser Diode Test Supply 1” for years, and we love it, but a pulsed laser tester would be a cool addition to the lab.

What to do with your junk DVD-ROM laser? Use the other leftover parts to make a CNC engraver? But we don’t need to tell you what to do with lasers. Just don’t look into the beam with your remaining good eye!

Are You In Bed?

If you’re building an omniscient home-automation system, it’s ability to make decisions is only as good as the input you give it. [Petewill]’s self-made panopticon now knows when someone is in bed. That way, the [petewill]’s automatic blinds won’t open when he’s sleeping late on weekends.

[Petewill] didn’t take the easy way out here. (In our mind, that would be a weight sensor under one of the bed’s feet.) Instead, his system more flexible and built on capacitive sensing. He’d tried force sensors and piezos under the mattress, but none of them were as reliable as capacitance. A network of copper tape under the mattress serves as the antenna.

Continue reading “Are You In Bed?”

Building A Taller Drillpress

[BF38] bought a mid-range miniature drill-press, and discovered that it was just too short for some of his applications. “No problem,” he thought, “I’ll just measure the column and swap it out for a longer one.” It sounds foolproof on paper.

He discovered, after having bought a new 48.3 mm steel column, that the original was 48 mm exactly in diameter. He’d have to make it fit. But how do you bore out a 48 mm diameter hole, keeping it perfectly round, and only increase the diameter by 0.3 mm? A file is out because you’d never get it round. A lathe is out because [BF38] doesn’t have a lathe.

[BF38] ended up making a DIY honing head, which is a gadget that presses (in this case) two pieces of sandpaper evenly against the sides of the hole to be widened. The head in question is a little bit rough — it was made as a learning project, but it looks like it served the purpose admirably.

Milk-Based 3D Scanner

3D scanners don’t have to be expensive or high-tech because all of the magic goes on in software. The hardware setup just needs to gather a bunch of cross-sections. In perhaps the lowest-tech of scanners that we’ve seen, [yenfre]’s GotMesh scanner uses milk.

Specifically, the apparatus is a pair of boxes, one with a hole drilled in it. You put the object in the top box and fill it with milk to cover the object. A camera takes pictures of the outline of the object in the milk as it drains out the hole, these get stitched together, and voilà.

There are limitations to this method. The object gets soaked in milk, so it won’t work for scanning sand-castles. (It’s optimally suited for chocolate-chip cookies, in our opinion.) If the camera is located directly above, the objects have to get wider as the milk drains out. You can do multiple takes with the object rotated at different angles or use multiple cameras to solve this problem. The edge-detection software will have issues with white objects in milk, so maybe you’ll want to scan that porcelain figurine in coffee, but you get the idea. More seriously, the rate of milk drain will slow down a bit as the amount of milk in the upper box decreases. This could also be handled in software.

In all, we’re not surprised that we don’t see commercial versions of this device, but we love the idea. It’s based on this experiment where they dip a guy in a tank of ink! If you just drank all your milk, but still have a line-laser lying around, maybe this build is more your speed. What’s your cheapest 3D scanner solution?

One SMT Breakout To Rule Them All

You need to use surface-mount technology (SMT) parts in your design. But you also need to prototype. How to fit those little buggers into your breadboard?

[Simon] came up with a general-purpose SMT-to-breadboard solution. Now, there are already myriad adapter boards for the many-pin devices: SSOP-to-DIP adapters and so on. But what do you do when you just need to work that tiny SOT223 voltage regulator into a breadboarded circuit?

[Simon]’s solution fills that gap with one breadboardable design to handle all of your small-pin-count part needs. It accommodates SOT223, SOT323, and SOT23 three-pin parts like transistors or voltage regulators, and also has pads for all of the common two-terminal parts like resistors and capacitors from 0402 on up to 1206. You could build up a full voltage regulator circuit on one of these things. He’s even included some whitespace on the back for your notes.

SMT parts aren’t even the future any more. And with the right procedure, they’re not hard to hand-assemble. So the next time you have some extra space in a PCB order, toss in a couple of [Simon]’s breakouts and you’ll be ready for your next breadboarding session.

Bela: Real-Time BeagleBone Audio/Analog Cape

Bela is a cape for the BeagleBone Black that’s aimed at artists and musicians. Actually, the cape is much less than half of the story — the rest is in some clever software and a real-time Linux distribution. But we’re getting ahead of ourselves. Let’s talk hardware first.

First off, the cape has stereo input and output as well as two amplified speaker outs. It can do all of your audio stuff. It also has two banks of analogue inputs and outputs, each capable of handling eight signals. In our opinion, this is where the Bela is cool. In particular, the analog outputs are not Arduino-style “analog outputs” where it’s actually a digital output on which you can do PWM to fake an analog signal. These are eight 16-bit outputs from an AD5668 DAC which means that you can use the voltages directly, without filtering.

Then there’s the real trick. All of these input and output peripherals are hooked up to the BeagleBone’s Programmable Realtime Units (PRUs) — a hardware subsystem that’s independent of the CPU but can work along with it. The PRU is interfaced with the real-time Linux core to give you sub-microsecond response in your application. This is a big deal because a lot of other audio-processing systems have latencies that get into the tens of milliseconds or worse, where it starts to be perceptible as a slight lag by humans.

The downside of this custom analog and audio I/O is that it’s not yet supported by kernel drivers, and you’ll need to use their “Heavy Audio Tools” which compiles Pd programs into C code, which can then drive the PRUs. Of course, you can write directly for the PRUs yourself as well. If you just want to play MP3s, get something you have a bunch of simpler, better options. If you need to do responsive real-time audio installations, Bela is a way to go.

The project is open-source, but we had to do a bunch of digging to find what we were looking for. The hardware is in zip files here, and you’ll find the software here. The demo projects look/sound pretty cool and their Kickstarter is long over-funded, so we’re interested to see what folks make with these.