Hacking On TV: What You Need To Know

It seems to be a perennial feature of our wider community of hackers and makers, that television production companies come up with new ideas for shows featuring us and our skills. Whether it is a reality maker show, a knockout competition, a scavenger hunt, or any other format, it seems that there is always a researcher from one TV company or another touting around the scene for participants in some new show.

These shows are entertaining and engaging to watch, and we’ve all probably wondered how we might do were we to have a go ourselves. Fame and fortune awaits, even if only during one or two episodes, and sometimes participants even find themselves launched into TV careers. Americans may be familiar with [Joe Grand], for instance, and Brits will recognise [Dick Strawbridge].

It looks as if it might be a win-win situation to be a TV contestant on a series filmed in exotic foreign climes, but it’s worth taking a look at the experience from another angle. What you see on the screen is the show as its producer wants you to see it, fast-paced and entertaining. What you see as a competitor can be entirely different, and before you fill in that form you need to know about both sides.

A few years ago I was one member of a large team of makers that entered the UK version of a very popular TV franchise. The experience left me with an interest in how TV producers craft the public’s impression of an event, and also with a profound distrust of much of what I see on my screen. This prompted me to share experiences with those people I’ve met over the years who have been contestants in other similar shows, to gain a picture of the industry from more than just my personal angle. Those people know who they are and I thank them for their input, but because some of them may still be bound by contract I will keep both their identities and those of the shows they participated in a secret. It’s thus worth sharing some of the insights gleaned from their experiences, so that should you be interested in having a go yourself, you are forewarned. Continue reading “Hacking On TV: What You Need To Know”

Sun Ray Thin Client Becomes Raspberry Pi Workstation

One of the great predictions of desktop computing from the mid 1990s was that we would all move to so-called thin clients, stripped-out desktop computers containing only processor, display driver, and peripheral interfaces, that would call up their applications not from a local hard disk but from a remote server. It was one that was never fulfilled in quite the way its proponents envisaged, but a business thin client hardware market did emerge for the likes of Citrix sharing of Windows applications. In a sense we have reached the same point through cloud-based in-browser applications such as Google Apps or Office 365, though even with newer thin client hardware such as the Chromebook these are still largely used on more traditional machines.

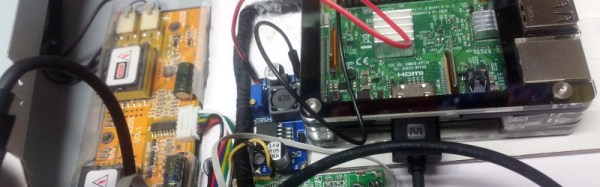
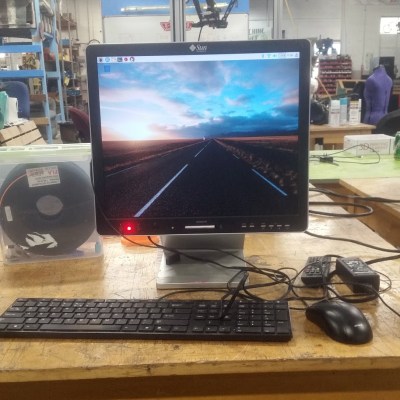
Even though thin clients never took the world by storm, it is still not unusual to encounter the hardware once it has outlived its usefulness. A surplus Sun Ray 270 all-in-one thin client came [Evan Allen]’s way, and to make something useful from it he converted it into a Raspberry Pi workstation.

The Sun Ray 270 has a MIPS processor board integrated into a 17 inch monitor. [Evan] was fortunate enough to find a generic HDMI controller board for its LCD panel, so was able to dispense with the MIPS board entirely and couple the controller with an automatic HDMI switch. This allows him to use the device both as a Raspberry Pi and as a monitor.

This may not rank among the most epic hacks ever, but it has delivered [Evan] a useful computer and it’s reminding the rest of us that these thin clients can be repurposed. So if one lands on your bench, look at it with fresh eyes.

Of course, if you have a Pi in a thin client, you could always take it full circle and use it to run a thin client.

Impression Products V. Lexmark International: A Victory For Common Sense

A few months ago we reported on a case coming before the United States Supreme Court that concerned recycled printer cartridges. Battling it out were Impression Products, a printer cartridge recycling company, and Lexmark, the printer manufacturer. At issue was a shrinkwrap licence on inkjet cartridges — a legal agreement deemed to have been activated by the customer opening the cartridge packaging — that tied a discounted price to a restriction on the cartridge’s reuse.

It was of concern to us because of the consequences it could have had for the rest of the hardware world, setting a potential precedent such that any piece of hardware could have conditions still attached to it when it has passed through more than one owner, without the original purchaser being aware of agreeing to any legal agreement. This would inevitably have a significant effect on the work of most Hackaday readers, and probably prohibit many of the projects we feature.

We are therefore very pleased to see that a few days ago the Supremes made their decision, and as the EFF reports, it went in favor of Impression Products, and us, the consumer.  In their words, when a patent owner:

…chooses to sell an item, that product is no longer within the limits of the monopoly and instead becomes the private individual property of the purchaser, with the rights and benefits that come along with ownership.

In other words, when you buy a printer cartridge or any other piece of hardware, it is yours to do with as you wish. Continue reading “Impression Products V. Lexmark International: A Victory For Common Sense”

A Retro Car Stereo With Arduino Inside

For some car enthusiasts whose passions run towards older vehicles, only originality will do. [RetroJDM] for instance has an RA28 Toyota Celica from the mid 1970s for which he has gone to great lengths to source a pristine center console to replace a damaged original.

There is only one problem with the center console on a 1970s Toyota, it doesn’t have a DIN cut-out for the standard-sized car radios that have become universal in the decades since its manufacture. Instead it has a cut-out for a Toyota-specific radio in the old style with holes for volume and tuning knobs to either side of a protruding center unit that would have contained a tuning dial and a slot for cassettes or maybe 8-track cartridges.

His solution is an interesting one, he’s put together his own car stereo in an enclosure suitable for the Toyota cut-out. Inside the radio there is an Arduino Mega controlling the breakout boards for an Si4703 FM tuner and a VMusic3 MP3/USB music player, and a PT2314 audio processor. For display there is a set of retro LED seven-segment modules, and an MSGEQ7 spectrum analyser. The result is a modern radio with FM, line-input, and MP3 player, with all the functions you’d expect. There is no onboard amplifier though, but this function is fulfilled by an external unit.

The finished unit is topped off with a very professional front panel, which you can see in his demo video below the break.

Continue reading “A Retro Car Stereo With Arduino Inside”

Saving A Part-Way-Through Failed 3D Print

This will be an experience shared by all 3D printer owners; a long print is mostly done, and something goes wrong. Result: most of the print and a heap of plastic vermicelli, or worse still, a print with an obviously offset layer in it.

[Simon Merrett] had a large part running on his printer, and 2.5 hours in to a 3 hour print the nozzle caught the edge of what he had already done, and as a result he was extruding into thin air (He told us in his tip email that his machine build was the likely culprit). Being fortunate enough to see it happening, he was able to hit the stop button in his Repetier software and bring the calamity to a swift halt.

How he rescued the situation is an interesting tale which he’s recorded in the screen capture video we’ve placed below the break, it involved using a spreadsheet to analyse the G-Code and remove the lines for the part he had already printed before inserting a new set of Z-axis dimensions to start the remaining section of print from the bed upwards. A few further fixes, and he was able to print the rest of his part, which he could then glue to the unfinished top of the section he had already printed. He points out in his YouTube description that he emailed the Repetier folks, and they told him a quicker way to deal with the Z-axis: using the G92 command to reset it.

You might ask why if he was prepared to spend this amount of time he didn’t simply reprint the entire part. But he points out, in that event the print could well have failed again at exactly the same point.

Continue reading “Saving A Part-Way-Through Failed 3D Print”

Integrated Circuit Reverse Engineering, 1970s Style

We are used to stories about reverse engineering integrated circuits, in these pages. Some fascinating exposés of classic chips have been produced by people such as the ever-hard-working [Ken Shirriff].

You might think that this practice would be something new, confined only to those interested in the workings of now-obsolete silicon. But the secrets of these chips were closely guarded commercial intelligence back in the day, and there was a small industry of experts whose living came from unlocking them.

Electron micrograph of a wire bond to the Z80 CTC die

Integrated Circuit Engineering Corporation were a Scottsdale, Arizona based company who specialised in semiconductor industry data. They have long since been swallowed up in a series of corporate takeovers, but we have a fascinating window into their activities because their archive is preserved by the Smithsonian Institution. They reverse engineered integrated circuits to produce reports containing detailed information about their mechanical properties as well as their operation, and just such a report is our subject today. Their 1979 examination of the Zilog Z80 CTC (PDF) starts with an examination of the package, in this case the more expensive ceramic variant, then looks in detail at the internal construction of the die itself, and its bonding wires. We are then taken in its typewritten pages through an extensive analysis of the circuitry on the die, with gate-level circuits to explain the operation of each part.

The detail contained in this report is extraordinary, it is clear that a huge amount of work went into its production and it would have been of huge value to certain of Zilog’s customers and competitors. At the time this would have been extremely commercially sensitive information, even if it now seems like a historical curiosity.

The Z80 CTC is a 4-channel counter/timer peripheral chip for the wildly succesful Z80 8-bit microprocessor, in a 28-pin dual-in-line package. We were surprised to find from a quick search that you can still buy this chip from some of the usual suppliers rather than the surplus houses, so it may even still be in production.

If IC reverse engineering takes your fancy, take a look at our archive of [Ken Shirriff] posts.

Thanks [fortytwo] for the tip.

A Water Jet Cutter From A Cheap Pressure Washer

We’ve become used to CNC mills and 3D printers becoming staples of our workshops, and thanks to the wonders of international trade even a modest laser cutter is not beyond the reach of most experimenters. But there is one tool that has so far evaded all but either commercial operations or the extremely well-heeled, the water cutter. These machines use a high-pressure water jet, usually carrying a stream of abrasive particles, to cut through the material placed beneath them. From our perspective they are interesting in that they can cut metal, something not normally possible with the laser cutters within our reach.

A water cutter is something you might think would be impossible for an experimenter to make for themself, but [Applied Science] is on hand to disprove that notion. He’s taken a cheap pressure washer, and modified it to produce a much higher water pressure for a water cutting head.

His very detailed description of the modifications makes for an extremely interesting watch, and we’ve placed the video below the break. The higher pressure is achieved by modifying the washer’s pressure on-off switch with a newly-machined sleeve and a stronger spring. The description of how the washer switch works is interesting in itself. Then we are treated to a complete teardown of a water cutting head, with abrasive feed, tungsten carbide tube, and ruby nozzle. This last component is surprisingly cheap. He then gives us a run-down of its design, particularly with respect to choosing the size of the orifices to match the pump. Finally we take a look at his abrasive feed system, and the plastic funnel he uses to keep water flow back out of his hopper.

For now the cutter is static, but his obvious next step is to bring it to some form of CNC table. If this project brings water cutting one step closer to the masses, we can’t wait!

Continue reading “A Water Jet Cutter From A Cheap Pressure Washer”