Advanced Beer Carrier, Or How To Get Beer Onto A Plane

beer-import-case

[Badmonky] was facing a life crisis. How could he enjoy the hard-to-find German beers from his homeland while living in Princeton, New Jersey? Sure, you can find many good imports if you try, but that may come at a hefty price. Plus, the lesser known beers are completely unavailable in the States. Of course the solution is to import them himself after each trip home. He just needed a way to get as much beer on a plane as he possibly could.

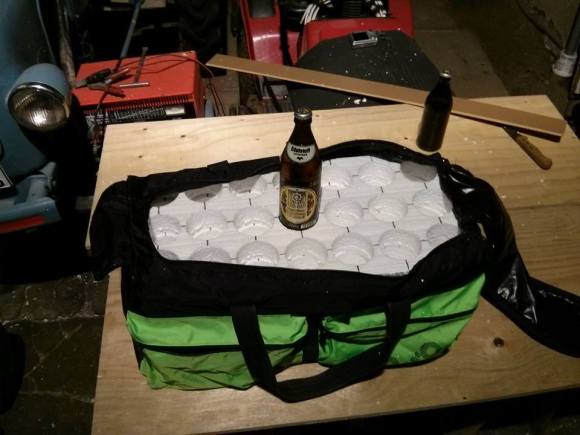
We’d have no problem walking down the aisle with a couple of cases of cold ones, but let’s be honest here. Security won’t even let you on the plane with a bottle of water these days much less a case of tallboys. [Badmonky] hacked together this custom carrier so that it could be checked as luggage while protecting the frothy goodness. Two limiting factors to consider are size and weight. He started with the latter, calculating that 24 bottles would remain under his 50 pound limit. From there he selected a sports bag and picked up sheets of foam which were perforated using a hole saw. Alas the size constraint forced him to leave three of the (now empty?) vessels behind.

The bottles ride upside down and made the international voyage without incident. In retrospect he would have picked a roller-bag as this thing is hard on your shoulder after a trip through the airport and the public transit ride home.

The real question in our mind: why didn’t he check a keg?

Introducing: Hackaday Projects

Today Hackaday is launching a new site that furthers our goal of being a Virtual Hackerspace. Now you can host your own hacks and builds in a place truly worthy of what we’re all about. We present to you: Hackaday Projects.

What’s so great about it? It has a dark theme, just like the blog! Actually, the awesome of the new site is a combination of what’s already available and what we have planned. First and foremost, the site has been built from the ground up with open data in mind. This means you own what you create on Hackaday Projects. You can export your work, delete it, and use a public API to extend the usefulness of the data. Secondly, we have a range of different tools which are extremely easy and quick to use, but allow rich styling and presentation when you need it. Want to see what we mean? Go check out the NFC Voting Rig that was at The Gathering.

Where do we go from here? A huge part of that is up to you. We need Hackaday readers to get in there and tell us what works, what doesn’t work, and what needs to be added. Are you up to the task? Request your alpha testing invite now and guide Hackaday Projects to be the hosting site the Hackaday community has always dreamed about!

Hackaday Links: February 16, 2014

hackaday-links-chain

[Moogle] wrote in to see if anyone can figure out why his unused electrolytic capacitors are popping. This is the behavior you see in populated caps whose electrolyte dries out. But these are still in his parts bin. Anyone know why they would pop when going unused?

We see a lot of BIOS flashing hacks; but it’s always a handy thing to know about when you get in a bind. Here [Adan] shows us how to reflash a corrupt BIOS using a Tiva C Launchpad board.

Wanting to hack together her own blow gun [Carlyn] scrapped a handheld vacuum cleaner. When she discovered the pump could not easily be converted from suck to blow she made a handheld suction manipulator which picks up paper plates and a few slightly heavier objects.

Unfortunately a drill press is not one of the tools we have in our lair right now. If we did, this tip about using it to help tap threads in a hole would come in really hand.

Retro computing fans will appreciate this Z80 computer build (translated). It’s a fairly large mainboard with plenty of chips, resistors, buttons, and seven segment displays. Excellent. [Thanks Daniel]

We start to drool a little bit when we see a teardown post that shows off a piece of equipment really well. We’ve already reached for a bib to catch the slobber from pawing our way through [David’s] teardown of an HP 6010A bench supply.

Robot Controller More Fun Than An Actual Wii-U

wii-u-bot-controller

Okay, that’s probably not fair since we never gave the Wii-U a try at all. But doesn’t this seem like a much better idea for controlling a robot than playing a gaming console?

The photo above is a bit deceiving because the unit actually has quite a bit of depth. Despite that, the cleanliness of the build is very impressive. [Alec Waters] started off with a backup monitor meant for automotive use (we’d estimate 7″). There’s a radio receiver, two analog joysticks where your thumbs line up when holding the controller, and an Arduino to pull it all together. If you haven’t figured it out already, this displays the wireless video from the robot he’s controlling. He’s also include an auxiliary port which lets you bypass the radio receiver and plug in a video feed directly.

Still convinced you need Nintendo’s consumer controller with a built-in screen. Yes, that can be hacked to work with all your projects. But seriously, this is way more fun.

Garage Clicker Dashboard Integration

garagedoor-opener-in-dash

Vehicles with the highest level of trim package sometimes come with the ability to learn garage door opener codes. Less costly offerings lack that feature as well as others bells and whistles, leaving blank plates where fancy buttons would have been. [JiggMcFigg] makes the best of this situation by gutting his garage remote and hiding it behind a button blank.

One thing that raised an eyebrow is the coin cell battery holder you can make out on the size-check image shown to the left. But really, these remotes must drain their batteries at a rate nearly the same as an unused battery so why complicate the hack? A holder was soldered onto the board, and jumper wires were soldered to the push button added to the blank plate. This type of utilitarian button is much more satisfying to use than those fancy-pants silk-screen molded-plastic types anyway!

Of course you could go the other way with this hack. [JiggMcFigg] started out with the problem of losing the remotes in the mess of the car. You could retrofit it with a huge button to make it harder to misplace.

Light Your Way To The Correct Resistor

click-and-see

Who doesn’t have issues with component storage (seriously, tell us your secret in the comments)? IF you can get your spare parts organized, it’s still quite difficult to figure out where you actually squirreled them away. Labeling drawers is one thing, but what if you have hundreds or thousands of drawers (we’re looking at you, every Hackerspace that’s been around for more than a few months). This project adds a digital cue to well-organized parts storage by lighting up the component drawer for stock selected from your computerized inventory (translated).

The idea is that all of your parts are assigned a drawer space on the computer. When you go into the index and select a part, the assigned drawer is illuminated by an LED. The setup here is a breakout board for an I2C LED driver which interfaces with a Raspberry Pi, but the concept should be easy to implement with just about any system.

Need help getting to the point where you’re organized enough to implement this? So do we. Maybe revisiting this storage roundup will help.

Fail Of The Week: Silicone Molding That Won’t Cure

fotw-uncured-silicone

Mold making is a hacking skill we see pop up around here from time to time. But rarely do we hear about problems in the process, and they must happen. Here’s proof. This Fail of the Week focuses on [Michael’s] unfortunate experience with failed mold making due to uncured silicone around the master mold. It’s worse than it may sound, since he lost about a pound of silicone to the fail, and we’re unsure of whether he can even use the master again (how do you clean uncured silicone off of something?). Not to mention the time lost from setting up the pour and waiting 20 hours for it to cure.

Soon after the issue presented itself [Michael] started researching to see what had gone awry and noticed that the master should have been sealed with acrylic lacquer. This gave him the opportunity to test several different finishes before making a run at the full mold once again. He picked up a variety of the paint products he could find locally, used them to coat some scraps, and globbed on some silicone to see which worked the best.  He found a couple of different primers worked well, as did both glossy and matte acrylic coatings.

If you’ve never had a reason for mold making before, keep it in mind. You’d be surprised what kind of factory-production-type things can be pulled off by 3D printing a master, and casting a silicone mold of it.


2013-09-05-Hackaday-Fail-tips-tileFail of the Week is a Hackaday column which runs every Wednesday. Help keep the fun rolling by writing about your past failures and sending us a link to the story — or sending in links to fail write ups you find in your Internet travels.