Update: Home Security Monitoring Prototype

home-security-monitoring-prototype-update-1

This project is about home security monitoring, but the update is crack for electronics designers. [Simon Ludborzs] continues to work on his prototype and he’s fantastic about sharing his success and failure in a conversational manner.

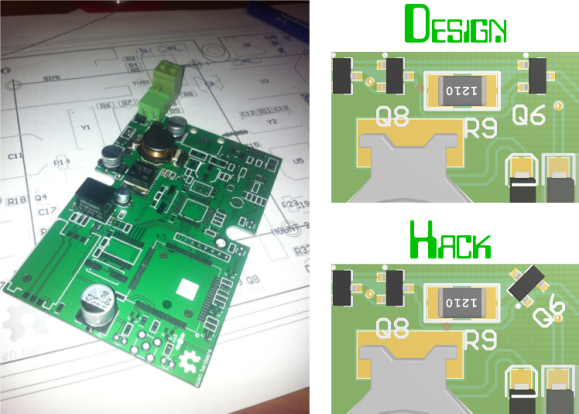
In April we saw his initial design which combined a SIM900 GSM modem with his own board to let him monitor his home security system without hiring a monthly service. Above you can see a snap of his latest prototype. It’s not fully populated as he’s testing the power supply… which in this state puts out 0V. Obviously that’s not up to his design specification so he started hunting around for the issue. He tells a tale of woe which is near to our hearts. He removed Q6, which is BC807 transistor, in order to test the FET used on the board. This brought it to life and had him looking into the datasheet of the part and its footprint in Altium. The footprint is right, the schematic symbol is wrong. There’s a lucky fix though. Above you can see the original design. The fix was just to rotate the part. This is illustrated as a change in the layout, but it worked with the original pad location. They’re not square to the transistor’s legs but they do still fit the outline.

He goes on to stress test the PSU output and then discuss whether it’s enough for the rest of the project. All in all a fascinating read!

Hackaday Links: Sunday, July 28th, 2013

hackaday-links-chain

[Chris Gammell] tipped us off that he’s building an online training program for learning electronics. The ten session course will cost money to take but you can get the goods for free if you’re one of the beta testers. We love to listen to The Amp Hour podcast which is just one of [Chris’] many endeavors.

Did you buy a Chromecast this week? We did, but we don’t have it in hand yet (ordered through Amazon). You can still get a look inside from the iFixit teardown.

Practice your Processing skills by using it to code a game of Pong.

A bit of lighter fluid and a hacked insert will get you a flaming wallet. We guess this is a different type of an anti-pickpocket device. [Thanks Stephen]

[Brain] used a $1.50 magnifying lens to help his Raspberry Pi camera module read QR codes better.

We really like [Aaron Christophel’s] LED matrix clock (translated). He started from a marquee that must be at least a decade old. He stripped it down and figured out how to drive it using a Sanguino as a controller.

GRBL Compatible Arduino CNC Shield

By the time you get to the point in a home CNC build where you’re adding control electronics you may be ready for the simplest means to an end possible. In that case, grab your Arduino and heat up that etching solution to make your own GRBL compatible shield.

This familiar footprint manages to contain everything you need for a three-axis machine. The purple boards slotted into the pairs of SIL headers are Pololu Stepper motor drivers. Going this route makes replacing a burnt out chip as easy as plugging in a new module. The terminal block in the center feeds the higher voltage rail necessary for driving the motors. The DIL header on the right breaks out all of the connections to the limiting switches (two for each axis), spindle and coolant control, as well as three buttons for pause, resume, and abort. There’s even a header for SPI making it easier to add  custom hardware if necessary.

This is a dual-layer board which may not be ideal for your own fabrication process. [Bert Kruger] posted his Gerber files for download if you want to put in a small run with OSH Park or a similar service.


Electric Skillet Reflow Soldering Guide

skillet-reflow-tutorial

It’s no secret that we’re bizarrely drawn to macro videos showing solder paste during the reflow process. This electric skillet reflow guide provides the fix we’ve been jonesin’ for while including some helpful tips for first-timers and veterans alike. Not sure what we’re talking about? Look at the grey paste at the top of this image. As it heats up it’s drawn under each component as seen in the lower half of the image.

This particular guide is aimed at one-off assembly so a solder paste stencil is not used (we learned a lot about those earlier in the month). It instead uses the painstaking toothpick application technique. It takes time but the upside is that once you get the hang of it you’ll apply the perfect amount of solder each time. After placing all of the components [Count Spicy] carefully transfers the board to an electric skillet, covers it with the glass lid (so he can see what’s going on), and sets the temperature just above the solder’s specified melting point.

Since the skillet is cheap and easy to find you really just have to order the solder paste to get into this type of assembly. Our only gripe is that you can’t really follow a temperature profile with this rig. For that you need to move up to some PID controlled hardware.

Continue reading “Electric Skillet Reflow Soldering Guide”

Propane Forge Built From A Soup Can

propane-forge-from-soup-can

It doesn’t look like much, but this easy to build propane forge is just what you need to try your hand at blacksmithing. [Code Cowboy] took on the build after watching this how-to video which shows the fabrication of a small knife after completing the forge build.

The first step is to eat all of the soup (or beans if you prefer). With an empty can in hand the stand — made of two angle brackets — and inlet are attached. Next comes the heat proofing for the walls of the forge. At first glance we thought that cat litter was one of the ingredients, but that’s just an empty container used to haul playground sand. The sand is mixed with equal parts of plaster of paris before adding water to achieve a clay-like consistency. This is packed into the can, with a small opening to receive the metal to be heated.

The torch itself can be used to cure the heat shield. After letting the mixture harden a 30 minute burn will force the rest of the water out of the heat proofing.

Continue reading “Propane Forge Built From A Soup Can”

Make Your Own Fume-extracting Glove Box

diy-clean-box

Here’s an easy to follow guide for building your own glove box. It’s a lab tool that contains the project you’re working on to keep things in or out. For instance, we could have used this a few years back when we tried to add an acrylic window to a hard drive. Instead, we ended up putting several hours of work into a cool-looking paperweight. But it will also come in handy for chemistry experiments that generate harmful or dangerous byproducts.

The picture above tells most of the story, but [Jason Poel Smith] does include several good tips about the construction in his video. He uses weather stripping along the edges of the clear container to ensure a seal. The hose is used to provide negative pressure so that no fumes leak out. We figure adding a smaller hole on the opposite side with a charcoal filter will help air pass into the chamber to serve as a fume extractor.

We’ve already seen a similar setup for a reflow oven. Perhaps this is the perfect solution to protect yourself from 3D printing fumes. We’re sure you saw the headlines about 3D printing being as bad as smoking cigarettes.

Continue reading “Make Your Own Fume-extracting Glove Box”