Everything You Need To Know To Make A Laser Engraver From Scrap

make-a-laser-engraver-from-scrap

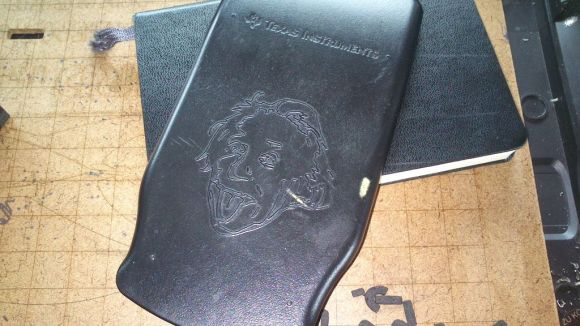
Check out the Einstein head which [Sebastian Müller] etched on the cover of his calculator using a laser engraver he made from scratch. We think he did a great job with the build, but we’re even more impressed with the work he put into sharing the techniques he used to salvage and repurpose all the components. It’s a perfect resource that should be pretty easy to adapt to different model/manufacturer source hardware.

He used an old scanner and an old printer for the bulk of the parts. These both originally included stepper-motor actuated gantries, which pull together to form the x and y axes in his Frankenstein Laser Engraver. As the parts came together he started in on the control electronics which include a couple of EasyDriver stepper motor boards and an Arduino.

At this point he took the machine for a test-run, attaching a marker to the carriage to use it as a pen plotter. After putting in a solid performance at this [Sebastian] moved on to adding in the laser diode. He covers how to drive the diode, as well as focal point alignment in great detail. It seems like his webpage post has the same content as the Instructable linked above but we wanted to leave the link just in case.

Raspberry Pi Housed Inside A Computer Monitor

rpi-inside-a-computer-monitor

Behold, something we’ve always wanted. [Matthieu] mounted his Raspberry Pi board inside of a computer monitor. His work makes for the cheapest smart-TV modification we can possibly think of.

The image above shows the monitor’s driver board on the left, with the Raspberry Pi mounted on the back plastic cover. [Matthieu] used a short HDMI cable to connect the two. The HDMI connector plugs into the RPi directly. The other end has been cut off and the wires soldered to the DVI pins on the monitor’s PCB. This is not a problem since HDMI and DVI use electrically identical protocols. The one thing missing is audio. But if you were pulling off the same hack with a device that had HDMI (like a television) it would just be a matter of also soldering in the audio connections. While he had his iron hot he also connected a 5V source from the monitor board to the RPi. He completes his hack by cutting a slot in the monitor case to allow access to the SD card.

We’ve long wanted an XBMC computer we could velcro to the back of the TV and the RPi turned out to be just the thing. Now we’ve got to consider cracking open the TV to replicate this internalization hack!

HDMI Color Processing Board Used As An FPGA Dev Board To Mine Bitcoins

fpga-eeColor-bitcoin-mining

The blue board seen above is the guts of a product called the eeColor Color3. It was designed to act as a pass-through between your television and HDMI source device. It boasts the ability to adjust the color saturation to suit any viewing conditions. But [Taylor Killian] could care less about what the thing was made for, he tore it open and used the FPGA inside for his own purposes.

The obvious problem with this compared to a proper dev board is that the pins are not all broken out in a user-friendly way. But he got his hands on it for free after a mail-in-rebate (you might find one online for less than $10 if you’re lucky) and it’s got an Altera Cyclone IV chip with 30k (EP4CE30F23C6N) gates in it so he’s not complaining. The first project he took on with his new toy was to load up an open source Bitcoin mining program. The image above shows it grinding away at 15 megahashes per second while consuming only 2.5 watts. Not bad. Now he just needs to make a modular rack to hold a mining farm.

Trashed LCD Monitor Turned Into A Light Box

light-box-from-lcd-monitor
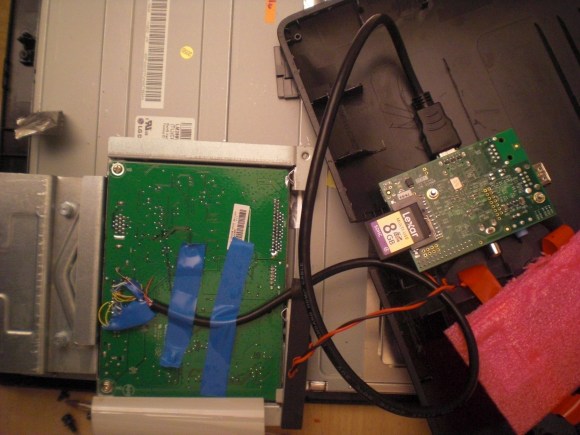
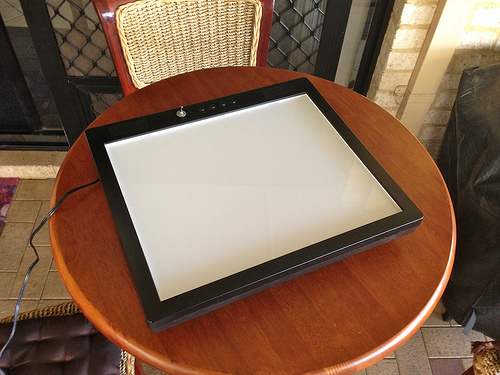
[x2jiggy] was given a non-functioning LCD monitor. He made a small effort to trouble-shoot its inability to display anything on the screen but couldn’t get it working again. When that failed he decided to repurpose it as light box instead of just sending it off for recycling.

Monitor manufacturers put in a lot of effort to make sure the back lights distribute brightness as evenly as possible and that will make this a pretty good light box. [x2jiggy] starts off the conversion by removing the case. While it was off he gave it a new coat of paint. The LCD panel, the PCB that drives it, and the light diffuser sheets were all removed, leaving just the backlight and inverter PCB. A bit of probing with the multimeter and he even found a place to connect a toggle switch to actuate the inverter’s power. You can see the silver switch he added to the bezel in the image above. The full build video is embedded after the break.

Continue reading “Trashed LCD Monitor Turned Into A Light Box”

Karma Controller Makes Reddit A Game

karma-controller-reddit

[Will] likes Reddit so much he built this dedicated controller that lets him play the social website like a video game.

He calls it he Karma Controller. In this case, ‘Karma’ refers to ability to accumulate a large number of net up-votes on a Reddit post. The device features seven buttons which are all it takes to up and down vote, navigate up and down on the Reddit listings, toggle images, as well as open and close new tabs for the comments section. We’re wondering if it allows you to follow a link to the post source too?

One of the reasons that we’re featuring this is that it’s only [Will’s] second electronics project. If you’re still reluctant to get your hands dirty we hope this acts as inspiration. He started by building the first version on a hunk of protoboard. The Digispark microcontroller seen at the top reads from his button network and communicates with the computer via USB. Once the design was proven he had some help etching this circuit board which is version 2. He shows it off in the clip after the jump.

If you just want some buttons for voting you should take a look at this project which includes a 3D printed enclosure and button covers.

Continue reading “Karma Controller Makes Reddit A Game”

Weather-O-Matic Displays Digital Weather On An Analog Face

SANYO DIGITAL CAMERA

This clean-looking readout uses analog dials to display the weather. [Nuno Martins] calls it the Weather-O-Matic and after the jump he explains what went into the project.

The hardware is about as simple as it gets. Each hand has a servo motor attached to it. An MSP430 gets the weather via a serial connection to a computer (data is scraped by a Python script) and sets the dials accordingly. The microcontroller also takes user input in the form of a single button on the side of the frame. The words on the left side of the dial are Portuguese for Today, Tomorrow, and After (meaning the day after tomorrow). Pressing the button multiple times will scroll through these three words, followed by the forecast temperature high and low for that day being displayed.

The nice thing about this is that the servo motors will stay in place if you cut the power to them. We bet if he wanted to make this a permanent fixture in his house he could get it to run well on batteries by using the sleep function of the microcontroller and adding an RF transceiver to communicate with the server.

Continue reading “Weather-O-Matic Displays Digital Weather On An Analog Face”

3D Printer Used To Make Custom Blade Server Type Mounting System

3d-printed-blade-server-mounts

We usually have no problem hacking together electronics into something useful. But finding an enclosure that makes sense for the build can be a real drag. In this case [Vincent Sanders] already had a working ARM build farm that leveraged the power of multiple ARM boards. But it was lying in a heap in the corner of the room and if it ever needed service or expansion it was going to be about as fun as having a cavity drilled. But no longer. He took inspiration from how a blade server rack works and 3D printed his own modular rail system for the hardware.

Each group of boards is now held securely in its own slot. The collection seen above mounts in a server rack which has its own power supply. This image is part way through the retrofit which explains why there’s a bunch of random pieces lying around yet. Instead of printing continuous rail [Vincent] uses a threaded rod to span the larger frame, securing small chunks of rail where needed by tightening nuts on either side of them. The white and red trays are prints he ordered from Shapeways designed to secure the eurocard form factor parts.

[Thanks Thomas]