RC Car Upgraded To Bluetooth Control

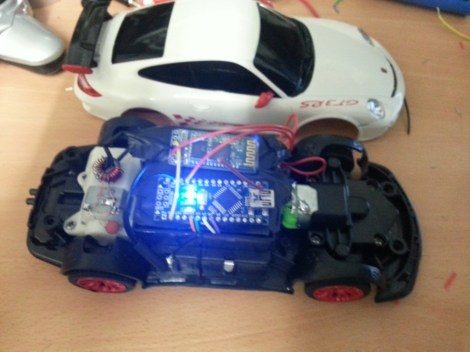
[Chet] is showing off the Bluetooth controller upgrade for this RC car. The donor vehicle is a rather inexpensive Porche which he purchased to make sure he didn’t start hacking up his more expensive toys.

He took a bit different route than the IOIO RC truck we saw earlier in the week, but the concept is basically the same. That build used an IOIO board with a USB Bluetooth dongle. This one uses an Arduino Mini with a serial Bluetooth module. He patched into the motor driver circuits on the original PCB. While he was at it he also soldered in some LEDs to use as switchable headlights.

There was one issue which he had to overcome. The current draw from the motor starting up would sometimes dip the voltage low enough to reset the Arduino. He tried using a bigger capacitor to feed the board, but in the end opted to add a boost converter.

IOS Terminal Debugging Tool

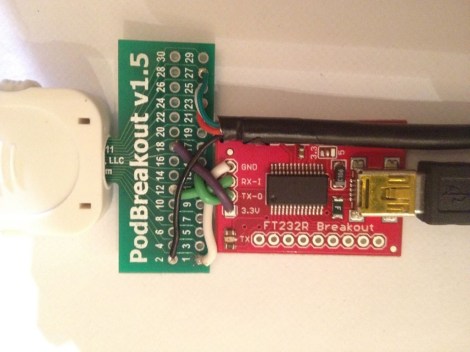
This is a simple iOS debugging tool that will take no time to solder together. There’s even a chance that you already have everything you need on hand. The hack simply connects an RS232-to-USB converter to a breakout board for an iPod connector.

The hardware is aimed not at stock iOS systems, but as an aid to those who wish to run alternative operating systems on them. When the OpeniBoot package is run on an iPod Touch or iPhone it enables a serial terminal on pins 12 and 13. The FTDI breakout board takes these as RX and TX and makes them available to your terminal program of choice via USB. Speaking of USB, you may already have noticed the black cable leaving the right side of the image. Using the terminal doesn’t limit your ability to use the device’s USB functions.

Art Controller: Relay Board With Switches For Timing

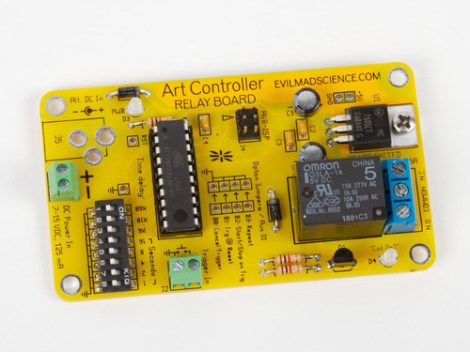
Meet the Art Controller, a new dev board available over at Evil Mad Scientist Laboratories. It provides a drop-in solution for switching higher voltage loads (but not mains). The thing we like most about it is the ability to alter a switching delay without reprogramming the firmware.

The board uses an ATtiny2313 for control. It’s fed regulated 5V power from the on-board 7805 linear regulator. The relay can handle a 24V DC or 40V AC load, which is targeted at an audience that needs electronic switching for art-related devices but doesn’t want the hassle of designing a circuit every time. This offers a single shot, or repeat action, with that bank of DIP switches selecting a delay from once every second, to every 31 hours. It can get its initial trigger from anything that can pull a pin low, like a button, or a coin acceptor.

Keep this in mind. The open source nature of the project means it could come in handy as a reference design.

Radio Built From The London Underground Map

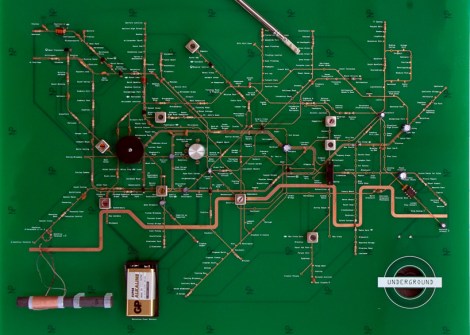
We love it when PCB artwork is actually artwork. Here’s one example of a radio whose layout mimics the map of London’s subway system.

The build is for an exhibit at the London Design Museum. They have an artist in residence program which allowed Yuri Suzuki time and resources to undertake the project. He speaks briefly about the concepts behind it in the video after the break.

The top layer of copper, and silk screen was positioned to mirror the subway lines and stops on a traditional transportation map. Major components represent various transfer hubs. In this way he hopes the functioning of the circuit can be followed by a layman in the same way one would plan a trip across town.

This may be a bit more abstract than you’re willing to go with your own projects. But there are certainly other options to spicing you track layout.

Continue reading “Radio Built From The London Underground Map”

Simple Concepts Behind Complex Coilguns

Coil guns use electromagnetic coils to propel a metal projectile. On the surface they may look rather complicated. But when you break down the concepts it’s pretty easy to learn. If you’ve ever thought of dabbling in this field this lengthy coilgun primer will be a great help.

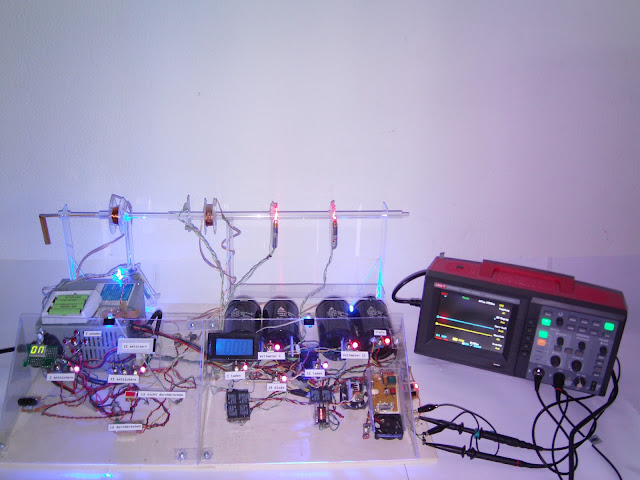
The basic concept of a coilgun comes in three parts: the coil, the voltage source, and the switch that combines the two. In the build above you can see two spools of wire on the clear barrel of the gun. These make up a pair of accelerators which connect to those huge black capacitors supplying the voltage. The switch they used can’t really be seen but from the article we know it’s a Thyristor; a Silicon Controlled Rectifier (2N6504).

In the video after the break you can see these three parts coming together for a test firing. This is the first step in a longer journey. To achieve higher projectile velocities you must add coils, as in the image above. But spacing and timing quickly complicate the simple concept. But if you can work out all the kinks you end up with some pretty great hardware.

Continue reading “Simple Concepts Behind Complex Coilguns”

Ugly Upgrade Keeps The Tunes Playing Longer

[Sam] picked up a Sansa Clip audio player to listen to some tunes while working on projects. He liked the fact that he could run the Rockbox alternative firmware on the device, but thought the 15 hour battery life needed some improving. He swapped out the stock cell with a larger Lithium cell for a long life of 50-60 hours. It’s an upgrade fom 300 mAh to 1100 mAh, but as you can see, the size of the replacement made for some interesting case modification.

The battery swap required more than just taking one battery out and putting in the other. [Sam] is using a cellphone battery as the replacement and he didn’t want to have issues with the internal circuitry. He took the cell out of its plastic enclosure, removing the circuit board in the process. That PCB is the charging circuit, which he replaced with the one from the stock battery. After insulating the cell with a layer of Kapton tape he soldered it to the MP3 player and did his best to adhere all the parts to each other.

Sure, its ugly, but that makes it right at home on the work bench.

Building A Recirculating Infusion Mash System For Your Brewing Pleasure

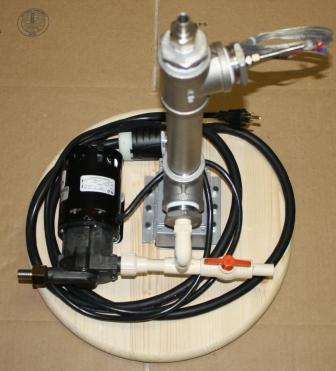
If you’re into all-grain brewing a little automation goes a long way. [Tom Hargrave] had his eye on a Recirculating Infusion Mash System (RIMS) but the price tag kept him from pulling the trigger. Recently he bit the bullet and built his own small and inexpensive RIMS for use with the 10 gallon cooler he uses as a mash tun.

Mashing is the part of brewing process that collects sugars from the milled grains. Water needs to move through the grain mash and should be kept within a narrow temperature window. This RIMS hardware does that automatically by combining a pump, the heating element from an electric water heater, and a temperature sensor. The wooden disc fits on the top of the mash tun and tubing lets the pump move the liquids as needed. The one thing missing from this build is the PID controller to automate the process. After the break we’ve embedded a video from a separate project that shows off how the PID control would work with a system like this one.

If you’re into automated home brewing you’ll also like this mini-batch brewing setup.

Continue reading “Building A Recirculating Infusion Mash System For Your Brewing Pleasure”