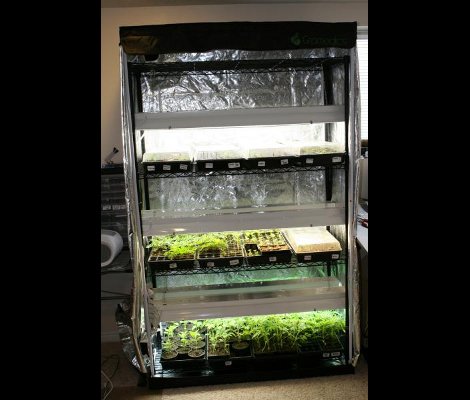
Scratch-build Garden Nursery Uses Arduino Monitoring

Starting your garden indoors helps to ensure large yields. This is because the plants get a head start before it’s warm enough for them to be put in the ground. But the process involves a fair amount of labor, ensuring that the lights are turned on and off at the right times each day, and that the temperature for germination and growth, as well as humidity, hit a certain target. It’s obvious that a bit of automation would be nice, and this Arduino-based garden nursery does just that. One of the things that sets this project apart is that it shows you how to go from an empty room to the bounty of plant starters seen here.

For the most part the equipment is what you’d expect, seed trays and covers, tray warming mats, and fluorescent light fixtures. the whole thing is given a small footprint thanks to an adjustable shelving unit. The Arduino is used in conjunction with a Sprout Board to add connectivity for switching the lights and warming mats. This is just a matter of driving a relay to switch mains voltage and can take any number of forms, including this home automation project we saw the other day.

[Thanks Tom]

NES Controllers For Any Bluetooth Application

[Dustin Evans] wanted to used his original NES controllers to play emulated games. The problem is he didn’t want to alter the classic hardware. His solution was to use the connectors and enclosure from a dead NES to build a Bluetooth translator that works with any NES controller.

Here he’s showing the gutted half of an original NES. Although the motherboard is missing, the connectors for the controllers are still there. They’ve been rewired to an Arduino board which has a BlueSMiRF modem. The controller commands are harvested by the Arduino and sent to whatever is listening on the other end of the Bluetooth connection. He also has plans to add a couple of SNES ports to the enclosure so that those unaltered controllers may also be used.

In the video after the break [Dustin] walks us through the hardware setup. He then demonstrates pairing the device with an Android phone and playing some emulators with the pictured controllers.

Continue reading “NES Controllers For Any Bluetooth Application”

Electronic Bracer Wraps A Lot Of Features Around Your Arm

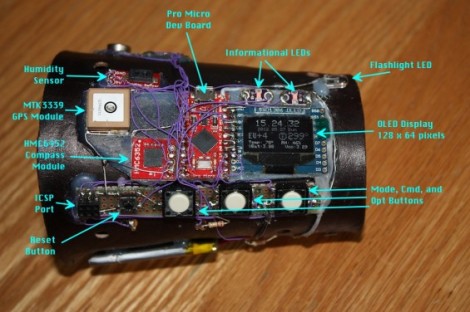
[Stephanie] just finished up her wearable project which puts a lot of information where a wristwatch would normally be found. She calls it the Integrated Sensors Electronic Bracer. We had to look up what a bracer is; the name originates with archers and it was a leather wrap used to protect the wrist. This does that, but we don’t think you’ll want the bowstring frequently hitting the electronic components hidden within.

There is a nice finished leather cover which wraps around the unit, leaving just a few holes for key components. Above you can see the parts undressed, with an Arduino compatible board in the middle. It provides a user interface with the OLED display and three input buttons. The array of sensors found on the device include a GPS module to display position data, humidity sensor, magnetometer, luminance sensor, and galvanic skin response.

The opposite side of the bracer has an opening secured by a couple of elastic cords. [Stephanie] mentions that this works, but she’s not happy with the look of it and hopes to make some leather-based improvements.

[via Adafruit]

LayerOne Badge Hacking Twofer

Here’s a pair of LayerOne Badge hacks that actually included the RC as intended by the badge designers.

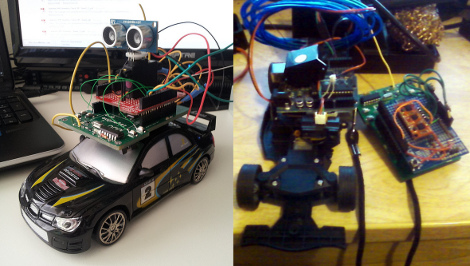
First up, we have the autonomous RC car built by [Arko]. He calls it Stanley Jr. as an homage to the Stanford DARPA Grand Challenge vehicle. It uses an Arduino shield to add a servo with an ultrasonic rangefinder on it. The lets the vehicle drive a bit, stop and scan the horizon, then drive some more. The hope is the rangefinder will keep it from running into anything. There’s a quick test run embedded after the break.

On the right is the badge hack which [Zjpahle] finished up after the contest was already over. He also chose to go with an Arduino shield, this time it’s an IMU board. But he added a standalone Arduino board to the vehicle which drives some EL wire (ground effects) and adds IR sensors to the front of the car. The IR sensors are for obstacle avoidance, and the IMU lets him tilt his badge for direction control.

We looked at the winner of the badge hacking competition on Wednesday. That hack didn’t involve the car, but used the badge as a Morse Code beacon.

Continue reading “LayerOne Badge Hacking Twofer”

Catch Neighborhood Speeders With Your Webcam

[John] is keeping the neighborhood safe by keeping an eye out for speeders. Well, he’s really keeping a webcam out for speeders. His technique doesn’t use radar or lasers. He’s processing webcam frames in Python to calculate speed.

It comes down to some basic image manipulation. He firsts gathers the images necessary to make the calculations by using a motion-detecting webcam program called YawCam. The images are analyzed to establish which parts have changed between frames; this gets rid of all the stationary objects. Now the frames can be compared to establish the distance in pixels. By calibrating the shot through measurements of the target area, this data can be directly converted into actual distance. It is then compared with the timestamps from each frame to arrive at speed. This can be used for vehicles on the street like we see above, or more whimsical measurements like pet turtle progress.

ATtiny85 Sketch Flashing Rig

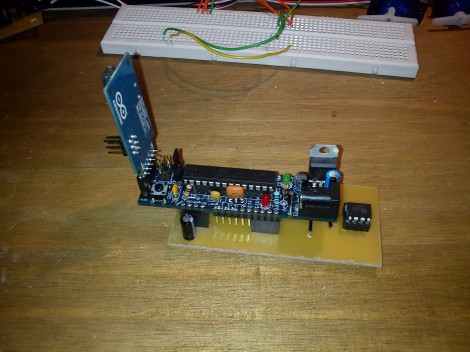
We’re happy to see Arduino enthusiasts championing the use of smaller hardware when the need for a full-blown ATmega-based board just isn’t there. [Chris] has been doing just that, using ATtiny85 chips in his projects. But he’s tired of hooking jumper wires to flash the sketches. He finally got around to etching this ATtiny85 programming adapter.

If the project is not pin hungry, an ATtiny85 can run Arduino sketches without the need to port the code. The best news is that the Arduino board you used to prototype the project can be used as the programmer for the standalone chip. Here that’s a Boarduino, and [Chris] laid out a double row of female pin headers for quick plug-in. To the right you can see the DIP socket for the target chip. Although this works perfectly well, we would have liked to also see the inclusion of a 2×3 AVR ISP programming header which could be used with the full range of AT chips.