Snow Plowing By Bicycle

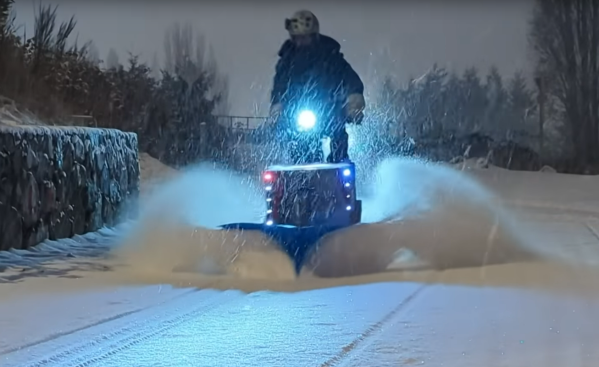
There are few challenges more difficult or dangerous than trying to get around the majority of North American cities by bicycle. Not only is the bicycle infrastructure woefully inadequate for safe travel (if it exists at all), but it’s often not maintained to any reasonable standard, either. This goes double in colder areas, where bike paths can essentially become abandoned in the winter after a snowfall. [Phil] found himself in this situation recently after a snowfall in western Canada and decided to DIY his own bike-powered snowplow to help keep his bike paths cleared.

The plow is built around an electric-assisted cargo bicycle, which is almost as rare in North America as bicycle infrastructure itself, but is uniquely suited to snowplow duty. It has a long wheelbase and a large front cargo area that can be weighed down if needed to ensure the plow makes good contact with the ground. The plow itself is built out of sections of plastic 55-gallon drums, which have been cut into two scooping sections and attached to the bike with a wooden 2×4 frame. The plow can be raised or lowered with a ratchet strap mechanism, and the plastic scoop skips over bumps in the path with relative ease.

With this relatively simple mechanism attached to his bike, [Phil] can make sure the trails that he frequents around Vancouver are more suitable for bike travel in the winter. Riding a bicycle through the winter, even in the coldest of climates, is not that difficult with the right support and investment in infrastructure, and this build is the best DIY solution we’ve seen to bicycle infrastructure support outside of adopting something like this remote-controlled snowblower to the job.

Continue reading “Snow Plowing By Bicycle”

AIOC: The Ham Radio All-In-One Cable For Audio And APRS

The Ham Radio All-in-one cable (AIOC) is a small PCB attachment for a popular series of radio transceivers which adds a USB-attached audio interface and virtual TTY port for programming and the push-to-talk function. The STM32F373 microcontroller (which, sadly is still hard to find in the usual channels) is a perfect fit for this application, with all the needed hardware resources.

With USB-C connectivity, the AIOC enumerates as a 
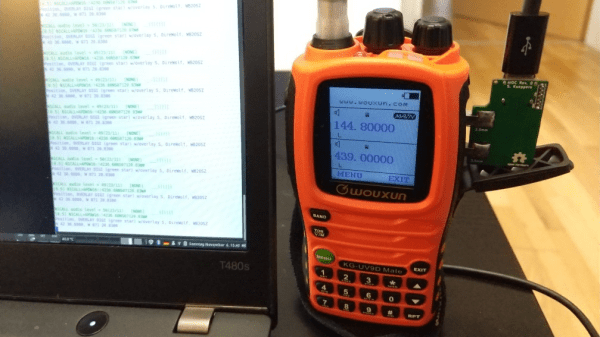
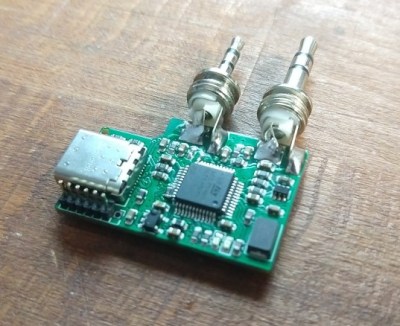
sound card as well as a virtual serial device, so interfacing to practically any host computer should be plug-and-play. Connection to the radio uses 12mm separation 3.5mm and 2.5mm TRS connectors, so is compatible with at least the Baofeng UV-5R but likely many other cheap transceivers that have the same physical setup.

Instructions are provided to use the AIOC with Dire Wolf for easy access to APRS applications, which makes a nice out-of-the-box demo to get you going. APRS is not all about tracking things though since other applications can sit atop the APRS/AX.25 network, for example, HROT: the ham radio of things.

We’ve seen quite a few Baofeng (and related products) hacks, like this sketchy pile of wires allowing one to experiment with the guts of the radio for APRS. Of course, such cheap radio transceivers cut so many engineering corners that there are movements to ban their sale, so maybe a new batch of better radios from our friends in the East is on the horizon?

Thanks to [Hspil] for the tip!

Steve showing a circuit built with spintronics blocks

Electronics Explained With Mechanical Devices

It can be surprisingly hard to find decent analogies when you’re teaching electronics basics. The water flow analogy, for instance, is decent for explaining Ohm’s law, but it breaks down pretty soon thereafter.

Hydraulics aren’t as easy to set up when you want an educational toykit for your child to play with, which leaves them firmly in the thought experiment area. [Steve Mould] shows us a different take – the experimentation kit called Spintronics, which goes the mechanical way, using chains, gears, springs and to simulate the flow of current and the effect of potential differences.

Through different mechanical linkages between gears and internal constructs, you can implement batteries, capacitors, diodes, inductors, resistors, switches, transistors, and the like. The mechanical analogy is surprisingly complete. [Steve] starts by going through the ways those building blocks are turned into mechanical-gear-based elements. He then builds one circuit after another in quick succession, demonstrating just how well it maps to the day-to-day electronic concepts. Some of the examples are oscillators, high-pass filters, and amplifiers. [Steve] even manages to build a full-bridge rectifier!

In the end, he also builds a flip-flop and an XOR gate – just in case you were wondering whether you could theoretically build a computer out of these. Such a mechanical approach makes for a surprisingly complete and endearing analogy when teaching electronics, and an open-source 3D printable take on the concept would be a joy to witness.

Looking for something you could gift to a young aspiring mind? You don’t have to go store-bought – there are some impressive hackers who build educational gadgets, for you to learn from.

LEDCard: The Pocketable Ring Light

How many times have you found yourself fumbling about with lighting while trying to get a clear up-close shot of an object? Although smartphones come with pretty nice cameras these days, properly lighting an object and taking impressive macro shots isn’t exactly their strong suit. This is where [MisterHW]’s LEDCard is a very welcome companion. Not only does it provide a credit card sized ring light, it also allows for a molded acrylic lens to be inserted for high-quality macro shots.

The project in its current iteration consists out of a single PCB with rechargeable Li-ion coin cells (LIR2430) and a USB-powered charge controller. After charging the LEDCard (or inserting freshly charged Li-ion coin cells), a single button press will light up the SMD LEDs via the LM3410 LED driver IC. Press the ON button gently (half-press) for medium brightness and fully for full intensity. Finally, pressing the TEST button with the LEDs lit performs a battery level test that turns the LEDs off if the battery is ok. If they stay lit, it’s time to recharge the LEDCard.

As [MisterHW] points out, the LEDCard being compact enough to carry around with you wherever you go makes it suitable as an emergency flashlight as well. It’s also not the final iteration of the design. Future (incremental) improvements include a diffuser for the ring light and more. Even so, in its current state LEDCard is already a proven design.

Showing a USB-C tester running the DingoCharge script, charging a battery pack at 7V. To the right is a battery pack being charged, and a USB-C charger doing the charging.

Use USB-C Chargers To Top Up Li-Ion Packs With This Hack

In USB-C Power Delivery (PD) standard, the PPS (Programmable Power Supply) mode is an optional mode that lets you request a non-standard voltage from a charger, with the ability to set a current limit of your choice, too. Having learned this, [Jason] from [Rip It Apart] decided to investigate — could this feature be used for charging Li-Ion battery packs, which need the voltage and current to vary in a specific way throughout the charging process? Turns out, the answer is a resounding “yes”, and thanks to a USB-C tester that’s programmable using Lua scripts, [Jason] shows us how we can use a PPS-capable USB-C charger for topping up our Li-Ion battery packs, in a project named DingoCharge.

The wonderful write-up answers every question you have, starting with a safety disclaimer, and going through everything you might want to know. The GitHub repo hosts not only code but also full installation and usage instructions.

DingoCharge handles more than just Li-Ion batteries — this ought to work with LiFePO4 and lithium titanate batteries, too.  [Jason] has been working on Ni-MH and lead-acid support. You can even connect an analog output thermal sensor and have the tester limit the charge process depending on the temperature, showing just how fully-featured a solution the DingoCharge project is.

The amount of effort put into polishing this project is impressive, and now it’s out there for us to take advantage of; all you need is a PPS-capable PSU and a supported USB-C tester. If your charger’s PPS is limited by 11V, as many are, you’ll only be able to fully charge 2S packs with it – that said, this is a marked improvement over many Li-Ion solutions we’ve seen. Don’t have a Li-Ion pack? Build one out of smartphone cells! Make sure your pack has a balancing circuit, of course, since this charger can’t provide any, and all will be good. Still looking to get into Li-Ion batteries? We have a three-part guide, from basics to mechanics and electronics!

A DIY Pulse Tube Cryocooler In The Quest For Home-Made Liquid Nitrogen

What if you have a need for liquid nitrogen, but you do not wish to simply order it from a local supplier? In that case you can build your very own pulse tube cryocooler, as [Hyperspace Pirate] is in the process of doing over at YouTube. You can catch part 1 using a linear motor and part 2 using a reciprocating piston-based version also after the break. Although still very much a work-in-progress, the second version of the cryocooler managed to reduce the temperature to a chilly -75°C.

The pulse tube cryocooler is one of many types of systems used for creating a cooling effect. Commercially available refrigerators and freezers tend to use Rankine cycle coolers due to their low cost and effectiveness at (relatively) warmer temperatures. For cryogenic temperatures, Stirling engines are commonly used, although they find some use in refrigeration as well. All three share common elements, but they differ in their efficiency over a larger temperature range.

In this video series, the viewer is taken through the physics behind these coolers and the bottlenecks which prevent them from simply cooling down to zero Kelvin. Despite the deceptive simplicity of pulse tube cryocoolers — with just a single piston, a regenerator mesh, and some tubing — making them work well is an exercise in patience. We’re definitely looking forward to the future videos in this series as it develops.

Continue reading “A DIY Pulse Tube Cryocooler In The Quest For Home-Made Liquid Nitrogen”

pulse oximeter as a small sticker that sticks on your fingernail and measures heart rate, motion, and blood oxygen

This Fingernail Sticker Can Detect When You Stop Breathing

Sometimes we dig through the archives to see what kind of crazy hacks we can pull out of the depths of the world wide web and this one was worth sharing. Researchers at Northwestern University developed a sticker that’s applied to the fingernail and measures heart rate, motion, and blood oxygen, all without a battery.

The photoplethysmograph (PPG) system is similar to what we’ve covered before and the motion sensor is simply an accelerometer, so we won’t go over those aspects of the device. The parts of the device that did catch our attention were the battery-less operation as well as its size. It’s just so dang small! And fits snuggly on a fingernail or on even on your earlobe. The size here is actually a very interesting feature and not just a marketing plug. Because the device is so small and lightweight, it is very easy to adhere to the fingernail or skin with very little sensory perception. Basically, the person wearing the device won’t even notice it’s there. That’s definitely an advantage over the traditional, bulky, hospital-grade instruments we’ve grown accustomed to.

The device adheres really well given its small and lightweight design, so motion artifacts are significantly reduced. Motion artifacts in PPG-based devices are due to the relative motion between the optode (LED and photodiode) and the skin. The traditional approaches of ensuring the device don’t move are for the patient to keep very still during a recording, to wear the device tightly against the skin (think of how tightly you need to wear your smartwatch to get consistent readings), or use some seriously tough and uncomfortable adhesive as you may have done if you’ve ever gotten an electrocardiogram reading before. This device eliminates those three problems.pulse oximeter as a small sticker that sticks on your fingernail and measures heart rate, motion, and blood oxygen

The other aspect of the device that caught our attention is its use of wireless power instead of a battery. In some senses, this could be seen as an advantage or as a disadvantage. The device relies on NFC for power and data transmission, a pretty common approach for devices that only need to be used intermittently. Wireless power could be a bit problematic for continuous monitoring devices which provide readings every second or several times a second. But who knows, wireless power seems to be everywhere these days.

Digging into the details a bit, the double-layer antenna is designed around the circumference of the device using wet etching to create traces on a copper polyimide foil. The team electroplated holes through the different layers of the device (optode layer, first antenna layer, polyimide, second antenna layer, component layer, protective top coat) connecting the antenna to the die pad NFC chip (SL13A, AMS AG). Connecting the chip requires some pretty fine-pitch soldering techniques, but nothing we’re not accustomed to here at Hackaday. Overall, they seemed pretty successful, obtaining a Q factor of 16 and a transmission distance of 30 mm using a smartphone and not some giant reader antenna.

Definitely, a really cool project that we recommend checking out.