Steampunk Theremin Goggles

wearable-theremin-goggles

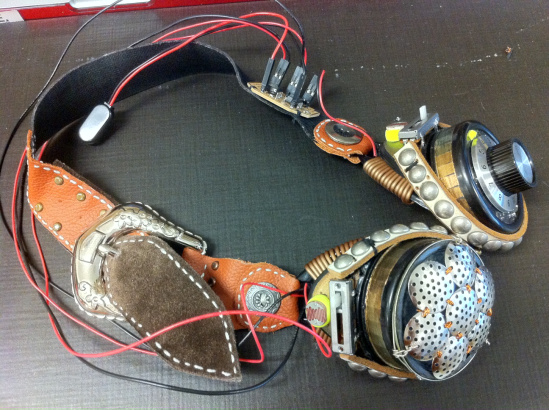
Lots of people build custom steampunk goggles, but most don’t implement any interactivity – they’re just an aesthetic accessory. [Sarah] recently decided to built a pair that, besides looking cool, would engage the wearer in creating sound. She accomplished this by integrating an optical theremin into their design.

To keep the build both affordable and wearable she researched simplified theremins, and eventually settled on creating a basic model that uses only a handful of components and two 555 timers. The main body of the goggles was constructed using mostly random mismatched pieces of metal and leather.  Mounted on the outer edge of each lens, there is a photo sensor and a corresponding slider control. Adjusting the slider alters the level of resistance, therein changing the pitch of the sound. The theremin will produce different pitches and octaves depending on how much light the sensors receive. So, the wearer, or a nearby friend, waves their hands around the wearers head to control it.

The speaker and volume knob are cleverly disguised as the two ‘lenses’. Rotating the volume knob lens adjusts an internal potentiometer that’s held in place by a custom laser etched piece of acrylic. To top it all off, she even designed her own PCB using Eagle.

Check out a video demonstration after the break.

Continue reading “Steampunk Theremin Goggles”

Used Hard Drive Repurposed As A Cotton Candy Machine

hard-drive-cotton-candy-machine

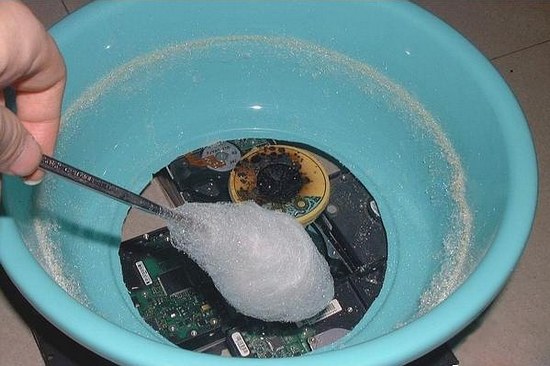
If you’re reading this website, you’re probably someone who likes to take things apart. As such, you probably also have one or more old computer hard drives just sitting around in a parts bin.  Of all the projects you could have for an old drive, here’s an interesting one – A Chinese engineer who operates a hard drive repair and data recovery center decided to turn a used drive into a cotton candy machine.

Possible sanitary concerns set aside, his creation is very cheap and easy to build. Most hackers probably have all the necessary gear just sitting around already. The only parts he used were: a hard drive that still powered up, a generic plastic basin, an aluminum can, a flat round metal tin, and six bicycle spokes.

It might not be pretty, but it works. If you want to create your own, be sure to check out the above link. There’s a full DIY guide complete with step-by-step photos.

[Thanks Fabien]

Ikea Dioder Ambilight Hack

There are a lot of hacks out there for Ikea’s Dioder LED light set. [Lambertus] wanted to create an easy and affordable ambilight while keeping the hardware modifications to a minimum. He also wanted anyone to be able to easily duplicate his work. He recently wrote in to share his successful solution.

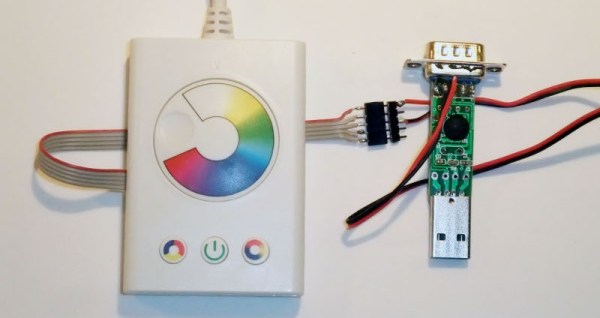
The customizations boil down to three main steps: solder the ICSP connector wires to the test points on the Dioder PCB, connect a PIC programmer to the ICSP port (and reprogram), and attach a 5V RS-232 device to the ICSP port. The software was the most difficult part of the procedure for [Lambertus]. The PIC16F684 didn’t contain the required UART and PWM controllers, so he had to get crafty. Fortunately he’s done all the work for us, and lists the necessary .hex file he created on his site.

By adding support to boblight, his new ambilight is working with his media center very nicely. There’s a little demo video after the break.

Continue reading “Ikea Dioder Ambilight Hack”

Epson Projector LED Mod

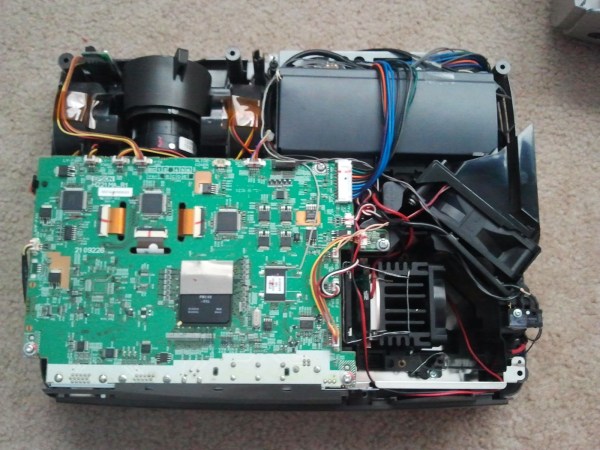
Projector bulbs can be incredibly expensive to replace. Sometimes it’s more cost efficient to just buy a whole new projector instead of a new bulb. [Shawn] recently found a nice deal on an ‘as is’ Epson EMP-S4 on eBay and decided to take a chance. He assumed it probably worked with the exception of the missing lamp the seller mentioned. His suspicions were correct, and one custom LED mod later, his projector was up and rolling.

Without a stock lamp installed, the projector would give an error message and shut itself off. So, the first step was to wire up a little bypass. Once that was taken care of, [Shawn] installed a 30W 2000 lumen LED and custom fit an old Pentium CPU heatsink to keep the LEDs temperature down. He also wired up the heatsink fan in parallel with the stock exhaust fan for good measure.  Optical lenses help focus the light, and some custom wiring makes the LED turn on and off just like the stock lamp would.

In the end, his first experiment was a success, but [Shawn] wants to try an 8000 lumen 100W LED to make it about as bright as the stock lamp was. Check out a little video walkthrough after the break.

[Thanks Shawn]

Continue reading “Epson Projector LED Mod”

Atomic Skull Clock Reminds Us We’re Dying

atomic-skull-clock

Whether you like it or not, every second that passes brings you one step closer to your own demise. It’s not a comforting topic to dwell upon, but it’s reality. This art installation entitled ‘Memento Mori’ is a haunting reminder of just that. Even with all the advanced technology we have today, we still have absolutely no way of knowing just when our time will come.

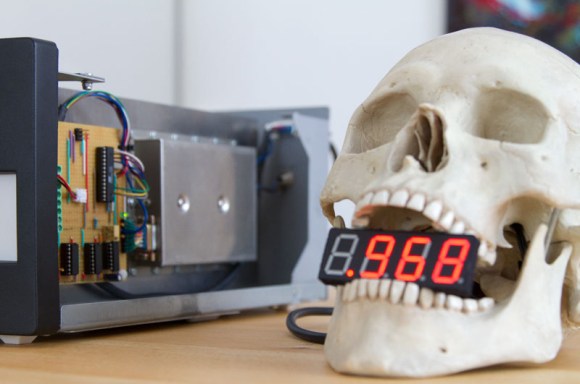
[Martin] cast a real human skull, then added a 4 digit LED display that’s attached to a rubidium atomic clock (running a FE-5680A frequency standard). The display counts down a single second over and over, measured in millisecond-steps, from 1.000 to 0.001. He built a custom electronic circuit to convert the 10 MHz sine wave into a 1 kHz pulse signal, and used ATmega8 chips running an Arduino sketch to do the rest of the dirty work.

Watching the video after the break, with that smooth mysterious music in the background, one can’t help but ponder our mortality. On a personal note, this totally feels like something you’d find in a video game.

[Thanks Martin]

Continue reading “Atomic Skull Clock Reminds Us We’re Dying”

DIY $6 Serial Cable For Vintage Apple QuickTake Cameras

diy-serial-cable-for-vintage-apple-cameras

Knowing he was a guy who liked electronics and taking things apart, one of [Erik]’s friends sent him a vintage Apple QuickTake 100/150 digital camera as a bit of a joke. [Erik] enjoyed the gift, but since his friend hadn’t sent the necessary serial cable he really couldn’t do that much with it. He searched online only to discover the cable is very difficult to find these days, and thus very expensive. So, being the handy guy he is, he built his own.

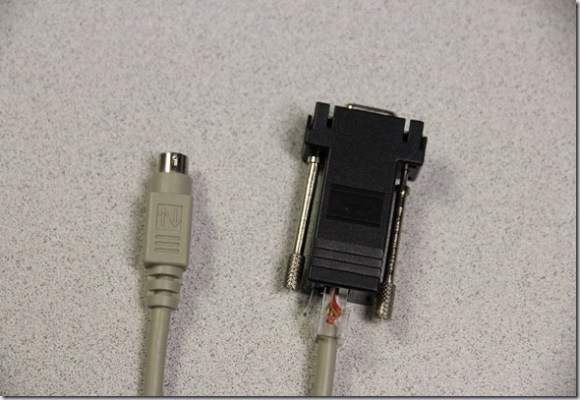
Starting with an Apple MiniDin8 Male cable, he cut off one end and attached the wiring to a RJ45 connector. That got plugged into a modular adapter with a DB9 Female Plug end and wired up. The procedure required no soldering, and cost less than $6. Awesome.

Unfortunately the lack of serial cable isn’t the only problem he faced. QuickTake isn’t compatible with newer Apple computers that use Intel. You have to either have a much older Mac, or use a Windows XP emulator. If that wasn’t bad enough, the cameras only want to save photos in QuickTake file format. Luckily, [Erik] documents how he overcome all these issues in his post.

[Thanks Erik]

Robot Bartender Mixes A Mean Drink

Back in 2002, [Dave] came across a discarded PUMA robotic arm and quickly set his sights on turning it into a bartender to serve drinks at his parties. Unfortunately, the arm was far from operational and being an engineer at his day job meant that working on this project was the last thing he wanted to do when he came home. So, progress trickled along slowly for years. He eventually announced a public deadline to spur him to action, and this years Pi(e) party saw the official debut of  ‘Sir-Mix-a-Bot’ – the robot bartender.

With the exception of having to build a new hand for it, mechanically, the arm was still in good condition when [Dave] found it. The electronics were another story however. Using some off the shelf components and his own know-how, [Dave] had to custom build all the controls. The software was written from scratch as well. (He lucked out and had help from his brother who was taking a Ph.D. program in robotics at the time).

As if the robotics aspect of the project wasn’t enough, [Dave] even created a beautiful custom table that both houses and displays his masterpiece. The quality of craftsmanship on his table alone is worth the time to check this out – there’s a short video after the break.

[Thanks Dave]

Continue reading “Robot Bartender Mixes A Mean Drink”