Trash Can Guitar Cab

Guitar Speaker Cabinet Actually Belongs In Garbage Can

[Dano] builds a lot of guitar pedals and amps. He needed a speaker cabinet dedicated to this task in order to be a consistent reference when checking out his electronic creations. He ordered a couple of 10″ guitar speakers…. and they sat around for a while.

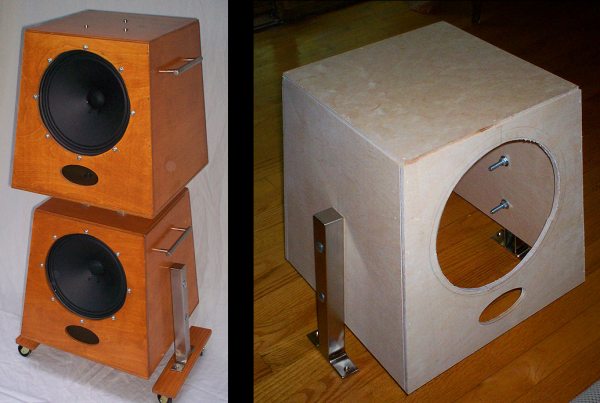
Then one day at the craft store, he stumbled on an inexpensive wooden trash can. It had a tapered design and came with a lid. As would any normal person, [Dano] immediately thought these would make a perfect speaker cabinet so he bought two of them.

The trash cans would be used in an upside-down orientation. The intended lid makes for a well fitting bottom of the cabinet. Holes were cut for the speaker and two terminal blocks. Since these cabinets would be used for testing a bunch of different amps, two different terminal blocks were used to permanently have multiple connector types available.

A pair of modern kitchen cabinet handles were used as carrying handles for each of the two cabinets. If a speaker cabinet one speaker tall is cool, a cabinet two speakers tall must be twice as cool. To get there, the two cabinets were bolted together using electrical conduit as an industrial looking spacer. Those brackets bolted to the sides of the bottom cabinet are actually Ikea shelf brackets that [Dano] had bought and never used. The Ikea brackets support casters making for easy moving around the studio.

Overall, [Dano] is happy with how his cabinets sound. They are very unique and interesting at the least. We’d be happy to play some riffs through them!

Tank Track Motorcycle Goes Anywhere, Slowly

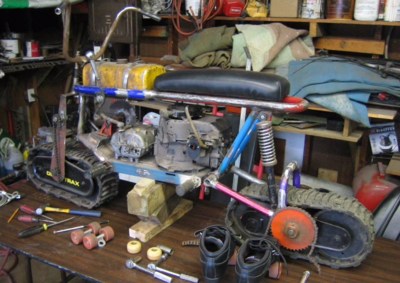
There are just somethings you don’t see often when it comes to motorcycles, 2 wheel drive and tank tracks. Well, [jeep2003] has combined both those oddities into one project he calls the Track-Powered 2×2 MiniBike.

As his descriptive project name suggests, this minibike has tracks instead of wheels. The track assemblies originally came off a snow blower. As if just having tracks wasn’t difficult enough, both sets are powered. The back has a straight forward chain and sprocket setup while the front ads in a clever jack-shaft and universal joint contraption which is shown in the video after the break around the 3:08 mark.

Tank Track Mini Bike

[jeep2003] doesn’t say where the tubing for his custom made frame came from, but from the photos available it appears they were once old bicycle frames. The powerplant is a 6.75hp vertical shaft Briggs & Stratton engine. The output shaft connects to a Peerless 5 speed transmission that also has reverse. This transmission usually outputs to two rear drive wheels of a riding lawnmower. [jeep2003] dedicates each axle output from the transmission to power one of the two track systems.

Although this minibike won’t be breaking any land speed records anytime soon, we here at HaD still think it’s a pretty rad build.

Continue reading “Tank Track Motorcycle Goes Anywhere, Slowly”

MAME Controller

MAME Now Available In The Palms Of Your Hand

Every kid dreams of having an arcade game at their house. When those kids grow up, they have a couple of options for getting that at-home arcade experience. They can either buy a one-game commercial game or build a multi-game MAME cabinet. Both options have the same disadvantage: they take up a bunch of space!

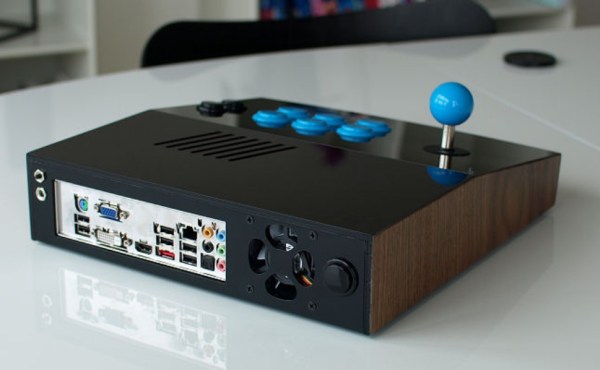
Arcade game-aholic, [lokesen], wanted to scratch his itch but do it with something a little less ‘big’ than a standard arcade cabinet. He came up with the only logical solution; a MAME computer stuffed inside an arcade controller.

A lot of thought went into the controller case, which is made from laser cut acrylic. It had to be large enough to allow a proper arcade-emulating spacing of the joystick and buttons as well as have room for a mini-ATX motherboard and 64gb SSD drive. The case also has provisions for a cooling fan and some exhaust vents. To finish off the case, wood grain veneer was applied to the sides.

[lokesen] chose this motherboard for a reason, it has several options of on-board video output; VGA, DVI and HDMI. Connecting this controller to any TV, monitor, or projector is a piece of cake.

robot arm laser cutter

Robot Arm Wields Laser, Cares Not For Your Safety

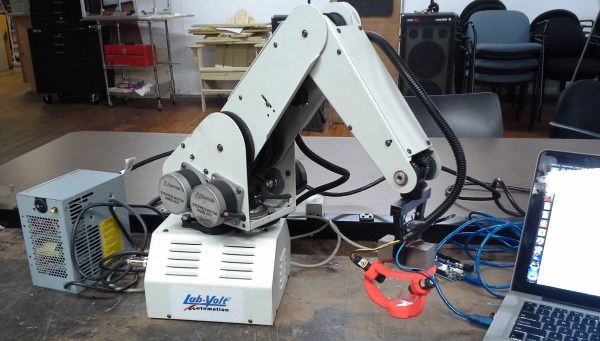
Here at Hackaday we’ve covered a bunch of DIY laser diode projects. And for good reason, they are just cool. We’ve seen people add lasers to their 3D printers, stick one in a milling machine, use a highly modified scanner and even build a simple XY gantry specifically for the task. To say the least there is definitely a wide range of methods for moving around a laser but we’ve never seen anything like what [Sp4rky] sent in to us. He and his friends outfitted an old educational robot arm with a laser.

The robot arm is a 5 axis Armdroid 5100 picked up from eBay for a couple hundred dollars. It didn’t come with a controller but all of the stepper drivers were housed in the base of the arm. After a little tinkering around with the inputs the team was able to get the arm to move by sending serial commands from a PC, through an Arduino Mega which then sends the appropriate signals to the uni-polar stepper drivers. That was the easy part of the build.

The hard part was getting the arm to hold the laser at a consistent angle and height above the table. Inverse Kinematics to the rescue! Since the desired position of the laser, as well as the length of the arm segments is known, mathematical formulas can be derived to determine the necessary arm segment and joint positions while moving the laser around. The process flow starts out with an image in Inkscape, g-code is then generated with this plugin, then sent to the Arduino running a modified version of GRBL that has the inverse kinematic formulas. The Arduino directly controls the stepper drivers and the robotic arm moves. The Arduino also controls 3 constant-current laser drivers made from LM317 regulators. Three laser drivers, why?

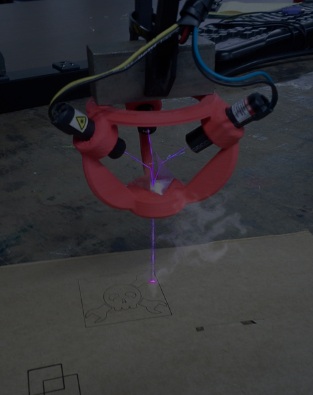
Triple Laser Robot[Sp4rky] got his laser diode modules out of surplus medical equipment and, unfortunately, the rated optical wattage was quite low. Since he had 3 diodes, he decided to try to combine the 3 low power beams into one high power beam. This can be done using a prism. A prism splits sunlight into a rainbow of colors because each wavelength(color) of light that passes through the prism is bent a different amount. Since the laser diodes only put out one wavelength of light, the beam bends but does not split or diffuse. A 3D printed bracket points each laser diode at a 3-sided pyramidal prism which sends the combined beam of light straight out the bottom towards the object to be cut or engraved.
This project is cool enough that we would have covered it even if [Sp4rky] wasn’t burning a Hackaday logo. Although it doesn’t hurt for anyone wanting their project to get covered!

diy electric skateboard

Electric Skateboard Rev’ed To Version 2

What’s cooler than a sweet skateboard? A sweet electric skateboard! And the only thing cooler than that is a DIY electric skateboard. [comsa42] has proven to be a DIY electric skateboard aficionado with his new project. It’s a rebuild and upgrade from his electric longboard that has previously been featured on Hackaday.

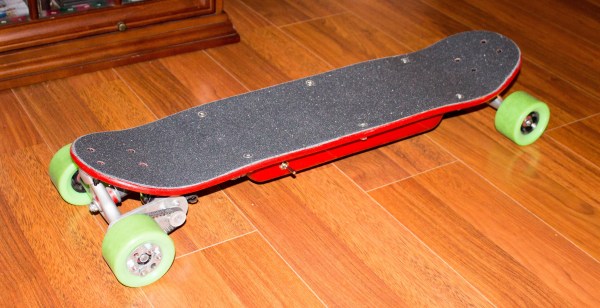
The most noticeable change is the size of the deck, it was cut down to be 31 inches long to enhance its maneuverability. The electronics are housed in an updated fiberglass compartment that attaches to the bottom of the deck. The old compartment had a large port that had to be removed in order to charge the battery. The new compartment has a plug for easily connecting the charger.

The drive components still consist of a brushless DC motor, RC hobby ESC and a LiPo battery. Previously, an RC transmitter and receiver were used to control the motor. [comsa42] wrote an app for his phone to send throttle signals to a Bluetooth module which controls the ESC as well as relays battery life back to the phone.

We think this project is pretty rad and wouldn’t mind taking this skate for a spin around the block.

diy brushless gimbal

Resourceful DIY Brushless Hand-held Camera Gimbal

Holding a video camera while shooting video can lead to finished footage that has some serious shakes. Lucky for us there are some solutions to this problem such as a passive steady cam stabilizer or an active motor-driven gimbal. [Oscar] wanted a smooth-operating brushless motor gimbal but didn’t want to spend the big bucks it costs for a consumer setup so he went out and built his own.

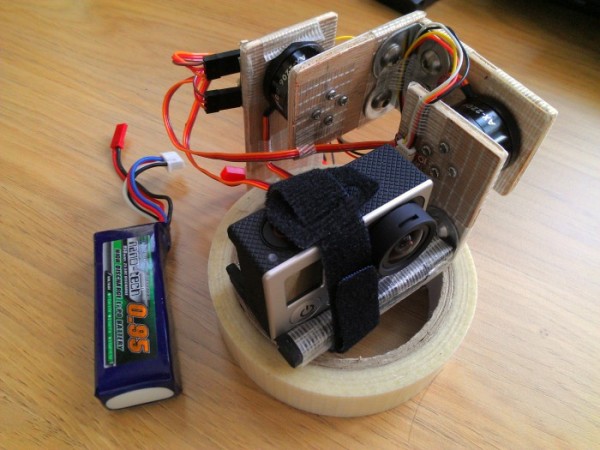
[Oscar] didn’t have a CNC machine or 3D printer to help with his build. He made his gimbal with simple hand tools out of plywood and hardware store bracketry. In his build post, he talks about how it is important to keep the pivoting axes of the gimbal in line with the camera lens and what he did to achieve that goal. The alignment of the axes and the lens ensures that the video is stable while the gimbal adjusts to keep the camera’s angle constant.

[Oscar] purchased the brushless motors and motor controller which included a gyro sensor on a separate PCB board. The gyro is mounted to the camera mount and sends tilt information back to the controller that then moves the brushless motors to keep the camera level. The final project worked out pretty good although [Oscar] admits he still would like to tune the PID settings in the controller a little better. Check out the video after the break where the stabilized camera is compared to one that is not.

Continue reading “Resourceful DIY Brushless Hand-held Camera Gimbal”

bluetooth snes headphones

SNES Headphones Cry For Bluetooth Has Been Answered

A year and a half ago we ran a post about a SNES controller modified into a pair of headphones. They were certainly nice looking and creative headphones but the buttons, although present, were not functional. The title of the original post was (maybe antagonistically) called: ‘SNES Headphones Scream Out For Bluetooth Control‘.

Well, headphone modder [lyberty5] is back with a vengeance. He has heeded the call by building revision 2 of his SNES headphones… and guess what, they are indeed Bluetooth! Not only that, the A, B, X and Y buttons are functional this time around and have been wired up to the controls on the donor Bluetooth module.

To get this project started, the SNES controller was taken apart and the plastic housing was cut up to separate the two rounded sides. A cardboard form was glued in place so that epoxy putty could be roughly formed in order to make each part completely round. Once cured, the putty was sanded and imperfections filled with auto body filler. Holes were drilled for mounting to the headband and a slot was made for the Bluetooth modules’ USB port so the headphone can be charged. The headphones were then reassembled after a quick coat of paint in Nintendo Grey. We must say that these things look great.

If you’d like to make your own set of SNES Bluetooth Headphones, check out the build video after the break.

Continue reading “SNES Headphones Cry For Bluetooth Has Been Answered”