Self balancing chopper

Self Balancing Vehicle Inspired By Bicycles Of Yesteryear

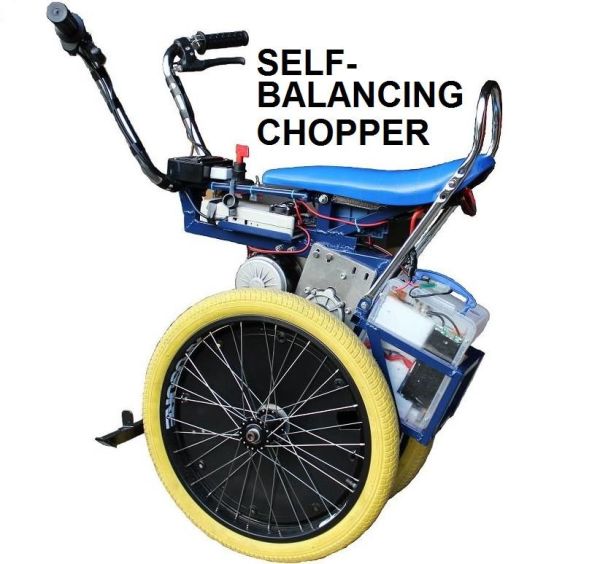
[XenonJohn] is not a newcomer to the world of self balancing vehicles. He was part of the Medicycle team and a semifinalist for The Hackaday Prize. Working on the Medicycle had exposed some opportunities for improvement of the design, the most significant being the single wide wheel supporting the vehicle and rider. The unicycle design was more difficult to learn to ride than that of a two-wheeled nature. [XenonJohn] wanted to make an improved self balancer and this new one will have two wheels that are independently controlled.

Although the finished product looks like it started with a bike frame, the self-balancer’s frame is actually completely custom. The handlebars and banana seat were purchased new as aftermarket parts for old-style bicycles. Powering the two wheels is a pair of 24v brushed motors, conveniently each one came with a 6:1 reduction gearbox pre-installed. The wheels are a complete compilation of parts not intended to go together. The BMX bike rims were laced to mountain bike front hubs. The hubs have provisions for a disk brake but [XenonJohn] mounted a large toothed pulley there instead. A belt then connects the drive motor gearboxes to the pulleys completing the drive train.

The LiFePO4 battery kit was purchased off eBay and puts out 24v and 15AH using eight cells. These batteries alone were a hefty percentage of the projects cost, costing nearly $300. Controlling the vehicle is an Arduino Mega that makes use of the FreeSix IMU library. The Mega receives inputs via I2C from a Sparkfun SEN-10121 board that contains both accelerometers and gyroscopes along with turn switches connected to the ‘brake’ levers on the handlebars. The Arduino then sends commands to the 25 amp Sabertooth motor controllers to keep you balanced as you buzz around town.

Video below.

Continue reading “Self Balancing Vehicle Inspired By Bicycles Of Yesteryear”

Cheap Unique CNC Plotter

DIY Plotter Strives For Cheapest CNC Machine Title

Arguably, taking the plunge into the CNC hobby does indeed have potential to end up costing more than expected. But that should be no reason to deter anyone from doing it! [msassa11] shows us how to do it in full effect with his definitely unique and extremely inexpensive homemade plotter.

The design goal was to keep this machine as low-cost as possible while at the same time using materials that can be found around any tinkerer’s shop or at least purchased locally. First of all, you’ll notice that there is only one linear rail, yes, one rail for two axes of movement. The single rail was removed from an inkjet printer along with the mating bushing that originally allowed the print head to move freely back and forth. A threaded rod lead screw does double duty here, keeping the X axis carriage from rotating around the linear rail and also transmitting the force to move the carriage back and forth. Both the lead nut and bushings are held in place with cast-epoxy mounts.

uniquecnc-closeup
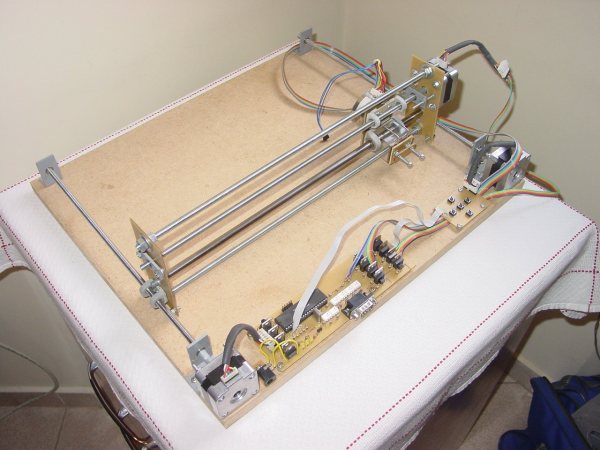
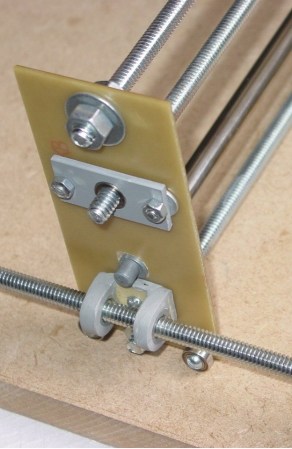
As unique as the X axis is, the Y sure gives it a run for its money. No linear rails are used, two lead screws are the only things that maintain the gantry’s position. To prevent gravity from pulling the gantry down and bending the Y axis lead screws, there are a couple of bearings on either side that ride along the bed of the machine. The frame material also hits the cheap target, it’s made from blank PCB board. A PIC16F877 microcontroller and a handful of mosfets control the motors. [msassa11] built this control circuit but admits it’s performance is not that great, it’s noisy and loses torque at high speed.

[msassa11] certainly proves that he is extremely resourceful with the outcome of this project. He met his goal of building an extremely inexpensive CNC machine. Check out his project page to see a ton of photos and find out what other unconventional ideas he used to build his machine.

Undershield, DIY Arduino Battery Shield

Battery Shield Mounts Underneath The Arduino

So, what do you do when your Arduino project needs to operate in a remote area or as a portable device? There are LiPo battery shields available, and although they may work well, recharging requires access to a USB port. You can also go the 9v battery route plugged into the on-board regulator of the Arduino but the low mAh rating of a 9v won’t allow your project to stay running for very long. [AI] needed a quick-change battery option for his Arduino project and came up with what he is calling the AA Undershield.

As the name implies, AA sized batteries are used in the project, two of them actually. Yes, two AA batteries at 1.5v each would equal only 3 volts when connected in series. The Arduino needs 5v so [AI] decided to use a MAX756 DC-to-DC step-up regulator to maintain a steady stream of 5v. This article has some nice graphs showing the difference in performance between a 9v battery being stepped down to 5v verses two AA’s being bumped up to 5v.

The ‘under’ in Undershield comes from this shield being mounted underneath the Arduino, unlike every other shield on the planet. Doing so allows use of a standard 0.100″-spaced prototype PCB and is an easy DIY solution to that odd-sized space between the Arduino’s Digital 7 and 8 pins. The Arduino mounts to the Undershield via its normal mounting holes with the help of some aluminum stand offs.

[AI] did a great job documenting his build with schematics and lots of photos so that anyone that is interested in making one for themselves can do so with extreme ease.

DIY FPV Goggles

DIY FPV Goggles Born From Necessity Of Cheapness

So now that you’ve built your quadcopter and can fly it without crashing most of the time, what’s next? How about metaphorically hopping into the pilot’s seat with a First Person View setup. Great idea… but the cost of the required gear can be a deal breaker. FPV goggles alone range from the low to high hundreds. [sneaky] was using his laptop screen for his FPV setup and decided to try to make is own FPV goggles.

The display is just a small LCD screen that was purchased off eBay. Craft foam board was cut, bent, glued and duct taped to form a box about the same size as the LCD screen which is also secured to the box with duct tape. [sneaky] then cut the opposite side of the box to fit his face before he lined it with 1/2″ weatherstripping foam. Staring at an LCD screen just inches from your face is sure to cause some discomfort. A Fresnel lens inserted in between the user’s eyes and the LCD reduces eye strain to make long flights tolerable. The whole assembly is then held to your noggin via a recycled ski goggle strap.

In the end, [sneaky] likes his new goggles better than his old laptop screen and sun shade setup. The goggles aren’t too heavy and he can wear them comfortably for a while. We’ve seen a DIY FPV goggle setup in the past that uses individual lenses for each eye rather than one large Fresnel lens.

Water Softener Monitor

Water Softener Level Detector Keeps You Out Of Trouble With Wife

Some households have water supplies that contain higher than desired levels of minerals. This condition is called hard water. There is nothing harmful about hard water but it does leave mineral deposits on pipes and appliances and makes cleaning a little bit more difficult. The solution is to have a water softener system which is basically a tank filled with salt that the household water passes through. This tank has to be refilled about every month and [David] was catching a little flak from his wife because he kept forgetting to fill it. He then set out to do what any great husband would do and built a Water Softener Monitor that reports the quantity of salt in the basement tank up to the living quarters.

[David] started thinking that he should test the salinity of the water to determine if salt needed to be added but after thinking about it for a while decided against it because any metal in that salty water would surely corrode. A non-contact approach would be to use an IR distance sensor mounted to the top of the tank and measure the distance to the pile of salt that slowly lowers as it dissolves into the water. In this case, he used a Sharp GP2D12 that can measure accurately from 10 to 80cm.

Continue reading “Water Softener Level Detector Keeps You Out Of Trouble With Wife”

CNC Router Skateboard

Self Replicating Skateboard…. What?!?!?

[Bart] and company over at Pumping Station One make a lot of skateboard decks. They wanted to build a CNC Router that was not only portable but had a size that was optimized for cutting skateboard decks. The project got a little out of hand and the CNC Router ended up also being a skateboard! As crazy as that sounds, the craziest part may be that they built it in just one night.

CNC Router Skateboard
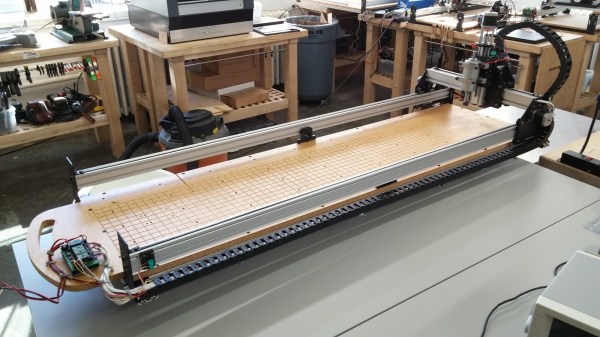
The project started off with some stock Shapeoko 2 parts. Achieving the deck-cutting size required shortening the X Axis and tripling the length of the Y Axis resulting in a 250 x 1200mm work envelope. The DC spindle used accepts ER16 collets and has a fully variable speed control. The stand alone selectable 24/48 volt power supply has a neat DIY handle to ease transportation. Even though the router itself has skateboard trucks, it also has a handle at the front so it’s easy to grab and drag behind you.

The guys that built this admit that, as a skateboard, it is kind of crappy. They do go on to mention that a 230lb dude was able to ride it without incident. As a project, however, they hit their goals on the head, ending up with an easily-transportable dedicated skateboard-deck-making CNC Router.

mobilesolderingworkstation

Mobile Soldering Workstation Sets Up Quickly, Lets You Get To Work

Who here hasn’t put off soldering up a project because pulling out and setting up all your soldering gear is a pain? A lot of hobbyists don’t have a dedicated workbench for such activities and their gear may even be packed away somewhere inconvenient. [laxap] has come up with a solution using a plastic toolbox as a base for his Mobile Soldering Workstation.

[laxap] started with a regular off the shelf toolbox that has a lid and three drawers on the bottom. Although the Weller soldering iron base fit nicely in the bottom drawer, it did necessitate ditching the middle drawer for clearance. The compartmentalized top drawer is unmodified and holds parts and supplies in an orderly fashion.

Lifting up the lid of the box reveals a removable tray, which as intended, is a great spot to store tools such as a multimeter and wire strippers. The area under the removable tray is reserved for a power strip and power cord storage. A hole drilled in the side of the toolbox allows quick access to the power strip’s plug, a quick pull out and plug in is all that is necessary to get this workstation powered up.

That front flip up panel was made specifically for this project. Not only does it help keep the drawers from sliding open during transport, it also holds a lamp to aid in seeing what you’re doing! A bent aluminum strip acts as a latch to keep the panel in position.

It’s a pretty simple idea but it certainly gets the job done and makes soldering a whole bunch more convenient. If you like mobile workbenches, you may want to check out this all-wooden shelf style or one that features integrated solderless breadboards.