GPS Bike Tracker

GPS Tracker Tracks Your Stolen Bike

Bikes are great for cruising through congested cities but there is a serious downside to pedaling your two-wheeler around… bike theft. It’s a big deal, for example, yearly estimates for stolen bikes in NYC are in the 60,000 – 100,000 range. Only an extremely small percentage of those are ever recovered. [stbennett] just got himself a halfway decent bike and is not too interested in having it stolen, and if it is stolen, he wants a way to find it so he built himself a GPS tracker for his bike.

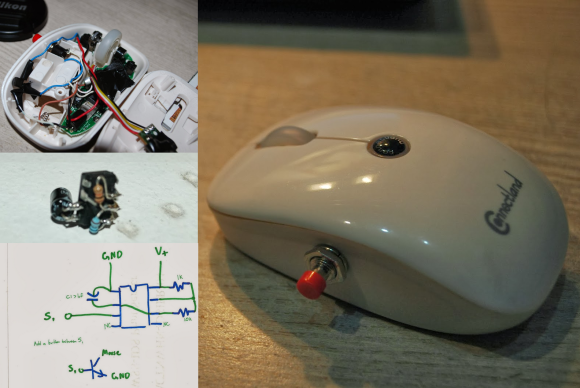
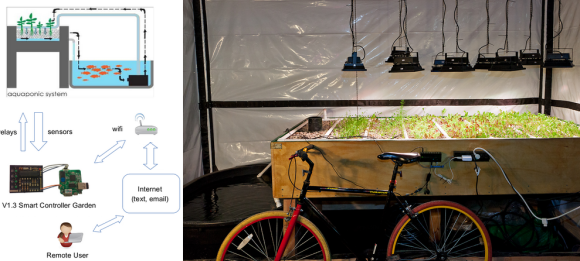
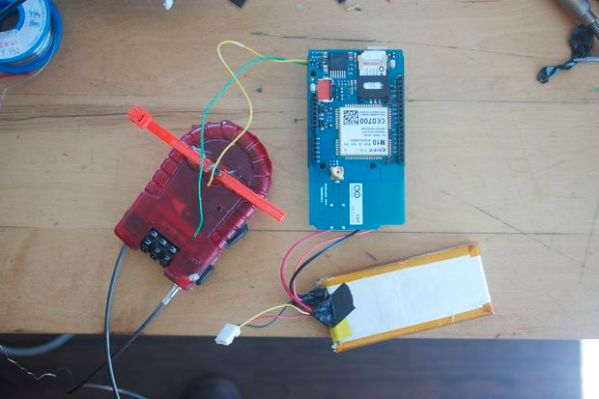
The entire project is Arduino-based. It uses a GSM Shield and a GPS module along with a few other small odds and ends. A 2-cell LiPo battery provides the required power for all of the components. It’s pretty neat how this device maintains an extremely long battery life. The metal cable of the bike lock is used as a conductor in the circuit. When the cable is inserted and locked into the lock housing a circuit is completed that prevents electricity from passing through a transistor to the Arduino. In other words, the Arduino is off unless the bike cable is cut or disengaged. That way it is not running 24/7 and draining the battery.

The entire system works like this, once the bike lock cable is cut, the Arduino wakes up and gives a 15 second delay before doing anything, allowing the legitimate user to reconnect the bike lock and shut down the alarm system. If the bike lock is not re-engaged, the unit starts looking for a GPS signal. At that time it will send out SMS messages with the GPS location coordinates. Punching those numbers into Google Maps will show you exactly where the bike is.

Of course your other option is to park your bike where nobody else can access it, like at the top of a lamp pole.

Rapid Fire Mod For A Wireless Mouse

Rapid Fire Wireless Mouse

Sometimes changing your computer mouse can be uncomfortable for a while until you get used to the replacement. It may also take some time to get used to new features or the lack of features the new mouse has. [Jon] bought an awesome wireless mouse that he really likes but it is missing one critical feature: rapid fire for gaming. He previously modded his old wired mouse to have a rapid fire button using a 555 timer. That worked fine as the mouse ran off the USB’s 5 volts, and that’s the voltage the 555 timer needed. The new wireless mouse has a 1.5 volt battery and can not support the 555 timer. What’s a gamer to do?

[Jon] searched around the ‘net but could not find any wireless rapid fire mods. Eventually, he did find a low-voltage variation called the LMC555 and ordered a few for his project. The new wireless mouse was taken apart in order to find out how the mouse buttons work. In this case, the signal pin is pulled low when the mouse button is pushed. Now that it is known how the mouse button works, just a couple of resistors, a capacitor, an NPN transistor and a push button switch are all that are necessary to finish up this mod. When the push button is pressed, the LMC555 timer activates the transistor in order to ground the mouse button signal pin. This happens to the tune of 1236 times a minute! That is a lot of rapid firing.

The few components were soldered up neatly and packed into the limited spare area inside the mouse. A hole drilled in the side of the mouse’s housing holds the new rapid fire push button in an ergonomically pleasing location.

Earlier, we mentioned [Jon] has done this mod before on a wired mouse. He learned about that project here on Hackaday. Check it out if your wired mouse is craving a rapid fire button.

Video after the break…

Continue reading “Rapid Fire Mod For A Wireless Mouse”

Super Nice CNC Router Build Leaves Little To Be Desired

Aluminum CNC Router
[Enzo] wrote in to tell us about his recently completed CNC Router (translated). This is an excellent high-quality, all-aluminum build with no cut corners. The work envelope is a respectable 340 by 420 mm with 80 mm in the Z direction. Linear ball bearings make for smooth travel and lead screws with both axial and radial bearings give a solid foundation of accurate and repeatable movements.

Aluminum CNC Router

We’ve had a bunch of CNC Router projects on Hackaday in the past, including other nicely made aluminum ones, but [Enzo] is the only one who spent just as much effort on his computer and machine control system as he did on the CNC machine itself. The computer, which is running Windows and Mach3, is an all-in-one style build that starts out with an old LCD screen from a broken laptop. Along with the reused screen, a very small ETX form factor motherboard was stuffed inside a custom made plexiglass enclosure. A Compact Flash card handles the storage requirements.

Underneath the monitor is another great looking custom made enclosure which houses the stepper motor drivers. There are 3 switches on the front panel to send main’s power out to the PC, spindle and an AUX for future use. On the back panel there are D-sub connectors for each stepper motor, the limit switches and the PC connection. Oh yeah, by the way [Enzo] designed his own bipolar motor drivers (translated) and sent the design out for fabrication. These boards use an A4989 IC and mosfets to control the motors. The schematics are on his site in case you’d like to make some yourself.

Continue reading “Super Nice CNC Router Build Leaves Little To Be Desired”

Aquaponic System Uses Arduino For Consistent Performance

Smart Aquaponics

Food is just one of those things that we need to survive. Plants can grow on their own without human intervention but the quantity and quality of the crop will vary from year to year. Even elaborate farms can have good and bad years due to variables such as weather, disease, bugs, pollution and soil condition.

There is a system called Aquaponics that attempts to control those variables. Aquaponics combines aquaculture (raising aquatic animals) with hydroponics (growing plants in water). The Aquaponic system tries to emulate what happens in nature without the variation; water-based animals eat plants and excrete waste and that waste is used as food for plants.

[Kijani Grows] has built an Aquaponic setup and added a smart controller that is made out a bunch of stuff you would not normally associate with a garden. Their are several sensors in the system that measure water flow, tank level, water quality and dissolved oxygen. An Arduino monitors these sensors and reports the information back to a $20 router running OpenWRT. All of the recorded data is also stored for review later. Software on the router determines what needs to be adjusted in the enclosed ecosystem. The router communicates this information back to the Arduino which in turn controls the water pumps, heaters, fish feeder and lighting. And as if that wasn’t enough, the control system can be set up to send out messages via email, SMS or social media.

Table-Top MAME Cabinet Dubbed “The Water Cooler”

Table-Top MAME Cabinet Dubbed "The Water Cooler"

[Greg] wanted to build a MAME cabinet. Not one of those monsters that take up a bunch of floor space, mind you: this one would be table-top size. He admits he could have made his game system out of new, currently available, off the shelf parts, but part of the design goal was to reuse old hardware that was kicking around. It was important to [Greg] to keep unnecessary waste out of the landfill.

An old PC motherboard was pulled out of an old desktop. It’s not fast enough for use as an everyday computer but it will be totally sufficient for a MAME machine. The project’s screen is an old 13 inch Gateway CRT computer monitor. Notice that it is turned 90 degrees so that it is taller than it is wide. This screen orientation lends itself better to certain types of games. The monitor’s plastic casing was removed before some measurements were taken. SketchUp was used to plan a basic idea of the cabinet.

Table-Top MAME Cabinet Dubbed "The Water Cooler"

The controls consist of a joystick and 4 buttons. During past projects, [Greg] has had experience with the least-expensive arcade controls available on eBay. Well, you get what you pay for. This time around he ponied up the extra cash for some high quality controls and is satisfied with the purchase. These buttons were wired straight into a PS/2 keyboard so the computer does not know the difference between the keyboard keys or recently added controls… another great re-use of old obsolete hardware.

The cabinet is made from MDF, glued and screwed together. The limited wood working tools available wasn’t a show stopper for this dedicated builder. For example, the square hole for the joystick was made by removing most of the material with a spade drill bit before using a chisel to clean up the edges. Doing it this way was a little tedious, but you have to do what you have to do sometimes. Once the entire cabinet was finished, several coats of paint were added in a yellow and blue water-theme. Black rubber molding finishes off the edges of the cabinet nicely.

Bubble Displays Are Increasing In Resolution

PipeDreams 3 bubble display

[Bruce] has created a pretty cool bubble display that is capable of showing recognizable photographs of people. This entire art installation is no slouch at 3-stories tall! This one resides at the Ontario Science Centre in Toronto, Canada. If you are unfamiliar with bubble displays, they consist of several clear vertical tubes filled with a liquid. A pneumatic solenoid valve mounted at the bottom of each tube allows a controlled amount of air to enter the tube at a very specific time. Since the air weighs less than the liquid, the air bubble travels up the tube of liquid. Interesting patterns can be made if these bubbles are timed correctly. This setup uses a Linux-based computer with custom control software to manipulate the valves.

[Bruce] didn’t start off making super-complex bubble displays. This is actually his 3rd go-around and with 96 individual tubes and capable of displaying raster images, it is the most complicated so far. His first creation consisted of 16 tubes, each larger in diameter than the most recent creation. With the larger diameter and less number of tubes came less resolution and the ability to only display simple shapes. Version 2 had twice as many tubes, 32 this time. In addition to doubling the tube quantity [Bruce] also colored the fluid in the tubes, not all the same color but all the colors of the rainbow, from red to violet. Still, this version could not show raster images. It appears to us that the third time’s the charm! Video after the break….

Continue reading “Bubble Displays Are Increasing In Resolution”

Homemade Soldering Station for cheap Soldering Irons

Homemade Soldering Stations For Cheapy Irons

Everyone reading this post has had a cheap pencil-style soldering irons that plug straight into the wall at some point in their lives. Even if you’ve upgraded to a professional soldering station, you probably have one of these cheapy irons kicking around that are slow to heat up to an unknown temperature. [Pantelis] thought he could fix the latter problem with his Homemade Soldering Station for those basic soldering irons.

Since the intent of the soldering station was to control the temperature of the iron [Pantelis] had to figure out a way to sense the temperature. He did this by strapping a thermocouple to the iron near the tip. The wires were run back through the handle and then along the power cord.

Homemade Soldering Station for cheap Soldering Irons

Both the stock iron plug and the thermocouple leads plug into a box put together specifically for this project. In the photo you’ll notice the LCD screen that displays both the target and actual temperatures. The linear potentiometer below the LCD screen is used to set the target temperature. The LED to the right alerts the operator that the iron is heating up and when it is at temperature and read to go.

Although there isn’t a lot of schematic or part list information, [Pantelis] did do a good job photo documenting his build. Check it out, it’s worth a gander.