A wooden scary face dispensing candy through its mouth

Automatic Candy Dispenser Takes The Hard Work Out Of Halloween

Halloween may be behind us, but we couldn’t resist showing you [Mellow]’s latest project: an automatic candy dispenser that takes the hard work out of serving trick-or-treaters. It’s a cool build that might serve as an inspiration for next year’s Halloween project, or perhaps for a different occasion altogether: think birthday parties or Valentine’s Day. After all, when’s a bad time to give sweet treats to someone you love?

The basic concept is a scary face, made of wood, that disgorges a set amount of candy through its mouth after you press its nose. The dispensing mechanism is made from 3D printed mechanical parts as well as a piece of drain pipe. Candy is stored in the pipe, with a servo-operated flap releasing a set amount each time the nose is pressed. [Mellow] cleverly designed the flap to be somewhat flexible, so that it wouldn’t crush any candy bars that got stuck between it and the pipe.

A Wemos D1 Mini reads out the nose switch and drives the candy-dispensing servo, as well as a further two servos that swivel the eyes left and right for an additional visual effect. The original idea was to have the eyes swiveling all the time, but because the mechanism turned out to be quite loud [Mellow] changed the code to only move them during the candy-dispensing process.

We’ve seen several designs for automated candy dispensers over the years, ranging from a Jack-o-Lantern that holds enough candy to feed a small city, to a beautifully over-engineered machine more suitable as a Valentine’s Day gift.

Continue reading “Automatic Candy Dispenser Takes The Hard Work Out Of Halloween”

A man playing an accordion-like instrument made from two Commodore 64s

The Commodordion Turns Two C64s Into A Single Instrument

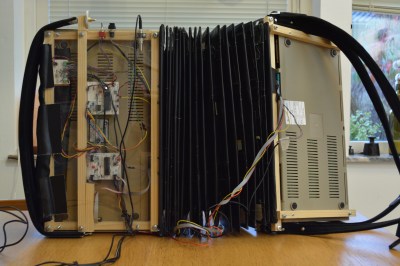
One of the main reasons the Commodore 64 became an icon of the 1980s was its MOS 6581 “SID” sound chip that gave it audio capabilities well beyond those of other microcomputers of the 8-bit era. The SID became something of a legend by itself among chiptune enthusiasts, and several electronic instruments have been designed that generate their sound through a SID chip. Not many of those look anything like traditional musical instruments however, so we’re delighted to see [Linus Ã…kesson]’s new project: two Commodore 64s joined back-to-back using a bellows to form a wonderful new instrument called the Commodordion. It can be played in a similar way one plays a traditional accordion: melodies are played with the right hand, chords with the left, and volume is adjusted by varying the pressure in the bellows.

An accordion-like instrument made from two Commodore 64sThe two computers are basically unmodified, and boot Commodore BASIC like they normally would. A custom circuit board emulates a cassette player and provides the software to be loaded into memory. Both computers run the same program and can be switched between the right-hand and left-hand role by pressing a specific key combination. The software in question is called Qwertuoso, and basically maps notes and various features of the SID chip to keys on the Commodore’s keyboard.

Of course, it’s the bellows that makes this instrument a true member of the accordion family. Made from 5.25″ floppy disks and sticky tape, it forms a more-or-less air-tight system linking the two computers. The airflow in the bellows is measured through a microphone placed next to the air intake: the amount of noise generated is roughly proportional to the amount of air being expelled or inhaled. This information is then used to modulate the volume generated by the two SID chips.

By [Linus]’s own admission it’s not the most ergonomic of instruments, so we’re doubly impressed by the amount of skill he demonstrates while playing it in the video embedded below. It’s not the first time either that he has turned a Commodore 64 into a musical instrument: he previously built a church organ and a theremin. While the Commodordion may look complicated, it’s actually much simpler in construction than a mechanical accordion.

Continue reading “The Commodordion Turns Two C64s Into A Single Instrument”

A solar inverter that asks for a password on its display

Decompiling Software To Fix An Old Solar Inverter

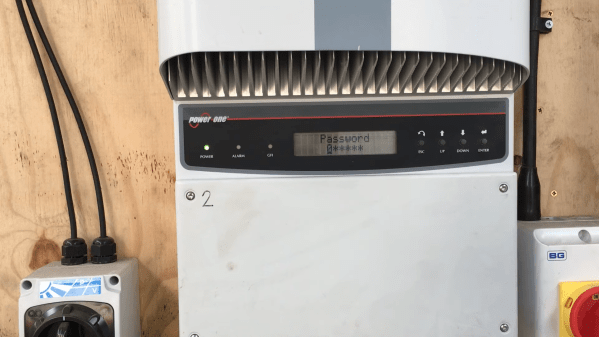
It’s a fact of life that electronic devices become obsolete after a few years. Sometimes this is because technology has moved on, but it can also happen that a perfectly functional device becomes near-useless simply because the original manufacturer no longer supports it. When [Buy It Fix It] found a pair of second-hand Power-One Aurora solar inverters, he ran into an issue for which he needed access to the service menu, which happened to be password-protected. The original manufacturer had ceased to exist, and the current owner of the brand name was unable to help, so [Buy It Fix It] had to resort to reverse engineering to find the password.

Thanks to the Wayback Machine over at the Internet Archive, [Buy It Fix It] was able to download the PC software bundle that originally came with the inverters. But in order to access all features, a password was required that could only be obtained by registering the unit with the manufacturer. That wasn’t going to happen, so [Buy It Fix It] fired up dnSpy, a decompiler and debugger for .NET programs. After a bit of searching he found the section that checked the password, and by simply copying that section into a new program he was able to make his own key generator.

With the service password now available, [Buy It Fix It] was able to set the inverter to the correct voltage setting and hook it up to his solar panels. Interestingly, the program code also had references to “PONG”, “Tetris” and “tiramisu” at various places; these turned out to be Easter eggs in the code, containing simple versions of those two games as well as a photo of the Italian dessert.

Inside the software archive was also another program that enabled the programming of low-level functions within the inverter, things that few users would ever need to touch. This program was not written in .NET but in C or something similar, so it required the use of x32dbg to look at the machine code. Again, this program was password-protected, but the master password was simply stored as the unencrypted string “91951” — the last five digits of the manufacturer’s old phone number.

The inverter was not actually working when [Buy It Fix It] first got it, and his repair video (also embedded below) is also well worth watching if you’re into power electronics repair. Hacking solar inverters to enable more features is often possible, but of course it’s much easier if the entire design is open source.

Continue reading “Decompiling Software To Fix An Old Solar Inverter”

A digital caliper connected to a tablet computer

Custom Interface Adds USB And Wi-Fi To Digital Calipers

Although old-school machinists typically prefer the mechanical vernier scale on their trusty calipers, many users nowadays buy calipers with a digital readout. These models often come with additional features like differential measurements, or a “hold” function for those situations where you have to maneuver the instrument somewhere deep inside a machine. Another useful feature is a data link that lets you log your measurements on a computer directly instead of manually entering all the values.

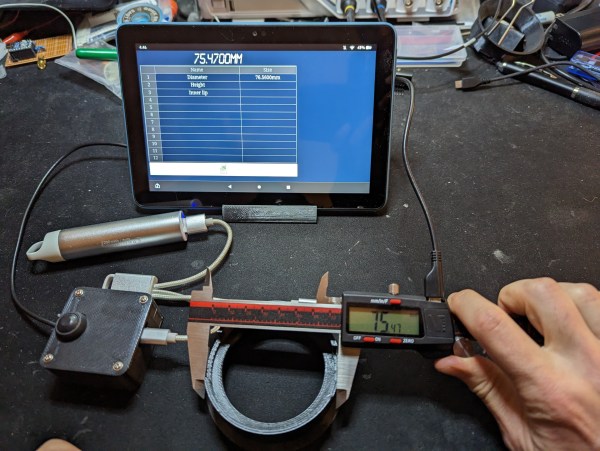
The VINCA-branded caliper that [Liba2k] bought has such a data link feature, which requires a USB adapter that’s sold separately. There is a micro-USB connector on the tool itself, but instead of implementing a USB interface, this is used to carry a proprietary serial protocol — a design decision that ought to be classified as a felony if you ask us. Rather than buying the official USB adapter, [Liba2k] decoded the protocol and built his own interface called VINCA Reader that can connect through either USB or Wi-Fi.

The serial format turned out to be a simple serial bus that clocks out 24 bits at a time. In order to adapt its 1.2 V signal level to the 3.3 V used by an ESP32, [Liba2k] designed a simple level shifter circuit using a handful of discrete components. The ESP can communicate with the computer through its Wi-Fi interface, for which [Liba2k] wrote a spreadsheet-like application; alternatively, an ordinary USB cable can be connected to emulate a keyboard for use with any other software.

With its added Wi-Fi feature, the VINCA Reader is actually more complete than the official USB adapter, and will probably be cheaper as well. The serial interface appears to be common to all caliper manufacturers, although many went for a more sensible connector than micro-USB. An automated readout system is particularly handy if you have to make thousands of similar measurements.

An infographic showing a tap with a sensor and a flow meter display

2022 Hackaday Prize: Sensible Flow Helps You Keep Track Of Your Water Usage

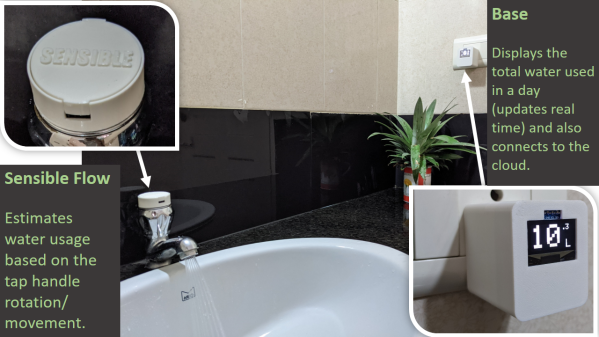
Safe, clean drinking water is a scarce resource that shouldn’t be wasted. But it’s not always easy to see how much you’re using when you turn on the tap: is it one liter a minute? Is it ten? How much do you actually use when washing your hands or brushing your teeth? If you’d like to get some hard data on your water usage, have a look at [Josh EJ]’s Sensible Flow project. It contains designs for a set of sensors that measure your water consumption and a convenient little display that shows the total amount consumed.

The most obvious way of measuring water consumption is to install an off-the-shelf flow meter onto your pipe, which is something that Sensible Flow supports. But probably the most interesting part of the project is a design for a non-invasive flow sensor that you can simply attach to any type of tap. This sensor contains a nine-axis inertial measurement unit (IMU) that detects how far you’ve twisted, turned or tilted the handle, and uses that information to estimate the amount of water flow. You will need to perform an initial calibration step using a timer and measuring cup, but you won’t have to rip open your plumbing just to keep track of your water usage.

Both types of sensors are powered by a coin cell battery that is estimated to work for about one year, thanks to a power-efficient Arduino Pro Mini and a BlueTooth Low Energy (BLE) module to communicate with the base station. The base station plugs into a wall socket and shows the total water consumption on a small one-inch OLED display. STL files for the enclosures are available on the project page, along with detailed circuit diagrams that show how all the parts are connected.

We’ve seen several water flow measurement systems for home use, such as this neat ESP8266-based shower water monitor. If you prefer just a simple visual reminder to turn off the tap, have a look at this LED gadget.

Continue reading “2022 Hackaday Prize: Sensible Flow Helps You Keep Track Of Your Water Usage”

Automatic Flag Waver Lets You Show Your Loyalty Without Getting Tired

A flag is a great tool to show your loyalty to a country, a sports team or even a philosophical movement. But there’s not so much you can actually do with a flag: you can either hang it somewhere, or wave it around to attact others to your cause. [Mellow] found that waving quickly becomes tiresome, and decided to design a machine that automates this task for him.

A man holding a device that waves two small rainbow flagsNow there’s a bit more involved in designing a proper flag-waver than simply moving the flag back and forth. Ideally, the fabric should flow smoothly from side to side and show both sides equally, in the same way a human would do when waving a big flag around. After a bit of research [Mellow] decided on a design that generates a rather complex motion using just a single servo: the mast is tilted from left to right, while gravity ensures the flag rotates around its axis. It’s probably best demonstrated visually, as [Mellow] does in the video embedded below.

The flag-waving mechanism is designed in Fusion 360 and 3D printed using white filament. Inside a little square box is a Wemos D1 Mini, powered by a lithium battery scavenged from a vape pen, as well as a battery management system and a power switch. The servo sits on top of the box and holds the flag in a little socket that allows the mast to rotate freely. [Mellow] also went one step further and built a two-flag waver, which still uses only one servo but creates two opposite motions through a set of spur gears. Both waver types bring a lively atmosphere to their surroundings, and we can actually imagine them being useful in places like sports bars.

Automatic flag-wavers are still rare devices, and as far as we can tell this is only the second one we’ve seen, after this hat-mounted example. That is, if you don’t count the automatic “flag” on this mailbox.

Continue reading “Automatic Flag Waver Lets You Show Your Loyalty Without Getting Tired”

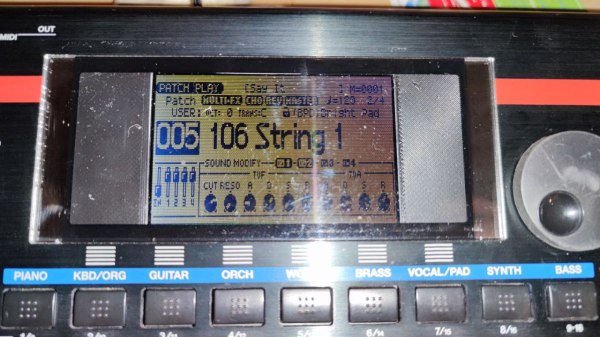
An LCD mounted inside a Roland synthesizer

Reverse-Engineering A Display Protocol To Repair A Roland Synthesizer

Repairing electronic devices isn’t as hard as it used to be. Thanks to the internet, it’s easy to find datasheets and application notes for any standard component inside your gadget, and once you’ve found the faulty one, you simply buy a replacement from one of a million web shops — assuming you don’t end up with a fake, of course. When it comes to non-standard components, however, things get more difficult, as [dpeddi] found out when a friend asked him for help in repairing a Roland Juno-G synthesizer with a broken display.

The main issue here was the fact that the display in question was a custom design, with no replacement or documentation available. The only thing [dpeddi] could figure out from the service manual was the basic pinout, which showed a parallel interface with two lines labelled “chip select” — an indication that the display contained two separate controllers. But the exact protocol and data format was not documented, so [dpeddi] brought out his logic analyzer to try and decode the signals generated by the synthesizer.

After a bit of trial and error, he was able to figure out the protocol: it looked like the display contained two KS0713-type LCD controllers, each controlling one half of the screen. Finding a compatible replacement was still proving difficult, so [dpeddi] decided instead to decode the original signals using a microcontroller and show the picture on a modern LCD driven by SPI. After some intial experiments with an ESP32, it turned out that the task of reading two reasonably fast parallel buses and driving an even faster serial one was a bit too much for the ESP, so [dpeddi] upgraded to a Raspberry Pi Pico. This worked a treat, and thanks to a 3D-printed mounting bracket, the new display also fit snugly inside the Roland’s case.

The Pico’s code is available on [dpeddi]’s GitHub page, so if you’ve also got a dodgy display in your Juno-G you can simply download it and use it to plug in a brand-new display. However, the method of reverse-engineering an existing display protocol and translating it to that of a new one is pretty universal and should come in handy when working with any type of electronic device: say, a vintage calculator or multimeter, or even another synthesizer.