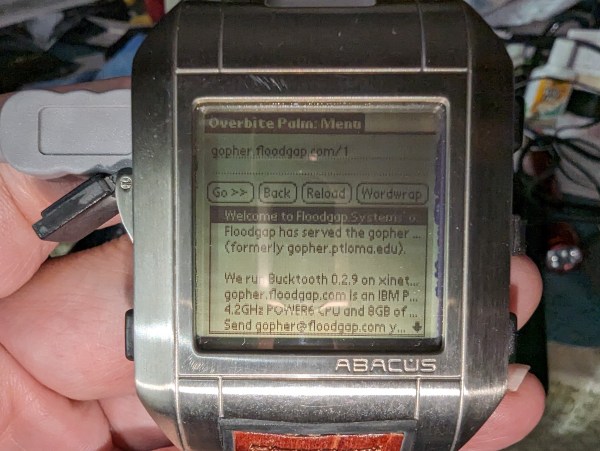
A Fossil Wrist PDA running the Overbite Gopher browser

Mobile Gopher Client Brings Fossil Wrist PDA Online

Like many new technologies, smartwatches needed a few iterations before they became useful enough for the average person. Early examples were too clunky and limited to be of use to anyone but geeks who wanted to show off their “next big thing”. The 2005 Fossil Wrist PDA was a prime example: although impressively compact for its time, its limited battery life and poor feature set made it obsolete as soon as it was released. But since it ran on Palm OS, it offered plenty of opportunity for hacking: Palm expert [Cameron Kaiser] has upgraded his Wrist with internet access.

While Palm OS 4 natively supports TCP/IP networking, this component was deleted from the Wrist version to save memory. In any case, the only viable network interface would have been the USB port, which isn’t too convenient for a watch. Not to be deterred, [Cameron] worked out a way to add network support back into the Wrist: he used the IR port on a Palm m505 to send a copy of its own network drivers to the watch. This works because both devices run the same basic OS version on the same CPU type; the only drawback is that the network setup dialog doesn’t respond correctly to the Wrist’s different set of buttons. Continue reading “Mobile Gopher Client Brings Fossil Wrist PDA Online”

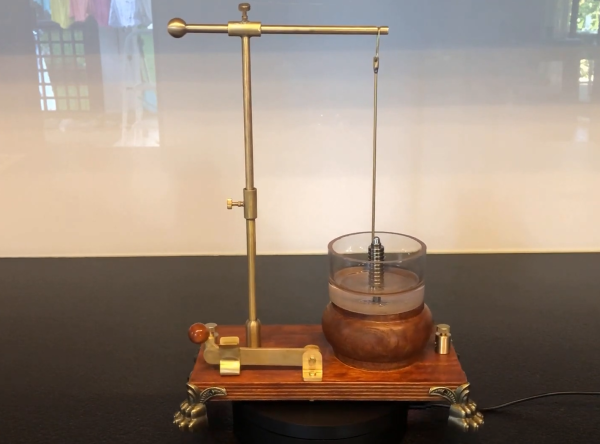
A brass-and-wood replica of Faraday's motor

Replicating Faraday’s 200-Year-Old Electric Motor

Although new electric motor types are still being invented, the basic principle of an electric motor has changed little in the past century-and-a-half: a stator and a rotor built of magnetic materials plus a bunch of strategically-placed loops of wire. But getting even those basic ingredients right took a lot of experimentation by some of the greatest names in physics. Michael Faraday was one of them, and in the process became the first person to turn electricity into motion. [Markus Bindhammer] has recreated Faraday’s experiment in proper 19th century style.

Back in 1821, the very nature of electricity and its relation to magnetism were active areas of research. Tasked with writing an article about the new science of eletromagnetics, Faraday decided to test out the interaction between a current-carrying wire and a permanent magnet, in a setup very similar to [Markus]’s design. A brass wire is hanging freely from a horizontal rod and makes contact with a conductive liquid, inside of which a magnet is standing vertically. As an electric current is passed through the wire, it begins to rotate around the magnet, as if to stir the liquid.

[Markus]’s video, embedded after the break, shows the entire construction process. Starting from rods and sheet metal, [Markus] uses mostly hand tools to create all basic parts that implement the motor, including a neat knife switch. Where Faraday used mercury as the conductive liquid, [Markus] uses salt water – cheaper and less toxic, although it does eventually eat up the brass wire through electrolysis.

While not particularly useful in itself, Faraday’s motor proved for the first time that electric energy could be converted into motion through magnetism, leading to a whole class of ultra-simple motors called homopolar motors. It would be a while before experiments by the likes of Tesla and Ferraris led to modern AC motors. If you don’t like your motors magnetic, you can use electrostatics instead.

Continue reading “Replicating Faraday’s 200-Year-Old Electric Motor”

Four large nixie tubes showing the number 2

[Dalibor Farný]’s Enormous Nixies Light Up Contemporary Art Museum

Nixie tubes come in many shapes and sizes, but in only one color: the warm orange glow that makes them so desirable. They don’t usually come in large numbers, either: a typical clock has four or six; a frequency counter perhaps eight or nine. But some projects go bigger – a lot bigger in [Dalibor Farný]’s case. He built an art installation featuring more than a hundred jumbo-sized nixie tubes that make an entire wall glow orange.

This project is the brainchild of renowned installation artist [Alfredo Jaar], who was invited to create an exhibition at the Hiroshima Museum of Contemporary Art. Its title, Umashimenkana, means “we shall bring forth new life” and refers to a poem describing the birth of a child amid the suffering and despair following the atomic bombing of Hiroshima. Visitors to the exhibit experience a dark room where they see a wall of orange numbers count down to zero and erupt into a waterfall of falling zeroes.

Nixie tube expert [Dalibor] was the go-to person to implement such an installation – after all, he’s one of very few people making his own tubes. But even he had to invest a lot of time and effort into scaling them up to the required 150 mm diameter, with 135 mm tall characters. We covered his efforts towards what was then known as the H-tube project two years ago, and we’re happy to report that all of the problems that plagued his efforts at the time have since been solved.
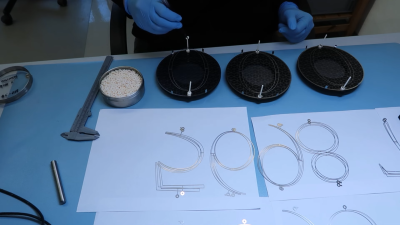
The cathodes of a large nixie tube being assembledOne of the major issues was keeping the front of the tubes intact during manufacture. Often, [Dalibor] and his colleagues would finish sealing up a tube, only for the front to pop out due to stress build-up in the glass. A thorough heating of the entire surface followed by a slow cooling down turned out to be the trick to evening out the stress. All this heat then caused oxidation of the cathodes, necessitating a continuous flow of inert gas into the tube during manufacture. Those cathodes already had to be made stronger than usual to stop them from flexing, and the backplate light enough to keep everything shock resistant. The list goes on.

After ironing out these quirks, as well as countless others, [Dalibor] was finally able to set up a small-scale production line in a new workshop to get the required 121 tubes, plus spares, ready for shipment to Japan. The team then assembled the project on-site, together with museum staff and the artist himself. The end result looks stunning, as you can see in the excellent video embedded below. We imagine it looks even better in real life – if you want to experience that, you have until October 15th.

You might remember [Dalibor] from his excellent video on nixie clock fault analysis – which we hope won’t be necessary for Umashimenkana. He might be able to make your favorite shape into a nixie tube, too. Thanks for the tip, [Jaac]!

Continue reading “[Dalibor Farný]’s Enormous Nixies Light Up Contemporary Art Museum”

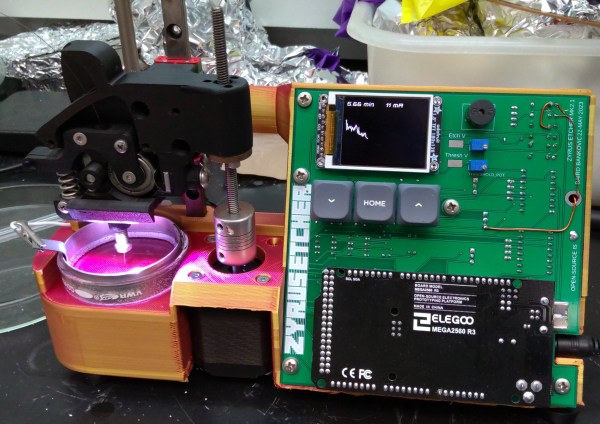
A homebrew machine that dips a piece of wire into an etching solution

Homebrew Probe Tip Etcher Makes Amazingly Sharp Needles

There’s a simple reason why high-tech gadgets like PCs, TVs and smartphones are so cheap: they’re mass-produced. By spreading out huge engineering costs over equally huge production volumes, the cost per item can remain quite low. The flipside to this is that devices with only a small niche market can be extremely expensive even when they seem quite simple.

[Baird Bankovic], an undergrad student at Penn State University, discovered this when he was working with a scanning tunneling microscope (STM). He noticed that the machines used to make STM probes, a pretty straightforward process, cost north of $7500. This inspired him to make a cheap STM probe etching machine using simple homebrew parts.

If you’re not familiar with scanning tunneling microscopy, here’s how it works in a nutshell: a very sharp tungsten needle is positioned a few nanometers above the sample to be analyzed, and a small voltage is applied between the two. Through an effect known as quantum tunneling, a small current then flows between the probe and the sample. By observing this current and scanning the probe across the sample, a three-dimensional picture of the surface is obtained with sub-nanometer-level resolution.

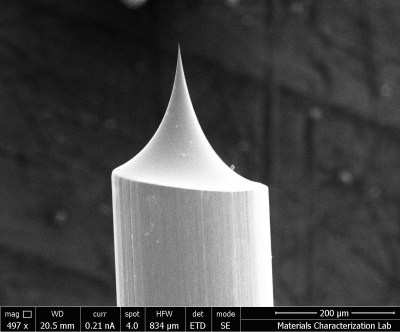
One of the many factors that determine the quality of the image is the sharpness of the probe. Because a very sharp probe is extremely fragile and prone to oxidation, they are typically made on-site by dipping a piece of tungsten wire into an etchant in one of those costly machines.

That’s exactly what [Baird]’s device does: a Petri dish on a 3D printed frame holds a volume of sodium hydroxide solution, while a jackscrew Z-stage moves a probe holder up and down. A piece of tungsten wire is dipped into the solution and a voltage is applied to start the etching process. Because most of the etching happens at the liquid’s surface, the wire gets progressively thinner at that point until it snaps and the bottom half drops off. When this happens, the current through the wire changes rapidly, which triggers the machine to pull the wire out of the solution and stop the etching process.

The resulting probes have a well-defined sharp tip with an estimated width of about 50 nanometers — pretty impressive for such a simple setup. The entire hardware design is open source and available on [Baird]’s GitHub page for anyone to replicate. Nanometer-sized needles might only seem useful for those with a professional STM setup, but they also come in handy for all kinds of homebrew atomic-scale imaging experiments.

Continue reading “Homebrew Probe Tip Etcher Makes Amazingly Sharp Needles”

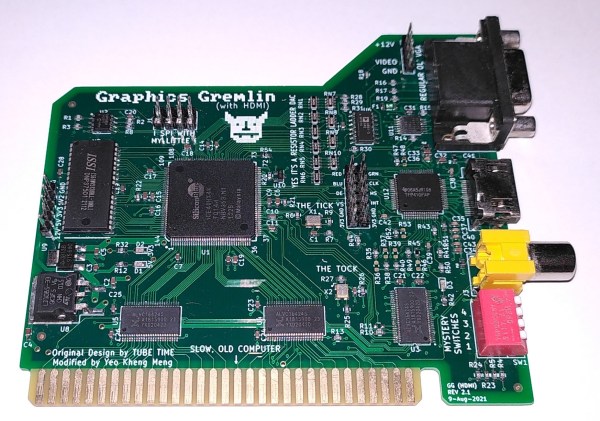
An 8-bit ISA card with VGA, HDMI and composite video connectors

Upgraded Graphics Gremlin Adds HDMI Video To Vintage PCs

Although new VGA-equipped monitors can still be bought, the old standard is definitely on its way out by now, being replaced by high-speed digital interfaces like HDMI and DisplayPort. It therefore makes sense to prepare for a VGA-less future, as [Yeo Kheng Meng] is doing. He designed an 8-bit ISA display card with an HDMI output that enables even the very first generation of PCs to talk to a modern monitor.

The design is based on the Graphics Gremlin by [Tube Time], which is an 8-bit ISA display card that aims to be software compatible with the obsolete MDA and CGA display formats while outputting a clean VGA signal. [Yeo Kheng Meng] modified the board by adding a TFP410 HDMI bus driver and replacing the rarely-used 9-pin RGBI connector with an HDMI version. He also updated the HDL code for the Lattice FPGA, which forms the heart of the graphics card, to account for the new digital output. While he was at it, he also added a few features he was missing in the original product, such as the option to select the color displayed in MDA mode and the ability to output both HDMI and composite video at the same time.

The video below shows the updated card in action in an IBM 5155 Portable PC. The HDMI port connects to a modern monitor, while the composite video output is routed to the 5155’s internal CRT as well as a small color monitor on top. The IBM thereby joins a small list of retro computers that have received an HDMI upgrade — the Amiga 500 and PlayStation 2 being other examples. HDMI might be a lot more complex to work with than VGA, but luckily there are open-source implementations that do much of the work for you.

Continue reading “Upgraded Graphics Gremlin Adds HDMI Video To Vintage PCs”

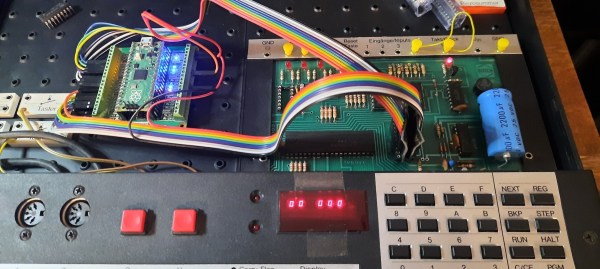
A Pi Pico on a breakout board inside a Busch 2090 educational computer

Pi Pico Becomes SRAM For 1981 Educational Computer

Ever since the Raspberry Pi Pico was introduced in early 2021 we’ve seen the tiny Pi being used for an astonishing variety of applications. It has powered countless clocks, gadgets, games, and accessories for all kinds of computers old and new. [Michael Wessel] has recently added an interesting new application in the “old computer” category, by turning a Pico into a 2114 SRAM emulator for his Busch 2090, an educational computer system from 1981.

The pinout of the classic 2114 SRAM chip is quite simple: ten address lines, four data lines, Write Enable and Chip Select. Since the 3.3 V Pico is more or less 5V tolerant, you could directly connect these signals to its GPIO ports, but [Michael] considered it more reliable to use level shifters between the two voltage domains. He experimented with a few standard level shifter circuits, but quickly realized he had to take the 33 kΩ pulldown resistors on the Busch 2090’s address bus into account. By just adding a couple of resistors to the Pico’s ports he could make completely passive level shifters, which worked just fine since the system’s clock frequency is only 500 kHz.

[Michael] demonstrates his RAM replacement in the video below, with a neat set of blinkenlights showing the data being shuttled around in real time. He has plans to make a proper PCB for his project, as well as to enable all kinds of neat features by modifying the system’s RAM in real time. This is of course not limited to the Busch 2090: the 2114 chip was widely used in the 1980s, so the PicoRAM can probably be used in many other systems of the era. Code for the Pi is available on GitHub if you’re interested in trying this for yourself. If you’d like to find out what programming a Busch 2090 feels like, you can emulate one using an Arduino.

Continue reading “Pi Pico Becomes SRAM For 1981 Educational Computer”

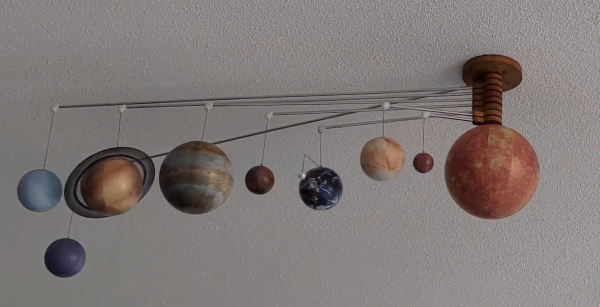
A ceiling-mounted model of the Solar System

Ceiling-Mounted Orrery Is An Excercise In Simplicity

Ever since humans figured out that planets move along predetermined paths in the heavens, they have tried to make models that can accurately predict their motion. Watchmakers and astronomers worked together to create orreries: mechanical contraptions that illustrate the positions of all planets and the way they move over time through complex gear systems. [Illusionmanager] continues the orrery tradition but uses a different approach: he built a beautiful ceiling-mounted model of our Solar System without a gearing system.

The mechanism that makes his Solar System tick is deceptively simple. All planets can move freely along their orbit’s axis except Mercury, which is moved along its orbit by a motor hidden inside the Sun. Once Mercury has completed a full revolution, a pin attached to its arm will begin pushing Venus along with it. After Venus has completed a full circle, its own pin will pick up Earth, and so on all the way to Neptune. Neptune is then advanced to its correct location as reported by NASA, after which Mercury’s motion is reversed and the whole procedure is repeated in the opposite direction to position Uranus.

Cycling through the entire Solar System in this way takes a long time, which is why the planets’ positions are only updated once a day at midnight. An ESP32, also hidden inside the Sun, connects to the internet to retrieve the correct positions for the day and drives the motor. The planet models, sourced from a museum shop, are hanging from thin aluminium tubes attached to wooden mounts made with a desktop CNC machine.

[Illusionmanager] made a detailed Instructables page showing the process of making a miniature version of the mechanism using just laser-cut wooden parts, as an update to a version we featured earlier. We really like the simplicity of this design, which stands in stark contrast to the huge gear trains used in more traditional orreries.

Continue reading “Ceiling-Mounted Orrery Is An Excercise In Simplicity”