A self-service checkout computer game

Practice Your Shopping Skills With This Self-Service Checkout Game

Self-service checkouts have become a common feature in supermarkets the world over, a trend accelerated by the coronavirus pandemic. While some may lament the loss of human contact, others relish the opportunity to do their own scanning: with a bit of practice, self-service can provide for a very fast checkout experience. Assuming, of course, that the machine recognizes each product, the built-in weight sensor works correctly, and you don’t get selected for a random check.

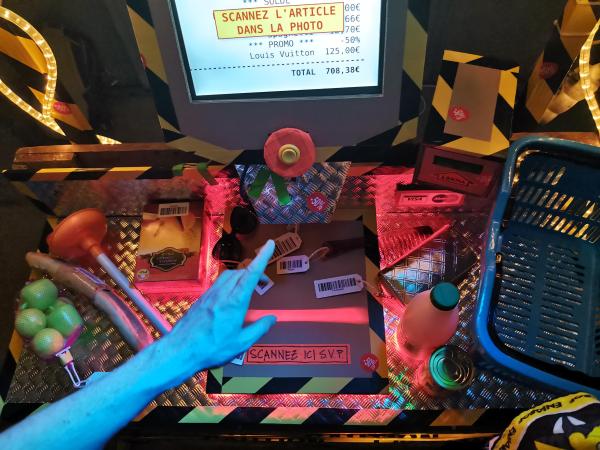
If you want to practice your checkout game without spending loads of money, you might want to have a look at [Niklas Roy] and [Kati Hyyppä]’s latest project: Bonprix is a game where the goal is to scan as many items as possible within a 90-second time limit. Installed at the Eniarof DIY festival, it’s designed to resemble a typical supermarket checkout with a display, a barcode scanner and a shopping basket filled with random items. The screen indicates which item should be scanned next; if you’re too slow, the checkout will begin to offer discounts, which you obviously don’t want. When the 90 seconds are over, the machine spits out a receipt indicating your total score.

The checkout desk is made from wooden pallets and cardboard; inside is a laptop running Linux, with a handheld barcode scanner attached via USB. An LED strip provides a beam of bright red light to indicate the scanning area, and turns green when a barcode is successfully scanned. Arduinos control the LEDs and the big red-and-yellow “start” button, while a thermal printer from an ATM prints the receipts at the end of each game.

Apart from a bit of fun, the Bonprix project tries to address questions relating to consumer culture and self-checkouts: is it fair to let customers do their own work? Should they be paid for it? Is it even ethical to encourage people to spend as much as possible?

While this is the first time we’ve seen a self-service checkout computer game, we’ve done a few deep dives into the fascinating technology of barcodes that makes it all possible. Check this out!

Continue reading “Practice Your Shopping Skills With This Self-Service Checkout Game”

A modified Palm IIIc mainboard

LED Backlight Brings Vibrant Colors To Classic Palm PDAs

Back in the days before the widespread adoption of smartphones, Palm was the market leader in PDAs. If you had one of those you’ll probably remember taking notes by writing those funky “Graffiti” characters and tapping your stylus onto, usually, a green monochrome screen. Some models even came with a battery-hungry backlight, but for the ultimate display experience you had to buy the Palm IIIc that came with a backlit full-colour display.

While revolutionary for its time, it was hampered by the technology available: the CCFL backlight took a second to start up, and even with the screen at full brightness it was rather dim by today’s standards. [TobleMiner] fixed these issues by designing a module to retrofit an LED backlight into your Palm IIIc.

A Palm IIIc showing the main menu on its displayThe new backlight consists of a long, thin PCB designed to fit exactly where the CCFL tube sits. The PCB holds twenty-one white LEDs along with their current-limiting resistors to provide even illumination from top to bottom. A little MOSFET soldered onto the mainboard ensures the new backlight also correctly responds to the device’s “brightness” setting. [TobleMiner] recommends to remove the bulky CCFL transformer from the Palm’s mainboard to disable the corresponding circuitry and save a bit of weight.

The end result is understandably hard to capture on camera, but apparently gives the screen more vibrant colours. In any case, this might be a useful hack for anyone with a Palm IIIc with a broken backlight, though we can’t remember if that was a common issue. If you’re among those who still use original Palm devices, you might like this Palm-compatible Bluetooth keyboard. Don’t have a classic PDA? You can also run PalmOS on modern custom hardware.

A home-made vacuum pickup tool

Hackaday Prize 2022: Salvaged Pumps And Hoses Make A Neat Vacuum Pickup Tool

Anyone who’s ever assembled a PCB full of tiny SMD parts will have found that tweezers are not always the best tool when it comes to accurate positioning. Thin, flat components like microcontrollers can be awkward to pick up securely, while small resistors and capacitors have a tendency of snapping out of your tweezers’ grip and flying off into the sunset (or your carpet). Vacuum pickup tools can be a great help, but the most convenient models, with an electric air pump and a foot switch, can be a bit expensive. [sjm4306] shows that it doesn’t have to be that way: he built his “VacPen” mostly from reused components.

At the heart of the project is a little vacuum pump with a pen-like device hooked up to it through a flexible hose. The tip of the pen holds a pickup nozzle that came from a cheap manual pick and place tool. Both the pump and pen were salvaged from some gas analysis instrument that [sjm4306] tore apart a long time ago; the pen is especially convenient since it comes with a built-in brush-like filter that can trap any debris or tiny parts that might be accidentally swallowed.

The VacPen controller is housed inside a neat 3D printed enclosure that holds a custom PCB with an ATtiny microcontroller. The pump can be operated either through a foot switch, or by pressing on the touch-sensitive pad on top of the enclosure. [sjm4306] made this by soldering a wire to a copper penny and sticking it on the inside of the lid: simple, effective and cheap.

As you can see in the video embedded below, the VacPen is perfectly capable of picking up any kind of SMD component, and just as importantly, immediately releasing it at the desired moment. If you’re new to SMD technology, we can recommend this tutorial by [Bil Herd] that covers vacuum tweezers as well. If you’re more into automating vacuum pickup tools, this cool robot might be of your interest.

Continue reading “Hackaday Prize 2022: Salvaged Pumps And Hoses Make A Neat Vacuum Pickup Tool”

A putter with an Arduino attached to its shaft

This Golf Club Uses Machine Learning To Perfect Your Swing

Golf can be a frustrating game to learn: it takes countless hours of practice to get anywhere near the perfect swing. While some might be lucky enough to have a pro handy every time they’re on the driving range or putting green, most of us will have to get by with watching the ball’s motion and using that to figure out what we’re doing wrong.

Luckily, technology is here to help: [Nick Bild]’s Golf Ace is a putter that uses machine learning to analyze your swing. An accelerometer mounted on the shaft senses the exact motion of the club and uses a machine learning algorithm to see how closely it matches a professional’s swing. An LED mounted on the club’s head turns green if your stroke was good, and red if it wasn’t. All of this is driven by an Arduino Nano 33 IoT and powered by a lithium-ion battery.

The Golf Ace doesn’t tell you what part of your swing to improve, so you’d still need some external instruction to help you get closer to the ideal form; [Nick]’s suggestion is to bundle an instructor’s swing data with a book or video that explains the important points. That certainly looks like a reasonable approach to us, and we can also imagine a similar setup to be used on woods and irons, although that would require a more robust mounting system.

In any case, the Golf Ace could very well be a useful addition to the many gadgets that try to improve your game. But in case you still end up frustrated, you might want to try this automated robotic golf club.

Continue reading “This Golf Club Uses Machine Learning To Perfect Your Swing”

A modern Tamagotchi PCB design and built-up prototype

Classic Tamagotchi Is Reincarnated In Modern Hardware

If you thought that Tamagotchis were a late ’90s fad that has faded from most people’s memory by now, you’d be wrong: the franchise is still alive and well today, with new models being released regularly. But even the original model from 1996, known as Tamagotchi P1, is being kept alive by a small group of enthusiasts. When ROM dumps of the original hardware began floating around the internet a couple of years ago, even those without the real thing could run these virtual pets in an emulator.

But the whole idea of the Tamagotchi hardware was that it was portable enough to carry around anywhere. If you’re among those who missed that part of the Tamagotchi experience, you’ll be pleased to know that [JC] designed OpenTama: a portable hardware platform that runs an emulated version of the original Tamagotchi P1 software. It’s about as close as it gets to those first-generation virtual pets, but with several additions that make your life easier.

The software platform is [JC]’s TamaLib which we featured last year; in effect it’s an open-source emulator that allows the Tamagotchi ROM to run on a variety of modern hardware platforms. It also contains several additional options like the ability to save and restore your progress or to select customized ROMs. The OpenTama hardware, meanwhile, is a proper 21st-century reimplementation of the original: a small, egg-sized PCB sporting an STM32 microcontroller driving an LCD or OLED display, powered by a 100 mAh battery that can be recharged through a USB-C port.

OpenTama is not limited to the TamaLib software, either: as an open-source general-purpose platform, it can also be used as a learning tool for embedded programming, so if you’ve always wanted to program your own virtual pet, or are simply looking to build a fancy egg timer, OpenTama’s GitHub page is the way to go. We’ve seen quite a few neat Tamagotchi-like projects recently: this 3D-printed one comes with a nice retro LCD screen, while this one’s giant size ensures you don’t forget to feed it.

Continue reading “Classic Tamagotchi Is Reincarnated In Modern Hardware”

A small plastic case with an OLED screen showing a side-scrolling game

Game & Light Brings Video Games To Your Keychain

If you’re old enough to remember the 1990s, you might recall the sheer variety of portable gaming platforms that were around in those days. There was of course the ubiquitous hand-held Game Boy, and if you preferred something larger you could buy a Sega Game Gear or an Atari Lynx. But you could also go smaller with tiny LCD games like Nintendo’s Game and Watch series, with some versions literally the size of a wristwatch.

With all of these having gone the way of the dodo, we’re happy to see that [grossofabian] kept the tiny game world alive by designing the Game & Light: a tiny hand-held games platform with an OLED screen. It’s small enough to attach to your keychain and comes with an LED to act as a mini flashlight. But of course the main feature is the included video game: currently it comes with LEDboy Adventures, a side-scrolling platformer similar to Google’s T-Rex Game. A USB port can be used to recharge the device as well as to upload new games.

The Game & Light is housed in a 3D printed case and powered by a lithium-ion capacitor that can store enough charge for around 40 minutes of play time. The CPU is an ATtiny402 eight-pin microcontroller with 4 kB of flash, which is just enough to store the entire LEDboy game. Although currently only one game is available, the system is fully programmable and open sourced, so anyone who feels up to the task can help develop new games for the platform.

If you like keychain-sized games, you’re in luck: we recently featured the solar-powered but otherwise similar RunTinyRun. A bit longer ago, creative hackers even managed to squeeze entire Game Boys into tiny packages.

Continue reading Game & Light Brings Video Games To Your Keychain”

A square PCB with a Raspberry Pi Pico mounted in the middle

Identify Radioactive Samples With This DIY Gamma-Ray Spectrometer

If you’re a radiation enthusiast, chances are you’ve got a Geiger counter lying around somewhere. While Geiger counters are useful to detect the amount of radiation present, and with a few tricks can also distinguish between the three types of radiation (alpha, beta and gamma), they are of limited use in identifying radioactive materials. For that you need a different instrument called a gamma-ray spectrometer.

Spectrometers are usually expensive and complex instruments aimed at radiation professionals. But it doesn’t have to be that way: physics enthusiast [NuclearPhoenix] has designed a hand-held gamma spectrometer that’s easy to assemble and should fit in a hobbyist budget. It outputs spectral plots that you can compare with reference data to identify specific elements.

A PCB with a sensor wrapped in black tape
The scintillator and sensor are wrapped in black tape to block out ambient light.

The heart of the device is a scintillation crystal such as thallium-doped sodium iodide which converts incoming gamma rays into visible light. The resulting flashes are detected by a silicon photomultiplier whose output is amplified and processed before being digitized by a Raspberry Pi Pico’s ADC. The Pico calculates the pulses’ spectrum and generates a plot that can be stored on its on-board flash or downloaded to a computer.

[NuclearPhoenix] wrote a convenient program to help analyze the output data and made all design files open-source. The hardest part to find will be the scintillation crystal, but they do pop up on auction sites like eBay now and then. We’ve featured an Arduino-based gamma spectrometer before; if you’ve always wanted to roll your own scintillators, you can do that too. Continue reading “Identify Radioactive Samples With This DIY Gamma-Ray Spectrometer”