How To Build Anything With Delrin And A Laser Cutter — Advanced Tricks

Everyone wants their prototypes to look polished, as opposed to looking like 3D-squirted weekend afterthoughts. The combination of Delrin and a Laser Cutter make this easy, especially if you learn a few tricks-of-the-trade that will make your assemply pop, both functionally and aesthetically.

Last time, we took a deep dive into fabbing parts with Delrin and a typical 40-watt laser cutter, and we discussed some of the constraints of the material. More recently, [Gerrit] gave us a close look at the material itself. It’s been about a year since our first post, but the list of tricks is far from complete.

If you’re just getting started in this domain, let me introduce you to two classic techniques for laser-cut prototypes: puzzle-piecing and the T-nut-slotting. While these techniques are tried-and-true, I hope, fearless reader, that they’ll leave you hungry for something cleaner, something more refined. If that’s the case, read on!

Continue reading “How To Build Anything With Delrin And A Laser Cutter — Advanced Tricks”

3-Phase BLDC Motor Controller Will Run You $20 In Parts

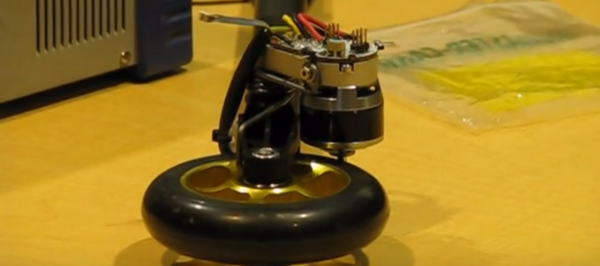
If you’re an active shopper on RC websites, you’ll find tiny motors spec’ed at hundreds of watts while weighing just a few grams, like this one. Sadly, their complementary motor controllers are designed to drive them at a high speed, which means we can only hit that “520-watt” power spec by operating in a max-speed-minimum-torque configuration. Sure, that configuration is just fine for rc plane and multicopter enthusiasts, but for roboticists looking to drive these bldc motors in a low-speed-high-torque configuration, the searches come up blank.

The days in the dust are coming to an end though! [Cameron] has been hard at work at a low cost, closed-loop controller for the robotics community that will take a conventional BLDC airplane motor and transform it into a high end servo motor. Best of all, the entire package will only run you about $20 in parts–including the position sensor!

“Another BLDC motor controller?” you might think. “Surely, I’ve seen this before“. Fear not, faithful readers; [Cameron’s] solution will get even the grumpiest of engineers to crack a smile. For starters, he’s closing the loop with a Melexis MLX90363 hall effect sensor to locate the rotor position. Simply glue a small magnet to the shaft, calibrate the magnetic field with one revolution, and–poof–a wild 14-bit encoder has appeared! Best of all, this solution costs a mere $5 to $10 in parts.

Next off, [Cameron] uncovered a little-known secret of the ATMEGA32u4, better known as the chip inside the Arduino Leonardo. It turns out that this chip’s TIMER4 peripheral contains a feature designed exclusively for 3-phase brushless motor control. Complementary PWM outputs are built into 3 pairs of pins with configurable dead time built into the chip hardware. Finally, [Cameron] is pulsing the FETs at a clean 32-Khz — well beyond the audible range, which means we won’t hear that piercing 8-Khz whine that’s so characteristic of cheap BLDC motor controllers.

Curious? Check out [Cameron’s] firmware and driver design on the Githubs.

Of course, there are caveats. [Cameron’s] magnetic encoder solution has a few milliseconds of lag that needs to be characterized. We also need to glue a magnet to the shaft of our motor, which won’t fly in all of our projects that have major space constraints. Finally, there’s just plain old physics. In the real world, motor torque is directly proportional to current, so stalling an off-the-shelf bldc motor at max torque will burn them out since no propeller is pushing air through them to cool them off. Nevertheless, [Cameron’s] closed loop controller, at long last, can give the homebrew robotics community the chance to explore these limits.

Manipulators Get A 1000x FPGA-based Speed Bump

For humans, moving our arms and hands onto an object to pick it up is pretty easy; but for manipulators, it’s a different story. Once we’ve found the object we want our robot to pick up, we still need to plan a path from our robot hand to the object all the while lugging the remaining limbs along for the ride without snagging them on any incoming obstacles. The space of all possible joint configurations is called the “joint configuration space.” Planning a collision-free path through them is called path planning, and it’s a tricky one to solve quickly in the world of robotics.

These days, roboticists have nailed out a few algorithms, but executing them takes 100s of milliseconds to compute. The result? Robots spend most of their time “thinking” about moving, rather than executing the actual move.

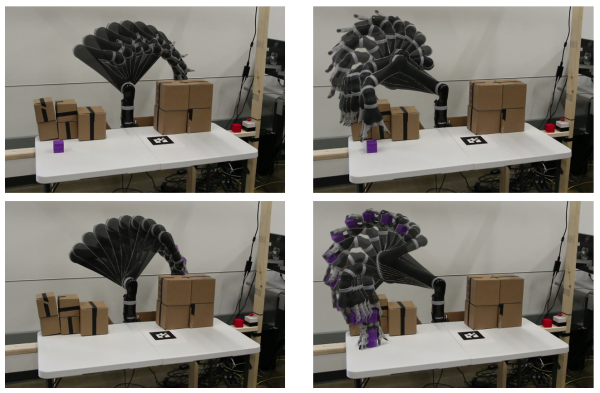
Robots have been lurching along pretty slowly for a while until recently when researchers at Duke University [PDF] pushed much of the computation to hardware on an FPGA. The result? Path planning in hardware with a 6-degree-of-freedom arm takes under a millisecond to compute!

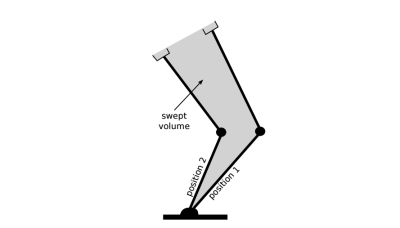
It’s worth asking: why is this problem so hard? How did hardware make it faster? There’s a few layers here, but it’s worth investigating the big ones. Planning a path from point A to point B usually happens probabilistically (randomly iterating to the finishing point), and if there exists a path, the algorithm will find it. The issue, however, arises when we need to lug our remaining limbs through the space to reach that object. This feature is called the swept volume, and it’s the entire shape that our ‘bot limbs envelope while getting from A to B. This is not just a collision-free path for the hand, but for the entire set of joints.

swept_volume
Image Credit: Robot Motion Planning on a Chip

Encoding a map on a computer is done by discretizing the space into a sufficient resolution of 3D voxels. If a voxel is occupied by an obstacle, it gets one state. If it’s not occupied, it gets another. To compute whether or not a path is OK, a set of voxels that represent the swept volume needs to be compared against the voxels that represent the environment. Here’s where the FPGA kicks in with the speed bump. With the hardware implementation, voxel occupation is encoded in bits, and the entire volume calculation is done in parallel. Nifty to have custom hardware for this, right?

We applaud the folks at Duke University for getting this up-and-running, and we can’t wait to see custom “robot path-planning chips” hit the market some day. For now, though, if you’d like to sink your teeth into seeing how FPGAs can parallelize conventional algorithms, check out our linear-time sorting feature from a few months back.

Continue reading “Manipulators Get A 1000x FPGA-based Speed Bump”

Formlabs Form 1+ API Now Available On Github

Since 2014, the Form 1+ has been serving a faithful community of avid resin-oriented 3D printer enthusiasts. With an API now released publicly on Github, it’s time for the Form 1+ to introduce itself to a crew of eager hardware hackers.

Exposing an interface to the printer opens the door to a world of possibilities. With the custom version of PreForm that arrives with this release, a whopping 39 different properties are open for tuning, according to the post on Reddit. Combining these newly-accessible parameters with a sufficient number of hackers, odds are good that the community will be able to quickly converge on stable settings for 3rd party resins. (We’re most excited to see the Homebrew PCBs community start exposing their UV-sensitive PCBs with this hardware setup.)

Heads-up: poking around in this brave new world is almost certain to void your warranty, but if you’re eager to get SpacewΛr up-and-running, it might just be worth it.

Taming The Beast: Pro-Tips For Designing A Safe Homebrew Laser Cutter

Homebrew laser cutters are nifty devices, but scorching your pals, burning the house down, or smelling up the neighborhood isn’t anyone’s idea of a great time. Lets face it. A 60-watt laser that can cut plastics offers far more trouble than even the crankiest 3D-printers (unless, of course, our 3D printed spaghetti comes to life and decides to terrorize the neighborhood). Sure, a laser’s focused beam is usually pointed in the right direction while cutting, but even an unfocused beam that reflects off a shiny material can start fires. What’s more, since most materials burn, rather than simply melt, a host of awful fumes spew from every cut.

Despite the danger, the temptation to build one is irresistible. With tubes, power supplies, and water coolers now in abundance from overseas re-sellers, the parts are just a PayPal-push away from landing on our doorsteps. We’ve also seen a host of exciting builds come together on the dining room table. Our table could be riddled with laser parts too! After combing through countless laser build logs, I’ve yet to encounter the definitive guide that tells us how to take the proper first steps forward in keeping ourselves safe while building our own laser cutter. Perhaps that knowledge is implicit to the community, scattered on forums; or perhaps it’s learned by each brave designer on their own from one-too-many close calls. Neither of these options seems fair to the laser newb, so I decided to lay down the law here.

Continue reading “Taming The Beast: Pro-Tips For Designing A Safe Homebrew Laser Cutter”

Vise Quick-Release Locks Down Your Parts For Good

If you’ve ever used a drill press, you too may be familiar with the dreaded airborne parts. Just a bit farther to drill and then–kachunk–a siezed drill bit sends your part spinning, or worse, hurling across the garage. We quickly learn to clamp down our parts in a vise. Unfortunately, even a vise wont prevent the drill bit from skipping around and drilling wherever it wants.

Fortunately [djpolymath] has a fix. From spare bicycle quick-releases, he’s cobbled together a vise clamp that’s both dead simple and dead clever. On a bicycle, the quick-release is a painless mechanism for taking off the wheels in a pinch without using fancy tools. [djpolymath] has simply relocated a few spares onto a vise. With a few washers for spacing them out correctly, he’s set–and so is the vise.

Now that things are getting a bit safer in the garage shop, why not try a few other tool modifications, like this jigsaw table.

Continue reading “Vise Quick-Release Locks Down Your Parts For Good”

Open Source SLA Printer Software Slices From The Browser

Resin-based SLA printers need a different slicing algorithm from “normal” melted-plastic printers. Following their latest hackathon, [Matt Keeter] and [Martin Galese] from Formlabs have polished off an open source slicer, and this one runs in your browser. It’s Javascript, so you can go test it out on their webpage.

Figuring out whether or not the voxel is inside or outside the model at every layer is harder for SLA printers, which have to take explicit account of the interior “empty” space inside the model. [Matt] and [Martin]’s software calculates this on the fly as the software is slicing. To do this, [Matt] devised a clever algorithm that leverages existing hardware to quickly accumulate the inside-or-out state of voxels during the slicing.

[Matt] is stranger to neither 3D mesh manipulation nor Hackaday. If you’re just getting started in this realm, have a look at Antimony, [Matt’s] otherworldly CAD software with a Python interface to get your feet wet with parametric 3D modeling.