SCCSI2SD card in a sound board

Making A Vintage 1990s Sound Board Do Rapid Fire Silently

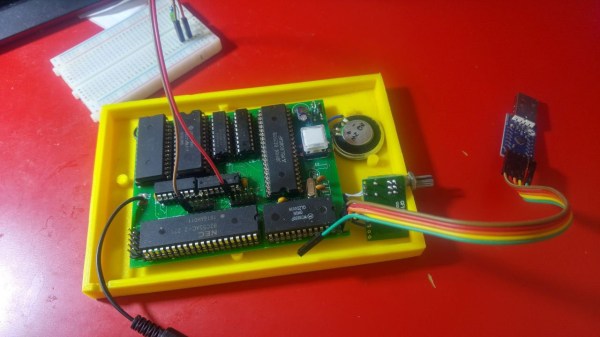
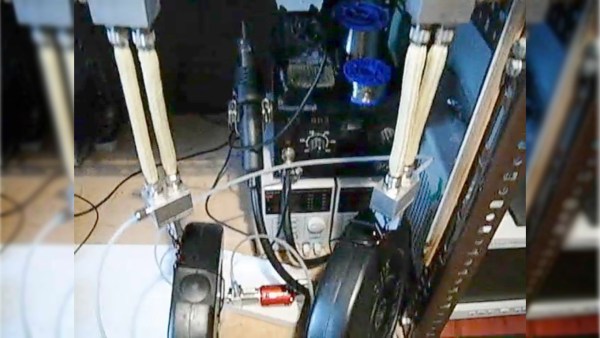
Sometimes a mix of old and new is better than either the old or new alone. That’s what [Brad Carter] learned when he was given an old 1990s sound board with a noisy SCSI drive in it. In case you don’t know what a sound board is, think of a bunch of buttons laid out in front of you, each of which plays a different sound effect. It’s one way that radio DJ’s and podcasters intersperse their patter with doorbells and car crash sounds.

Before getting the sound board, [Brad] used a modern touchscreen table but it wasn’t responsive enough to get a machine gun like repetition of the sound effect when pressing an icon in rapid succession. On the other hand, his 1990s sound board had very responsive physical buttons but the SCSI hard drive was too noisy. He needed the responsiveness of the 1990s physical buttons but the silence of modern solid state storage.

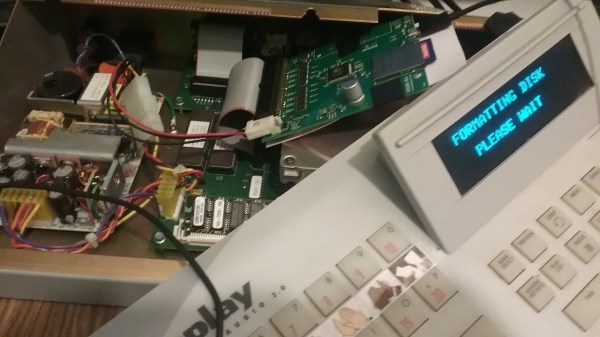
And so he replaced the sound board’s SCSI drive with an SD card using a SCSI2SD adaptor. Of course, there was configuration and formatting involved along with a little trial and error to get the virtual drive sizes right. To save anyone else the same difficulties, he details all his efforts on his webpage. And in the video below you can see and hear that the end result is an amazing difference. Pressing the physical buttons gives instant sound and in machine gun fashion when pressed in rapid succession, all with the silence of an SD card.

A SCSI2SD card is a nice off-the-shelf solution but if you want something a little more custom then there’s a Raspberry Pi SCSI emulator and one which uses a Teensy with a NCR5380 SCSI interface chip.

Continue reading “Making A Vintage 1990s Sound Board Do Rapid Fire Silently”

4-Mation Fish eats fish

Time-Stretching Zoetrope Animation Runs Longer Than It Should

3D printers have long since made it easy for anyone to make 3-dimensional zoetropes but did you know you can take advantage of a 4th dimension by stretching time? Previously the duration of a zoetrope animation would be however long it took for the platform to rotate once. To make it more interesting to watch for longer, you filled out the scene by creating concentric rings of animations. [Kevin Holmes], [Charlie Round-Turner], and [Johnathan Scoon] have instead come up with a way to make their animations last for multiple rotations, longer than three in one example. If you’re not at all familiar with these 3D zoetropes, you might want to check out this simpler version first.

4-Mation Fish eats Fish zoetropeTheir project name is 4-Mation but they call the time-stretching technique, animation multiplexing. One way to implement it is to use one long spiral beginning in the center and ending on the platform’s periphery. It’s the spiral path which make the animation last longer.

In their Fish eating Fish animation, the spiral is of a small fish which exits a clam at the center and gets progressively larger as it spirals outward until it swallows another fish located in a ring at the periphery. Of course when you look at it with a properly timed strobe light, there is no spiral. Instead, it appears as though a bunch of fish move more-or-less radially out from the center. The second video embedded below walks through the animation step-by-step, making it easier to follow the intricacies of what’s going on.

Other features include built-in strobe lighting and both manual and phone app control. This project is a product for a kickstarter campaign and so normally, details of the electronics would be absent. But clearly [Kevin] is familiar with Hackaday and sent in some additional info which you can find below, along with the videos.

Continue reading “Time-Stretching Zoetrope Animation Runs Longer Than It Should”

Hydraulic artificial muscles

Soft Hydraulic Muscles Lift Weights As A Team

Working with hydraulics usually means having a fluid tank and valves. [consciousflesh] does away with both those for his DIY hydraulic artificial muscles. Instead, he uses a pair of muscles, both preloaded with fluid. To contract one, he pumps the fluid into the other, expanding that one, and vice versa. A bidirectional gear pump moves the fluid while also acting as a valve. And flexible materials replace heavy metal cylinders.

As we said, this is a DIY project. He made the muscles by surrounding silicone tubes with aramid fiber sleeves, giving added strength. The blocks at either end are also custom-made. The gear pump is one he purchased and made substantial modifications to, including removing the tank and fixing a brushless DC motor to one end. The final custom piece was a controller board for the motor. A Gerber file, schematic, and technical drawings, along with further details are all on his Hackaday.io page. Meanwhile, check out the load test in the video below as the muscles lift and lower 5 kg (11 lbs) each.

A search of Hackaday shows hydraulic artificial muscles may be rare, so perhaps this will be the first of many. For example, how about replicating how human arm muscles work together, one contracting while the other expands? We’ve seen that done already using pneumatics with [James Hobson’s] exoskeleton arms. Perhaps someone should do it with these pairs of flexible hydraulic muscles?

Continue reading “Soft Hydraulic Muscles Lift Weights As A Team”

Coffee machine current sensor hardware

Tracking The Office Coffee Machines Using Current Draw

Coffee is the lifeblood of hackers, IT workers, and apparently, IT workers who are also hackers. [Omerfarukz] is clearly the latter. He works as part of a large team spread over multiple floors, all with coffee machines, any one of which is fair game. The problem is knowing which one has coffee that is ready to pour. He needed a non-invasive way to monitor the coffee machines.

Coffee machine sensor voltage chart
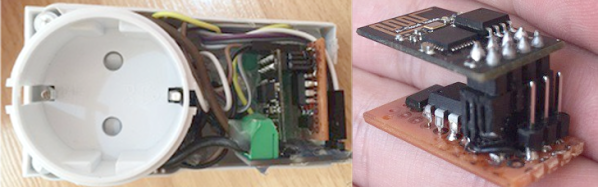
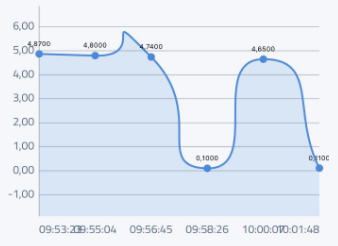
After contemplating a few solutions, he opted for one which wouldn’t offend the coffee gods. The machines use a high current to produce their heat, so he adapted some old remote control power sockets for the machines to plug into which would now monitor the current. A high current means the coffee is brewing and he knew that brewing takes one minute per cup, so the duration of the high current tells him the number of cups.

Having had no success with a current sensing transformer, he opted for an ACS712 chip, at heart a Hall effect sensor which outputs a voltage proportional to the test current. That goes to the IO pins of an ATtiny, and from there via serial to an ESP8266 and thence to Google Firebase for processing and notifying of IT workers in need of stimulation. For those wishing to partake, he’s posted the circuit on Github.

We’ve seen a few other non-invasive ways to do this monitoring. For example, there’s weighing the machines using a bathroom scale and the more manual phone-notifying alarm button.

Kathleen Booth: Assembling Early Computers While Inventing Assembly

Imagine having to program your computer by rewiring it. For a brief period of time around the mid-1940s, the first general-purpose electronic computers worked that way. Computers like ENIAC initially had no internal storage for code. Programming it involved manipulating thousands of switches and cables. The positions of those switches and cables were the program.

Kathleen Booth began working on computers just as the idea of storing the program internally was starting to permeate through the small set of people building computers. As a result, she was one of the first programmers to work on software and is credited with inventing assembly language. But she also got her hands dirty with the hardware, having built a large portion of the computers which she programmed. She also did some early work with natural language processing and neural networks. And this was all before 1962, making her truly a pioneer. This then is her tale.

Continue reading “Kathleen Booth: Assembling Early Computers While Inventing Assembly”

8085-based single board computer

OMEN Alpha: A DIY 8085-Based Computer

[Martin Malý] has put together a sweet little 8085-based single board computer called OMEN. He needed a simple one for educational purposes, and judging by the schematic we think he’s succeeded.

Now in its fourth iteration, it has a 32K EEPROM, 32K of memory, one serial and three parallel ports. In the ROM he’s put Tiny BASIC and Dave Dunfield’s MON85 Serial Monitor with Roman Borik’s improvements. His early demos include the obligatory blinking LED, playing 8-bit music to a speaker, and also a 7-segment LED display with a hexadecimal keyboard. There is also a system connector which allows you to connect a keyboard, a display, and other peripherals. Of course, you can connect serially at up to 115200 baud, making it very easy to compile some assembly on a PC and use the monitor to paste the hex into the board’s memory and run it. Or you can just jump into the Tiny BASIC interpreter and have some nostalgic fun. He demos all this in the video below.

He’s given enough detail for you to make your own and he also has the boards available in kit form on Tindie for a very reasonable price. With some minimal soldering skills, you can be back in the ’80s in no time.

Continue reading “OMEN Alpha: A DIY 8085-Based Computer”

Restoring 100-year-old vice

Restoring A 100 Year Old Vice To Pristine Condition

We love our vices. They hold pipes for us to saw away at, wood while we carve, and circuit boards so that we can solder on components. So we keep them in shape by cleaning and greasing them every now and then, [MakeEverything] went even further. He found a 100-year-old vice that was in very rough shape and which was going to be thrown out and did a beautiful restoration job on it.

It was actually worse than in rough shape. At some point, one of the jaws had been replaced by welding on a piece of rebar where the jaw would normally go. So he made entirely new jaws from solid brass as well as the pins to hold them firmly in place. We applaud his attention to detail. After removing all the old paint and corrosion, he painted it with a “hammered” spray paint to give it a nice hammered look. Though when he made the raised letters stand out by applying gold paint to them using an oil-based paint marker, we felt that was just showing off. The result is almost too gorgeous to use, but he assures us he will use it. You can see his process, as well as have a good look at the newly revived vice in the video below.

Continue reading “Restoring A 100 Year Old Vice To Pristine Condition”