Better 3D Printing Overhangs? Dive! Dive!

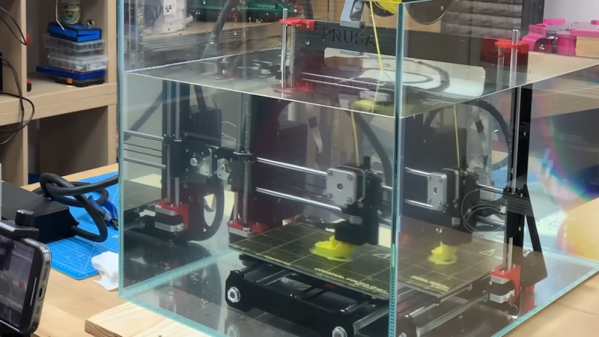
If you want better 3D-printed overhangs, you need better cooling, right? What would be better for cooling than printing submerged in water? It turns out [CPSdrone] tried it, and, at least for overhangs, it seems to work pretty well. Check it out in the video below.

Of course, there are some downsides. First, the parts of the 3D printer don’t want to work in water. The guys used deionized water to minimize water conductivity and also sealed open connections. Some components were replaced with equivalents that were less likely to corrode. However, the bearings in the stepper are still going to corrode at some point.

There’s no free lunch, though. Cooling is good for some parts of 3D printing. But for the hot parts, it could cool down too much. They encased the hot end in a large silicon block to help prevent this. They also potted the controller board, which works but makes future maintenance and upgrades painful. Initial tests looked promising.

Continue reading “Better 3D Printing Overhangs? Dive! Dive!”

Stereoscopic Macro Lens Shows Two Is Better Than One

You’d be forgiven if you thought [Nicholas Sherlock’s] new lens design was a macro lens that was 3D printed. In fact, it is, but it is also a macro lens that takes 3D images using two different cameras. If you have a pair of Sony E/FEs, you can 3D print your own copy today. If you don’t, you might have to adjust the design or wait for future releases. In any event, you are sure to enjoy the example photos, and there’s a video review of the device you can watch below.

The design merges two 4x microscope lenses to provide a 2X stereo image with a 5mm baseline. As you might expect, the secret is a prism in the assembly that allows one camera to shoot directly at the subject and the other to shoot with a 5mm offset. This is trickier than you might think because the cameras shift the image some, also.

Continue reading “Stereoscopic Macro Lens Shows Two Is Better Than One”

Another OmniBot 2000 Upgrade

There were many toy robots back in the 80s that were — frankly — underwhelming by today’s standards. Back then, any old thing that rolled around with some blinking lights would impress, but the bar is higher today. Then again, some of the basic components won’t really change. You still need wheels, motors, batteries, and all that. But the computers we can bring to bear today are much better. Maybe that’s why so many people, including [mcvella], decide to give these venerable toys like the OmniBot 2000 a facelift or, maybe a better analogy, a brain transplant.

In this particular case, the brain in question is a Raspberry Pi. The robot will also sport new sensors, motor controllers, and a webcam. There is also a new battery pack in play. The project doesn’t cover working with the single powered gripper arm. The left arm isn’t motorized. There is also a cassette tape deck you could probably make do something interesting. Of course, with a Raspberry Pi, you get wireless control, and the project uses Viam to define and control the robot’s motion.

There is some retro cool factor to using a robot like Ominbot. However, we might be more tempted to just build our own. With a 3D printer, a laser cutter, and a few motors, you could make something that would be about equivalent or better with little effort.

We have seen OmniBot conversions before, particularly over on Hackaday.io. Maybe someone will convert one over to steam power.

Scope GUI Made Easier

Last time, I assembled a Python object representing a Rigol oscilloscope. Manipulating the object communicates with the scope over the network. But my original goal was to build a little GUI window to sit next to the scope’s web interface. Had I stuck with C++ or even C, I would probably have just defaulted to Qt or maybe FLTK. I’ve used WxWidgets, too, and other than how many “extra” things you want, these are all easy enough to use. However, I had written the code in Python, so I had to make a choice.

Granted, many of these toolkits have Python bindings — PyQt, PySide, and wxPython come to mind. However, the defacto GUI framework for Python is Tkinter, a wrapper around Tk that is relatively simple to use. So, I elected to go with that. I did consider PySimpleGUI, which is, as the name implies, simple. It is attractive because it wraps tkinter, Qt, WxPython, or Remi (another toolkit), so you don’t have to pick one immediately. However, I decided to stay conservative and stuck with Tkinter. PySimpleGUI does have a very sophisticated GUI designer, though.

About Tkinter

The Tkinter toolkit lets you create widgets (like buttons, for example) and give them a parent, such as a window or a frame. There is a top-level window that you’ll probably start with. Once you create a widget, you make it appear in the parent widget using one of three layout methods:

  1. Absolute or relative coordinates in the container
  2. “Pack” to the top, bottom, left, or right of the container
  3. Row and column coordinates, treating the container like a grid

The main window is available from the Tk() method:

import tkinter as tk
root=tk.Tk()
root.title('Example Program')
button=tk.Button(root, text="Goodbye!", command=root.destroy)
button.pack(side='left')
root.mainloop()

That’s about the simplest example. Make a button and close the program when you push it. The mainloop call handles the event loop common in GUI programs.

Continue reading “Scope GUI Made Easier”

Robot Goes To Summer Camp

There are a lot of hobby and educational robots that have a similar form factor: a low, wide body with either wheels or tracks for locomotion. When [Alexander Kirilov] wanted to teach a summer robot camp, he looked at several different commercial offerings and found all of them somewhat lacking. His wish list was a neat-looking compact robot that was easy to extend, had various sensors, and would work with Python. Finding nothing to his liking, he set out to make his own, and Yozh robot was born.

The robot certainly looks neat. There is a color TFT display, seven reflective sensors pointing down, two laser time-of-flight sensors facing forward, an IMU, and some LEDs. There are plenty of expansion ports, too. You can check out the code that runs it, too.

Continue reading “Robot Goes To Summer Camp”

In New Doctor’s Office, Stethoscope Wears You

The medical professional wearing a stethoscope is a familiar image, but Northwestern University wants to change that. Instead of someone hanging an ancient device around their neck to listen inside of you, they want to put sticky sensors on patients to continuously monitor sounds from hearts, lungs, and the GI tract.

The tiny devices stick to your skin and wirelessly beam audio to clinicians for analysis. They’ve tested the devices on people ranging from people with chronic lung disease to premature babies. In fact, you can hear breath sounds (and crying) from a microphone attached to a baby in the video below. The device uses noise suppression to remove the crying sounds effectively.

Continue reading “In New Doctor’s Office, Stethoscope Wears You”

Heat Pump Dryer Explained

Historically, having a washer and a dryer in your house requires “a hookup.” You need hot and cold water for the washer as well as a drain for wastewater. For the dryer, you need either gas or — in the US — a special 220 V outlet because the heating elements require a lot of wattage, and doubling the voltage keeps the current levels manageable. You also need a bulky hose to vent hot moist air out of the house. But a relatively new technology is changing that. Instead of using a heater, these new dryers use a heat pump, and [Matt Ferrell] shows us his dryer and discusses the pros and cons in a video you can below. We liked it because it did get into a bit of detail about the principle of operation.

These dryers are attractive because they use less power and don’t require gas or a 220 V outlet. They also don’t need a vent hose which means they can sit much closer to the wall and take up less space. Heat pumps don’t convert electrical energy into heat like a normal heating element. Instead, it uses a compressor to move heat from one place to another. In this case, the dryer heats the air using the heat pump. That causes water in the clothes to evaporate into the air. The heat pump dryer then uses a second loop to cool the air, condensing the water out so the it can reheat the air and start the whole cycle over again.

Continue reading “Heat Pump Dryer Explained”