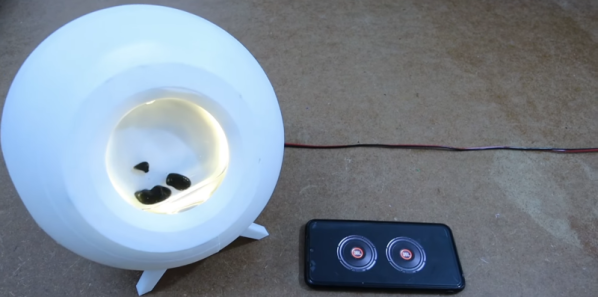
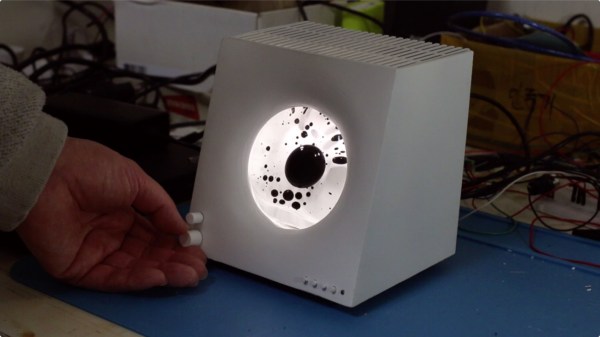
A speaker project isn’t usually very different, but we couldn’t help but notice [Electronoob’s] latest speaker not for its audio performance but because it features dancing ferrofluid and is an unusual work of art. The housing is 3D printed and includes some translucent portions for LEDs.You can see and hear the speaker at work in the video below.
Apparently, not all ferrofluid is created equal. You can get just the fluid, but then you have to work up some sort of carrier fluid. You can also get the material already in a glass with a carrier fluid, which is a better option. Apparently, you can also get cheap material that is little more than iron filings suspended in a liquid. That’s not really ferrofluid.
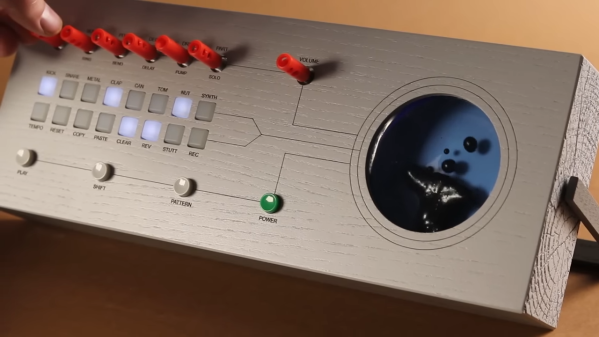
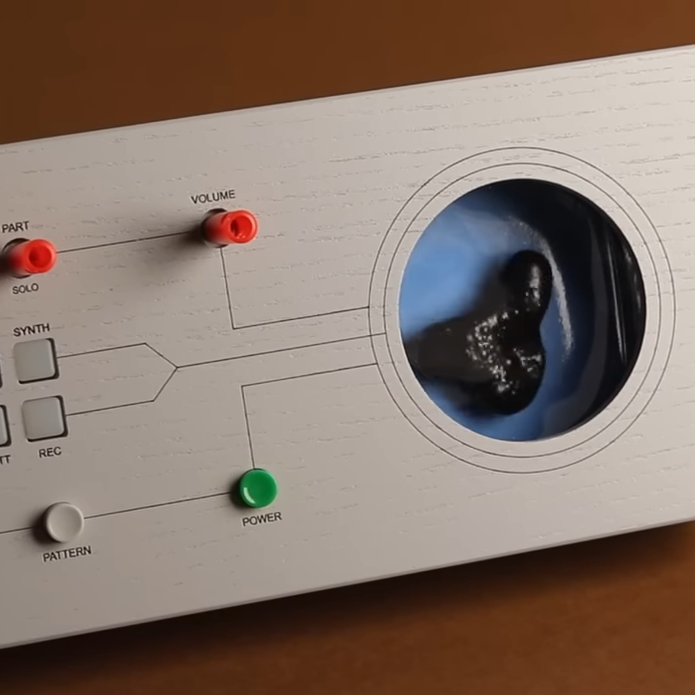
[Love Hultén]’s work often incorporates reactive sound elements, and his Ferrofluid drum synth is no exception. Sadly there are no real build details but have no fear: we’ve gathered plenty of DIY insights when it comes to ferrofluid-based projects.
Ferrofluid isn’t easy to work with, but there are plenty of DIY resources to make things easier.
First of all, ferrofluid is shockingly expensive stuff. But if you can get your hands on some old VHS tapes and acetone, you can make your own. Second, working with ferrofluid to make reactive elements is harder than it may look. Particularly, making the stuff dance to sound beats isn’t as simple as putting a container of the stuff in front of a speaker coil, but people have discovered a few ways that work more reliably than others.
[Love Hultén]’s drum synth was inspired by this custom Bluetooth speaker with dancing ferrofluid by [Dakd Jung], which drives an electromagnetic coil with frequencies selected from the audio with an MSGEQ7 equalizer. That way, only frequencies that work best for moving the fluid in interesting ways get used for the visualization. The MSGEQ7 spectrum analyzer chip is very useful for music-driven projects, as demonstrated by these sound-reactive LED shades which illustrate the audio element nicely.
We have one last tip to share about enclosures. Some readers may have noticed that this drum synth project is housed in what looks like a piece of painted lumber. Wood is certainly a versatile material for making custom shapes, and for lettering and labels it turns out that toner transfer works just as well on wood as it does for making custom PCBs.
Ferrofluid is a wonderous substance. It’s a liquid goop that responds to magnetic fields in exciting and interesting ways. It’s actually possible to make it yourself, and it’s cheap, too! The key is to get yourself some old VHS tapes.
The only fitting end for a copy of Speed II.
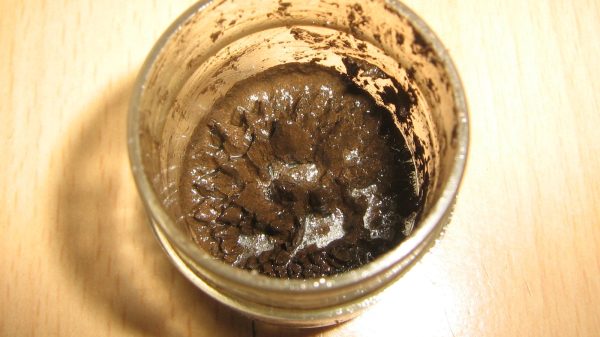
The trick is to separate the ferric oxide from the plastic tape inside the VHS cassette. Step one is naturally to smash open a cassette, and pull out the plastic tape from inside. The tape can then be dunked in acetone to dissolve the plastic, leaving behind the ferric oxide that once stored your cherished copy of Heat. A magnet is an easy way to collect the ferric oxide, which should then be left to dry. The powdery substance can then be blended in a ratio of 1 mL of ferric oxide to 0.333 mL of cooking oil. Poor mixing can be improved by adding a droplet of water mixed with dish detergent. You should end up with a brownish sludge that acts as a rudimentary ferrofluid.
It’s a neat bit of home science. As with most such activities, it bears noting the safety risks. Don’t leave your acetone uncovered to form a nasty flammable vapor, and keep yourself keenly aware of any fire or ignition risks. Overall though, it’s a fairly straightforward process. While the resulting material isn’t necessarily lab grade, you could potentially use it to build your own ferrofluid display!
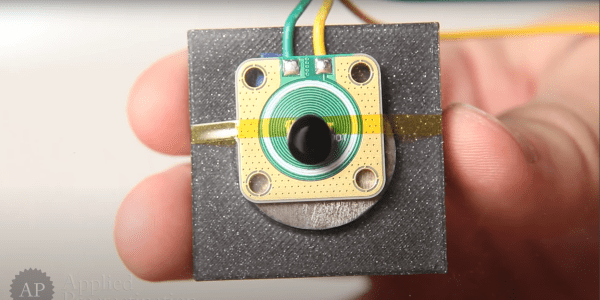
[Applied Procrastination] is in the business of vertical ferrofluid displays, but struggles somewhat with the electromagnets available off the shelf and the proliferation of wiring that results. [Carl Bugeja] is in the business of making PCB coils, both with rigid and flex PCB substrates, so when the opportunity for a collaboration arose, [AP] jumped at the opportunity.
As [Simen from AP] mentions in the video after the break, they had considered using a large PCB with embedded coils for Fetch their ferrofluid display unit, but the possible magnetic field was just too weak, and attempting to crank up the amps, just overheats them. Some improvements were made, first sticking the coil PCB to a small disk of ferrous metal, which doubled up as a handy heatsink. Next, he tried adding a permanent magnet, which added a bit of bias field. Alone this was not enough to hold the ferrofluid in place, but with the coil powered, it was starting to look encouraging.
Much more progress was made when [Carl] sent over a new design of his, a 12-layer PCB coil. This obviously had a much larger field, but still not enough without the extra boost from permanent magnet.
[Simen] currently doesn’t think the PCB approach is quite there yet, and is looking for help to source PCB-mounted electromagnets of the wired variety. We would imaging prototyping with such a large 12-layer PCB would be rather prohibitively expensive anyway.
In 2019 [Simen] and [Amud], two students from the University of Oslo, set out to design a unique open-source display. The result was Fetch, a display that uses electromagnets to suspend ferrofluid on 252 “pixels” across the screen. After some delays due to COVID, they have recently unveiled version 2.0 of the display on their project’s page.
While the duo managed to overcome the mechanical challenges associated with using ferrofluids fairly easily, they were quickly bottlenecked by their electronics. The use of electromagnets holding up a liquid presented a unique challenge; the magnets could not be switched off, even for a millisecond, or else the “pixel” would fall down to the bottom of the screen. That immediately ruled out any sort of multiplexing and meant everything would have to be driven in parallel. As if that wasn’t already difficult enough to work around, the effect of having multiple electromagnets activated next to each other would change how the ferrofluid flows. This meant that the strength of each electromagnet would have to be adjusted based on what is currently being displayed, rather than just being on or off.
The mess of connections were not helped with the layout of the old driver boards shown here. The new design puts the connections closer to each individual electromagnet.
All of this, paired with other overhead like generating pulse-width modulation for the inputs, was just too much for a single microcontroller to handle. So, the pair set out to design a better version of their electronics that would offload a lot of the hard work. At the same time, they decided a bit of mechanical optimization was in order; they redesigned the boards to be longer and thinner, allowing them to fit cleanly behind the row of electromagnets they controlled.
The new boards feature a PCA9685 IC, which allows for the control of up to 16 channels of 12-bit PWM over i2C, perfect for the size of the display. Since this IC can’t source enough current to drive the electromagnets, it was paired with a ULN2803 Darlington Transistor Array, capable of delivering up to 500mA to each electromagnet.
With prototypes in hand (and a few bodge wires here and there), [Simen] and [Amud] had the new driver boards running beautifully, displaying text in a mesmerizing way that no ordinary display could match. Watch the video after the break for a demonstration of the new controllers in action, as well as a deeper dive into the process of developing them.
Ferrofluids, as the name implies, are liquids that respond to magnetic fields. They were originally developed for use by NASA as rocket fuel but are available to the general public now for anyone who wants to enjoy their unique properties. For [Dakd Jung], that meant building a special chamber into a Bluetooth speaker that causes the ferrofluid inside to dance along with the rhythm of the music.
This project isn’t quite as simple as pushing the ferrofluid container against a speaker, though. A special electromagnetic device similar to a speaker was used specifically to manipulate the fluid, using a MSGEQ7 equalizer to provide the device with only a specific range of frequencies best tailored for the fluid’s movement. The project includes two speakers for playing the actual music that point upward, and everything is housed inside of a 3D-printed case. There were some additional hurdles to overcome as well, like learning that the glass needed a special treatment to keep the ferrofluid from sticking to it.
All in all it’s a unique project that not only brings sound to a room but a pleasing physical visualization as well. Being able to listen to music or podcasts on a portable speaker, rather than the tinny internal speakers of a phone or laptop, is the sort of thing you think you can live without until you get used to having higher quality sound easily and in every place you go. And, if there’s a way to improve on that small but crucial foundation with something like a dancing ferrofluid that moves with the music the speaker is playing, then we’re going to embrace that as well.
We know this project is supposed to be about developing a fine-looking ferrofluid clock, and not about the value of procrastination. But after watching the video below, see if you don’t think that procrastination has taken these two students further than expected.
We first ran into [Simen] and [Amund] several months ago when they launched their ferrofluid project in a fit of “There’s got to be more to life than studying.” It seemed then that building a good-looking, functional ferrofluid display would be a temporary distraction, but the problems posed proved to be far deeper and thornier than either of the electrical engineering students expected. The idea is simple: contain a magnetic fluid between two transparent panels and create pixels using an array of electromagnets to move dots of the fluid around. The implementation, however, was another matter, with the ferrofluid itself proved to be the biggest obstacle. All the formulas they tried seemed to coagulate or degrade over time and tended to stain the glass. While the degradation was never fully sorted, they managed to work around the staining by careful cleaning of the glass and using a saturated brine solution to fill the container.
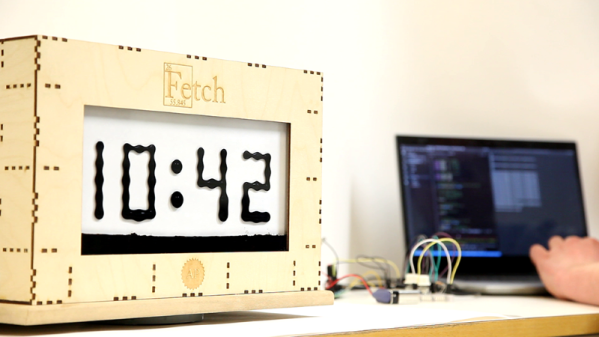
Backed by 252 electromagnets and drivers on ten custom PCBs, the video below shows the (mostly) finished panel in action as a clock. We’re impressed by the smoothness of the movements of each pixel, even if there’s a bit of drooping at the bottom thanks to gravity. As for the future of the project, that’s unclear since [Simen] is headed off for a NASA internship. We’re not sure if that was despite or because of this procrastination-driven project, but we congratulate him either way and look forward to hearing more from both of them in the future.