With the holiday season, you might turn to paper plates to cut down on dishwashing after having family or friends over. But what do you do with the extras? If you are [TKOR] you make some speakers. The process is fairly simple and if you know how a speaker works, you won’t find any surprises, but there are some neat techniques you might pick up. You can see the video below.
A drill and a steel rod help with the coil winding duty. You can probably adapt the technique to make other kinds of coils and we’d rig up an encoder to count revolutions, too.
When we were kids we rode bicycles without pads and helmets. We drank sugary drinks. We played with chemistry sets and power tools. We also built things that directly used AC line current. [Mike] remembers and built one, presumably more to discuss the safety precautions around things that can shock you and not entice you to duplicate it. He calls it The Retro QRP Widowmaker, if that’s any kind of a hint. (Video of this unsafe transmitter also embedded below.)
The design showed up from time to time in old electronic magazines. Built on an open board and with no ground wire, the radio didn’t need a complex power supply. This wasn’t limited to transmitters, either. Some TVs and radios had a “hot chassis.” That’s why we were taught to touch an unknown chassis with the back of your hand first. A shock will contract your muscles and that will pull your arm away instead of making you grab the electrically active part.
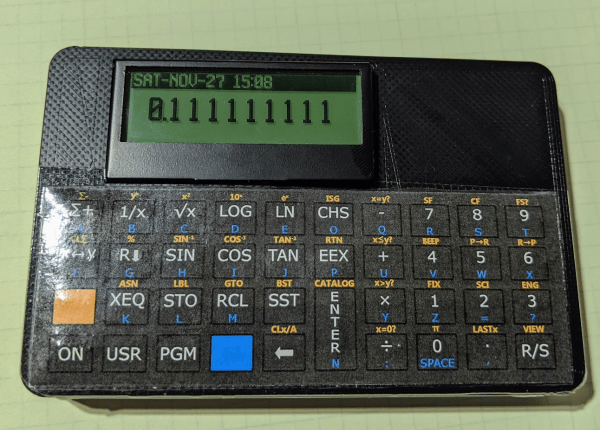
I have a confession to make. I write about a lot of projects for Hackaday, but there are very few I read about and then go actually build a copy of it. I don’t have a lot of time and I’m usually too busy building my own stuff. But once in a while, something strikes my fancy and I’ll either raid the junk box or buy the kit. The most recent case of that was the PX-41C, a replica of the classic HP-41C.
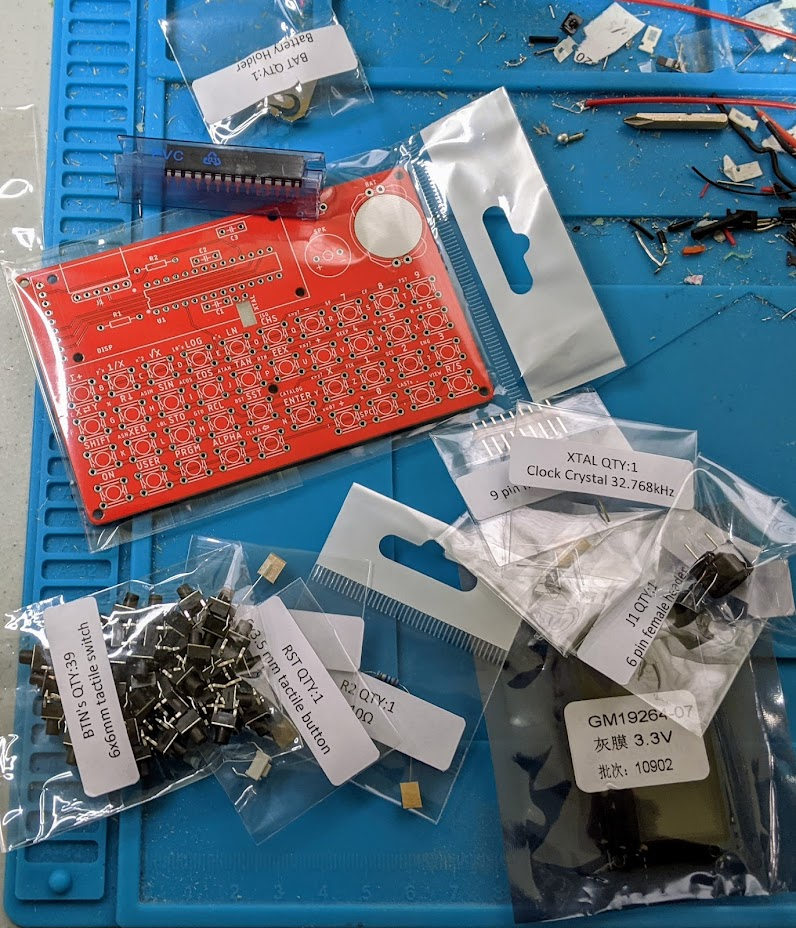
Nicely bagged parts.
The HP-41C is a somewhat legendary reverse-polish notation calculator. I still have my original HP-41C from 1979 (a very low serial number). It is still a workhorse but at 43 years old or so, I don’t like to leave it hanging around or near anything that might damage it. It has enough wear from the daily use it received 40 years ago. Sure, I have great emulation on my phone and I use that too, but the PX-41C kit looked fun, and with all through-hole parts it would be a quick build. The black Friday sale on Tindie sealed the deal for me.
Start-Up
The kit arrived on the Saturday after Thanksgiving, I decided to tackle it while waiting for some 3D prints. The components were all nicely bagged and marked. Tearing into the bags was a bit frustrating, but not hard and it did keep everything separate. There was a bill of materials, but — I thought — no instructions. Turns out the last part of the bill of materials is a link to some instructions. They aren’t much and I didn’t realize they were until after completing the board, but it isn’t hard to figure out. All the parts are marked on the silkscreen and you can probably figure it out — with a few caveats.
I must confess, that I try not to run Windows any more than absolutely necessary. But for many reasons, it is occasionally necessary. In particular, I have had several laptops that are finicky with Linux. I still usually dual boot them, but I often leave Windows on them for one reason or another. I recently bought a new Dell Inspiron and the process of dual booting it turned out to be unusually effective but did bring up a few challenges.
If you ever wanted a proper dual-booting laptop, you’ll be interested in how this setup works. Sure, you can always repartition the drive, but the laptop has a relatively small drive and is set up very specifically to work with the BIOS diagnostics and recovery so it is always a pain to redo the drive without upsetting the factory tools.
Since the laptop came with a 512 GB NVMe drive, I wanted to upgrade the drive anyway. So one option would have been to put a bigger drive in and then go the normal route. That was actually my intention, but I wound up going a different way.
History is full of stories about technology that makes sense to the designer but doesn’t really fit the needs of the users. Take cake mixes. In 1929, a man named Duff realized that he could capitalize on surplus flour and molasses and created a cake mix. You simply added water to the dry mix and baked it to create a delicious cake. After World War II General Mills and Pillsbury also wanted to sell more flour so they started making cakes. But sales leveled out. A psychologist who was a pioneer in focus groups named Dichter had the answer: bakers didn’t feel like they were contributing to the creation of the cake. To get more emotional investment, the cake mixes would need to have real eggs added in. Actually, Duff had noticed the same thing in his 1933 patent.
It is easy to imagine a bunch of food… scientists? Engineers? Designers?… whatever a person inventing flour mixes in the 1930s was called… sitting around thinking that making a mix that only requires water is a great thing. But the bakers didn’t like it. How often do we fail to account for users?
From Cake Mix to Tech
Apple has made a business of this. Most of us don’t mind things like arcane commands and control key combinations, but the wider pool of global computer users don’t like those things. As the world continues to virtually shrink, we often find our users are people from different lands and cultures who speak different languages. It is, after all, the world wide web. This requires us to think even harder about our users and their particular likes, dislikes, and customs.
[Atomic14] bought some wireless LEDs that receive power from a base station. They were very neatly packaged, but — we like it — he took one apart and made his own versions. They may not look as polished, but they work and they are undeniably cool.
The LEDs work by receiving power from an induction coil. Once you have power, lighting up an LED is no big deal. Reverse engineering found the transmitter sends 217 kHz into a 2.2 mH inductor. A capacitor resonates the coil and drives the attached LED.
Old radios didn’t have much in the way of smarts. But as digital synthesis became more common, radios often had as much digital electronics in them as RF circuits. The problem is that digital electronics get better and better every year, so what looked like high-tech one year is quaint the next. [IMSAI Guy] had an Icom IC-245 and decided to replace the digital electronics inside with — among other things — an Arduino.
He spends a good bit of the first part of the video that you can see below explaining what the design needs to do. An Arduino Nano fits and he uses a few additional parts to get shift registers, a 0-1V digital to analog converter, and an interface to an OLED display.
Unless you have this exact radio, you probably won’t be able to directly apply this project. Still, it is great to look over someone’s shoulder while they design something like this, especially when they explain their reasoning as they go.
The PCB, of course, has to be exactly the same size as the board it replaces, including mounting holes and interface connectors. It looks like he got it right the first time which isn’t always easy. Does it work? We don’t know by the end of the first video. You’ll have to watch the next one (also below) where he actually populates the PCB and tests everything out.