Hackaday Prize 2023: Universal Tensile Testing Machine

Material testing is important in big industry, where manufacturers must be able to trust the properties of the raw materials they’re using. The rest of us generally take a supplier’s word for it that they’re giving us what we’ve paid for. However, you could always take on material testing yourself with the Universal Tensile Testing Machine from [Xieshi Zhang].

Unlike a six-figure industrial machine, this build is much more affordable, costing on the order of $300 to build. It uses an Arduino to read a tensile strain gauge, and is capable of applying up to a kilonewton of force. To achieve this, it uses a NEMA 17 stepper motor driving a lead screw to apply tensile strain or compression to the specimen under test.  The test fixture is assembled from 3D-printed components, and built on top of a piece of aluminium extrusion.

Fundamentally, it’s a smaller version of a machine most engineering undergraduates will see in a materials lab experiment. It could be highly useful for anyone wanting to experiment with 3D printed structures; it would be more than capable of testing various filaments and infill types for their tensile and compression performance. Video after the break.

Continue reading “Hackaday Prize 2023: Universal Tensile Testing Machine” →

Angry Robot Face Is Less Than Friendly

Sometimes you just need to create a creepy robot head and give it an intimidating personality. [Jens] has done just that, and ably so, with his latest eerie creation.

The robot face is introduced to us with a soundtrack befitting Stranger Things, or maybe Luke Million. The build was inspired by The Doorman, a creepy art piece with animatronic eyes. [Jens’] build started with a 3D model of a 3D mask, with the eyes and mouth modified to have rectangular cutouts for LED displays. The displays are run by a Raspberry Pi Pico, which generates a variety of eye and mouth animations. It uses a camera for face tracking, so the robot’s evil eyes seem to follow the viewer as they move around. In good form, the face has a simple switch—from good to evil, happy to angry. Or, as [Jens] designates the modes: “Fren” and “Not Fren.”



[Jens] does a great job explaining the build, and his acting at the end of the video is absolutely worth a chuckle. Given Halloween is around the corner, why not build five to eight of these, and hide them in your roommate’s bedroom?

Video after the break.
Continue reading “Angry Robot Face Is Less Than Friendly” →

Why Nuclear Bombs Can’t Set The World On Fire

Before the first atomic bomb was detonated, there were some fears that a fission bomb could “ignite the atmosphere.” Yes, if you’ve just watched Oppenheimer, read about the Manhattan Project, or looked into atomic weapons at all, you’ll be familiar with the concept. Physicists determined the risk was “near zero,” proceeded ahead with the Trinity test, and the world lived to see another day.

You might be wondering what this all means. How could the very air around us be set aflame, and how did physicists figure out it wasn’t a problem? Let’s explore the common misunderstandings around this concept, and the physical reactions at play.

Continue reading “Why Nuclear Bombs Can’t Set The World On Fire” →

A Nifty Tool For Counting Neopixels

Picture it. You’ve got a big roll of NeoPixels, but you have no idea how many are actually on the tape. Or you need to count how many WS2812B LEDs are in a display to properly plan your animations. Fear not, for [Gustavo Laureano] has built the perfect tool for counting the addressable LEDs.

The tool is based on a Raspberry Pi Pico, so it’s easy to replicate at home. The LED strip is simply connected to the microcontroller via a set of jumper wires going to the 5V and GND pins, while one of the Pico’s ADC pins is then connected to the strip’s GND pin after the jumper. A further GPIO pin is used to send data to the strip.

Essentially, this uses the jumper wire as a rudimentary current shunt. The code steps through the string of LEDs, turning each one on and then off in turn, comparing the value read by the ADC pin at each state. When the Pico detects no difference in current draw between the on and off states, that suggests it’s trying to turn on an LED beyond the end of the string, and thus the count is concluded.

You don’t need to understand any of that to put this device to good use, however. You can easily whip it up on a breadboard with a Pi Pico and parts you have lying around in the shop. Video after the break.

Continue reading “A Nifty Tool For Counting Neopixels” →

Building A DIY Cloud Chamber

[RCLifeOn] happened to come into possession of some radioactive uranium ore. He thus decided to build a cloud chamber to visualize the products of radioactive decay in a pleasing visual manner.

The construction is fairly straightforward stuff. A 3D-printer build plate was used to heat isopropyl alcohol to a vapor, while a bank of thermoelectric coolers then cool the alcohol down to -30 C to create a dense fog. The build uses a glass chamber with a bank of powerful LEDs to illuminate the fog, making it easier to see the trails from radioactive particles passing through. [RCLifeOn] later used a variety of radioactive sources to deliver a bunch of particles into the chamber for more action, too. He also experimented with blocking particles with a variety of materials.

It’s one of the bigger cloud chambers we’ve seen, and seems to work great. You can build a simple version pretty easily, or you could travel to a local museum or science center if you’re too busy to tackle it at home. Video after the break.

Continue reading “Building A DIY Cloud Chamber” →

Building A Peltier-Powered Cloud Chamber

If you’ve been watching Oppenheimer and it’s gotten you all excited about the idea of radioactive decay, you might want to visualize it. A cloud chamber is the perfect way to do that, and [NuclearPhoenix] is here to show us just how to build one.

The build relies on a Peltier device to cool a 10 cm square copper plate down to temperatures as low as -30 °C (-22 °F). Isopropyl alcohol is evaporated via warming resistors within the cloud chamber, and then condenses in the cooled area, creating a thin layer of fog. Ionizing radiation that passes through the chamber can then be spotted by the the trails it leaves through the fog. It’s even possible to identify the type of radiation passing through by the type of trail it leaves. Alpha particles leave shorter traces, while more energetic beta particles which are difficult to stop tend to streak further.

It bears noting that if you see a ton of activity in your cloud chamber at home, it might be worth making some enquiries. Some cloud chambers you’ll see in museums and the like use a small radioactive source to generate some excitement for viewers, though. Video after the break.

Continue reading “Building A Peltier-Powered Cloud Chamber” →

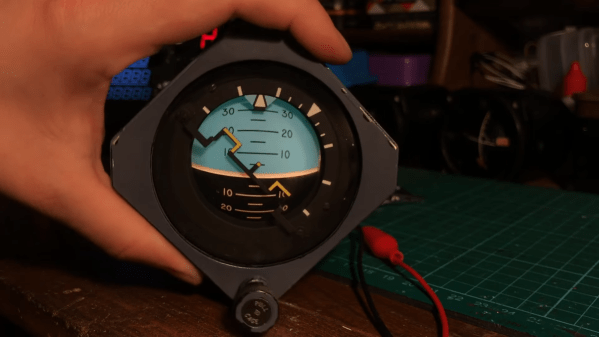
Vintage Artificial Horizon Is Beautiful In Motion

Attitude indicators are super useful if you’re flying a plane, particularly in foggy conditions or over water. They help you figure out which way the plane is pointing relative to the unforgiving ground below. [Hack Modular] has been toying with a few, and even figured out how to get them powered up!

The attitude indicators use spinning gyroscopes to present a stable artificial horizon when a plane is in motion. Airworthy models are highly expensive, but [Hack Modular] was experimenting with some battered surplus examples. He sets about opening the delicate gauges, noting the seals and other features intended to protect the equipment inside. We get a great look at the gimbals and the reset mechanism used to zero out the device. He then pulls a classic mechanic’s trick, robbing a few screws from Peter to reassemble Paul.

We wouldn’t trust the gauges for flight duty, but they look great when powered up, all lit and spinning. They have the beautiful vintage glow that you only get from filament bulbs and deftly painted instrumentation. While avionics don’t come cheap off the shelf, it’s worth tinkering with cheap older gear if you can find it. The engineering involved, even in older equipment, is truly impressive. Video after the break.

Continue reading “Vintage Artificial Horizon Is Beautiful In Motion” →