Interactive LED Dome Glows With The Best Of Them

With the price and availability of components these days, it’s easier than ever to throw a whole pile of LEDs at a build and get them flashing away. The hard part is doing it well. [Amy Goodchild] is an artist, and has a knack for producing rather beautiful LED projects. The When in Dome installation is no exception.

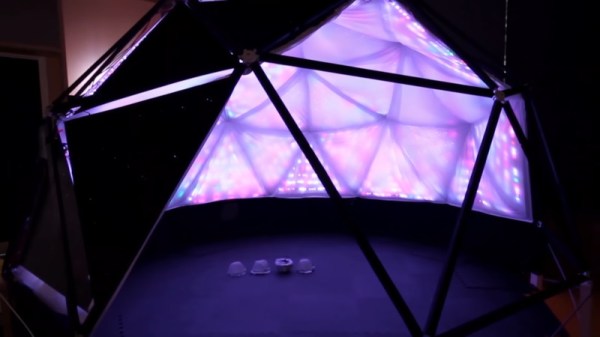
The build is based around a large geodesic dome, fitted with LED panels that glow and react to the occupants inside. Using the Microsoft Kinect as a sensor enables the dome to map out what’s happening in 3D space, and use this data to guide its animations. WS2812B LED strips were used, in combination with a Fadecandy controller along with Processing. This is a powerful combination which makes designing attractive LED effects easier, without forcing users to go to the effort of writing their own libraries or optimizing their microcontroller code.

For those more interested in the dome itself, you’ll be happy to know that [Amy] doesn’t skimp on the details there either. The build actually started as a commercially available kit, though there’s still plenty of manual cutting, screwing, and painting required. She does an excellent job documenting the dome build through a series of videos, and walks the reader through some of the design decisions she made (and would remake, if given the chance).

People love geodesic domes at the best of times; adding an interactive LED installation just takes things to the next level. We’ve seen them used as greenhouses too, and they make a great hackerspace project as well. Video after the break.

Continue reading “Interactive LED Dome Glows With The Best Of Them” →

Copper Coil Lamp Built With 3D Printed Tools

3D printing is a great way to create complex geometric forms. However, it can be very slow, and parts may lack strength compared to other alternatives. There are other ways to take advantage of this technology however, as shown in the build of this tidy voronoi lamp. 

The lamp is so-called for its voronoi-patterned base, named after the mathematical concept. 3D printing is used to create the base, which would be very difficult to create with traditional subtractive machining methods. A copper coil is then used to give the lamp some height, as well as act as protection for the filament bulb. Here, 3D printing helps out in a different way, being used to create a jig to allow the copper to be quickly wound into an accurate coil shape. The coil also serves to act as a conduit for the mains wiring, giving the lamp a neat finished appearance.

The project goes to show that even if 3D printing is appropriate to produce your final parts, it may be of help to create useful jigs or tools to get the job done. We’ve even seen similar applications before in the microcontroller space!

Ask Hackaday: Does Your Car Need An Internet Killswitch?

Back in the good old days of carburetors and distributors, the game was all about busting door locks and hotwiring the ignition to boost a car. Technology rose up to combat this, you may remember the immobilizer systems that added a chip to the ignition key without which the vehicle could not be started. But alongside antitheft security advances, modern vehicles gained an array of electronic controls covering everything from the entertainment system to steering and brakes. Combine this with Bluetooth, WiFi, and cellular connectivity — it’s unlikely you can purchase a vehicle today without at least one of these built in — and the attack surface has grown far beyond the physical bounds of bumpers and crumple zones surrounding the driver.

Cyberattackers can now compromise vehicles from the comfort of their own homes. This can range from the mundane, like reading location data from the navigation system to more nefarious exploits capable of putting motorists at risk. It raises the question — what can be done to protect these vehicles from unscrupulous types? How can we give the user ultimate control over who has access to the data network that snakes throughout their vehicle? One possible solution I’m looking at today is the addition of internet killswitches.

Continue reading “Ask Hackaday: Does Your Car Need An Internet Killswitch?” →

3D Print Your Own Thermal Insert Press

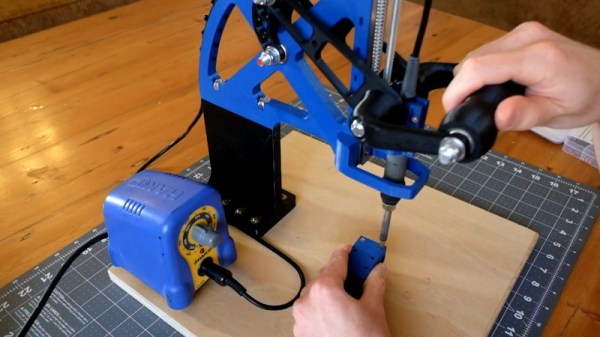
Thermal inserts are a big thing when it comes to engineering with plastic. They make it easy to use threaded fasteners with plastic parts, and they work great with 3D printing too. There’s a bit of a knack to installing them without damaging your workpiece, however, and [John Culbertson] wanted to make using them as easy as possible. Thus, he created a thermal insert press of his very own!

If you’re not using heat-set inserts with your 3D printed parts you’re missing out. Hackaday’s own [Joshua Vasquez] wrote a great guide on thermal inserts which you heat up to securely melt the plastic as they are pushed into a slightly under-sized hole. While it’s possible to install these inserts by hand, using a press means much more consistent results.

This press relies on 3D printed components in combination with off-the-shelf bearings and fasteners. There’s a linear rail as well, to give the soldering iron a  clean, smooth downward motion. This helps make sure that the inserts go in straight and true, first time, every time. We’ve seen other DIY builds before, like this modified arbor press that gets the job done. Continue reading “3D Print Your Own Thermal Insert Press” →

Pie Face Game Rigged To Throw Pie At Anyone But You

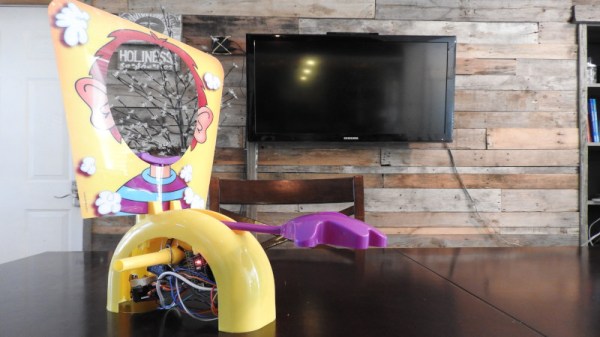
Pie Face is a game that does pretty much what you’d expect from the title. Players sit in front of a spring loaded arm, taking turns to twist a crank. Eventually, one unlucky player will release the arm and be splattered with whipped cream to the enjoyment of the group. [Harrison] wasn’t one to leave things to chance, however, so decided to rig the game.

Instead of allowing the spring-loaded arm to be released by the internal rotating drum, [Harrison] had a better idea. The drum was sanded smooth, to remove the teeth used by the release mechanism. Then, the release mechanism was replaced with a servo, controlled by an Arduino Nano fitted with a Bluetooth module. With just a tap on his smart phone, [Harrison] can trigger the game, guaranteeing his friends get the cream every time.

It’s a tidy build, and one that takes care to avoid detection with subtle design. Had he not released a Youtube video on the build, [Harrison]’s friends would likely be none the wiser. If your thirst for cheating is still unsated, consider loading your dice for a round of Settlers of Catan. Video after the break.

Continue reading “Pie Face Game Rigged To Throw Pie At Anyone But You” →

Dual Screen Laptop Is A Slick DIY Build

Laptops are great for portable productivity, but ergonomically they can leave something to be desired. They tend to force the user to look down, creating neck strain over extended periods. Rather than invest in expensive massages, [DIY Perks] decided what he really wanted was a dual screen laptop. So he built one! (Video embedded below.)

The build stats with a replacement laptop screen sourced from eBay, a nice full-HD IPS unit with a matching Embedded DisplayPort driver to enable the screen to be driven with the laptop’s existing HDMI port. To power the display, a USB-C Power Delivery board is used, in combination with a high-quality USB-PD compliant battery pack. This provides the 12 V required to run the screen.

To integrate the screen into the laptop, a set of 3D-printed hinges are used to create a folding mechanism, along with a brushed aluminium backing plate. Finished with a set of 3D-printed bezels, the final result is quite attractive from the front, looking almost stock at a glance.

It’s a build that may prove enticing to serious laptop professionals, particularly those that are willing to trade-off productivity against a little added bulk. We’ve seen other great work from [DIY Perks] before too, like these versatile LED panel lights. Video after the break.

Continue reading “Dual Screen Laptop Is A Slick DIY Build” →

3 Words To Describe Any Spot On Earth

For quite a long while now, latitude and longitude has been the way humankind has navigated the globe. This is a perfectly workable system, but it’s a little overwrought for daily use by the layperson. What3Words seeks to provide a simpler solution.

The system is based on splitting the surface of the globe into a grid of 3 m x 3 m sections. This includes oceans and bodies of water. With the grid layed out, each section is given a name consisting of three English words strung together. For example, ///eggs.form.breakfast denotes a spot in the outskirts of Chengdu, China, while ///crops.cards.gifts is a good approximation of that spot where the Naked Cowboy hangs out in Times Square, New York.

Addresses in this format are written with three leading forward slashes, along with a dot between each word. An attempt has been made to only use uncontroversial words, as well as to make sure no crude addresses are created by awkward combinations. Don’t worry, we checked – but if you do find anything good, drop it in the comments below.

It’s a tool that’s been around for a while, but an interesting one nonetheless. It’s something that needs a wider societal acceptance to become truly useful; we imagine it could be good in a small social circle once everyone is familiar with it. It may yet catch on – only time will tell!