3 Words To Describe Any Spot On Earth

For quite a long while now, latitude and longitude has been the way humankind has navigated the globe. This is a perfectly workable system, but it’s a little overwrought for daily use by the layperson. What3Words seeks to provide a simpler solution.

The system is based on splitting the surface of the globe into a grid of 3 m x 3 m sections. This includes oceans and bodies of water. With the grid layed out, each section is given a name consisting of three English words strung together. For example, ///eggs.form.breakfast denotes a spot in the outskirts of Chengdu, China, while ///crops.cards.gifts is a good approximation of that spot where the Naked Cowboy hangs out in Times Square, New York.

Addresses in this format are written with three leading forward slashes, along with a dot between each word. An attempt has been made to only use uncontroversial words, as well as to make sure no crude addresses are created by awkward combinations. Don’t worry, we checked – but if you do find anything good, drop it in the comments below.

It’s a tool that’s been around for a while, but an interesting one nonetheless. It’s something that needs a wider societal acceptance to become truly useful; we imagine it could be good in a small social circle once everyone is familiar with it. It may yet catch on – only time will tell!

A Crane Fit For Any Workshop

Sometimes we will encounter items in our workshops that are a little bigger than we bargained for. An engine block, an anvil, or a particularly substantial machine tool. Lifting these things may be possible, but doing so risks injury, perhaps a hernia or worse. For these moments a particularly well-appointed workshop will include a small crane, and [Workshop from scratch] has posted a video that we’ve placed below the break showing the construction of a particularly nice model.

The fabrication of a crane is not in itself a difficult task, in that most metalwork-minded readers could probably make one. What’s appealing about this video is the sense of gratification at watching metalwork being done well, and that while he does use a bandsaw and a drill press there’s not a lot in the video that couldn’t be done with more basic tools. The result is a handsome item that is probably better than many commercial offerings, though the gut feeling here is that the pivot points would have been better made with a sleeve and pin rather than a threaded bolt. The lifting effort comes from an off-the-shelf hydraulic ram.

Cranes feature here surprisingly rarely, but at least we’ve brought you a balcony crane.

Continue reading “A Crane Fit For Any Workshop”

Barcode Guitar Plays More Than Beep-Bop

One of our favorite things about the rise of hobbyist development ecosystems such as the Arduino is that it’s now possible to make a MIDI controller out of almost anything, as long as you have the the shields and the dedication. We’re glad that [James Bruton] takes the occasional break from making robots to detour into instrument making, because his latest creation turns it up to 11.

This awesome guitar uses a barcode scanner to play notes, and various arcade controls to manipulate those notes. The barcodes themselves scan as ASCII values, and their equivalent integers are sent to an external MIDI device. This futuristic axe is built on an Arduino Mega, with a USB shield for the barcode scanner, and a MIDI shield on top that [James] connects to various synths in the video after the break.

In between shooting barcodes, the right hand also controls octave shifting and changing MIDI channels with the joystick, and doing pitch-bends with the rotary encoder. The array of arcade buttons on the bottom neck let him switch between single player for monophonic synths, and multiplayer for polys. The other three buttons are press-and-scan programmable single-note sounders that assist in chord-making and noodling.

We particularly dig the construction, which is a combination of 20/20 and 3D printed boxes. [James] found some angled PVC to serve as fretboards for the four necks, and a nice backgrounds for bar codes.The only thing we would change is the native beep of the barcode scanner — either silence it forever or make it mutable, because it doesn’t jive with every note. It might be nice to get the gun to scan continuously so [James] doesn’t get trigger finger. Or better yet, build the scanner into a glove.

Want to do something more useful with that barcode scanner in your parts bin? Use it to manage your household inventory. But first, reacquaint yourself with the history of the humble barcode as presented by [Adam Fabio].

Continue reading “Barcode Guitar Plays More Than Beep-Bop”

Mini-VFD Clock Floats The Display Above It All

As [sjm4306] says, “You can never have too many clocks based on obsolete display technologies.” We couldn’t agree more, and this single-tube VFD clock is one we haven’t seen before.

The vacuum-fluorescent display that [sjm4306] chose to base this clock on is the IV-21, an eight-digit seven-segment display on the smallish side. The tube is Russian surplus from the ’80s, as all such displays seem to be. The main PCB sports an ATMega328, a boost converter to provide the high voltage needed to run the VFD, a real-time clock, and the driver chip for the tube segments. The tube itself lives on a clever riser card that elevates the display above the main PCB and puts it at the proper angle for reading. [sjm4306] designed it to be modular; should you want to user a bigger VFD you need only make a new riser PCB. Figuring out the proper way to space the through-holes in Eagle proved elusive, but he hacked a solution using a spreadsheet to handle the trigonometry and spit out Cartesian coordinates for each hole. Pretty neat. The video below shows the clock assembly and a test.

We really like the look of this clock for some reason – perhaps it’s the quirky nature of the VFD, or the soft teal glow of the digits. We’ve featured plenty of clocks with odd displays before: VFDs large and small, faux-NIMO, de-encapsulated LED “filaments”, and lots and lots of Nixies.

Continue reading “Mini-VFD Clock Floats The Display Above It All”

Hypnotic Visuals Synthesizer

Ever wanted to make some seriously trippy retro graphics to go along with your lo-fi hip hop beats? Now you can, with [teafella]’s aptly named Hypno Video Synthesizer, a Raspberry Pi-based video synthesizer that digitally emulates and extends analog video workflows through colorization, shape generation, and feedback, patching the modifications into a compact interface. The device allows music creators to perform with live visuals, or alternatively to create a unique visual source for a video setup. Once the CV input is plugged in, all it requires is a composite display and power to start working.

Hypno takes input through a control voltage (CV) jack using a MCP3008 ADC via SPI, with voltages scaled from -5-5V to 0-5V. The device attaches on top of a Raspberry Pi, using Raspbian for the operating system and the Pi Zero GPIO to interface with an OpenGL Engine. The input parameters are taken from knobs through a multiplexer into a single channel of the ADC, with values offset in software based on the CV inputs.

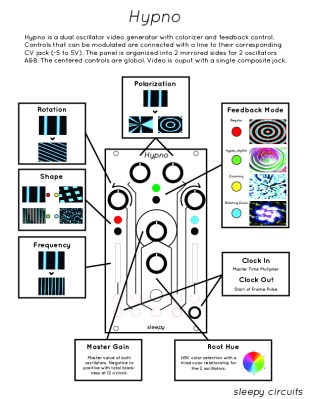
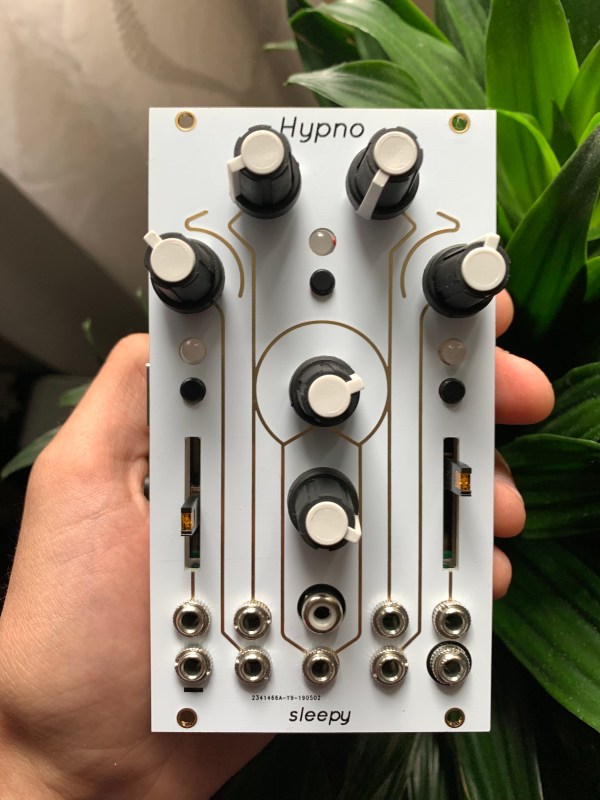
Using the Hypno ends up being fairly straight forward, as the controls are organized onto two mirrored sides for the two oscillators A & B, with global controls in the center. There are knobs that control polarization, rotation, shape, feedback modes (regular, hyper digital, zooming, rotating zoom), clock in/clock out, frequency, root hue, and master gain, as well as RGB LEDs that provide visual feedback.

A single jack outputs the composite result, although a micro-HDMI plug can also be used on the back. For advanced functionality, Hypno allows for patching, which mixes effects on top of one another and allows for shapes such as oscillator cross modulation. There are also alt-controls that open up self modulation and other shapes. Examples include bipolar drift (smoothly scrolls the oscillator) and mirroring (mirrors the oscillator’s shape in different patterns for a kaleidoscope-eque tiled madness).

The software is written in C++ and GLSL, with the main engine running with one plane in OpenGL, drawing the output of a GLSL shader. The CV and knob inputs are fed into shader uniforms that are used to change the visuals in the engine.

[teafella], a self-professed Arduino user, uses WiringPi for the GPIO interactions. The Shader system is inspired by analog video synthesis, with every shape having a simulated “scan” over the screen and function mapped to it that can be transformed into polar coordinates.

The setup for Hypno is fully compatible with analog CV equipment such as Eurorack synthesizers, which makes it easy for music creators to plug and play. Here’s a couple of sample outputs from some soundtracks inputted into Hypno:

Too many combinations to even imagine? Check out a demo of Hypno in action!

Continue reading “Hypnotic Visuals Synthesizer”

Review: OSEPP STEM Kit 1, A Beginner’s All-in-One Board Found In The Discount Aisle

As the name implies, the OSEP STEM board is an embedded project board primarily aimed at education. You use jumper wires to connect components and a visual block coding language to make it go.

I have fond memories of kits from companies like Radio Shack that had dozens of parts on a board, with spring terminals to connect them with jumper wires. Advertised with clickbait titles like “200 in 1”, you’d get a book showing how to wire the parts to make a radio, or an alarm, or a light blinker, or whatever.

The STEM Kit 1 is sort of a modern arduino-powered version of these kits. The board hosts a stand-alone Arduino UNO clone (included with the kit) and also has a host of things you might want to hook to it. Things like the speakers and stepper motors have drivers on board so you can easily drive them from the arduino. You get a bunch of jumper wires to make the connections, too. Most things that need to be connected to something permanently (like ground) are prewired on the PCB. The other connections use a single pin. You can see this arrangement with the three rotary pots which have a single pin next to the label (“POT1”, etc.).

I’m a sucker for a sale, so when I saw a local store had OSEPP’s STEM board for about $30, I had to pick one up. The suggested price for these boards is $150, but most of the time I see them listed for about $100. At the deeply discounted price I couldn’t resist checking it out.

So does an embedded many-in-one project kit like this one live up to that legacy? I spent some time with the board. Bottom line, if you can find a deal on the price I think it’s worth it. At full price, perhaps not. Join me after the break as I walk through what the OSEPP has to offer.

Continue reading “Review: OSEPP STEM Kit 1, A Beginner’s All-in-One Board Found In The Discount Aisle”

Silicone Injector Gives Parts Production A Shot In The Arm

Many of us are happy to spend hours cooking up a solution that saves us seconds, if success means never having to do a hated task again. [frankensteinhadason] molds enough silicone parts that he grew tired of all the manual labor involved, so he built a silicone injector to do it for him. Now, all he has to do is push the handle in notch by notch, until silicone starts oozing from the vent holes in the mold.

The mold pictured above is designed to make little shrouds for helicopter communications connections like this one. His friends in the industry like them so much that he decided to sell them, and needed to scale up production as a result. Now he can make six at once.

He designed brackets to hold a pair of syringes side by side against a backplane. There’s a lever that pushes both plungers simultaneously, and adapters that keep the tubing secured to the syringe nozzles. Ejected two-part silicone travels down to a double-barrel mixing nozzle, which extrudes silicone into the top of the mold.

Naturally, we were going to suggest automating the lever operation, but [frankensteinhadason] is already scheming to do that with steppers and an Arduino. Right now he’s working on increasing the hose diameter for faster flow, which will mean changes to the adapter. Once that is sorted, he plans to post the STLs and a video of it pumping silicone.

Ever thought about doing the reverse, and using silicone to mold hot plastic? Yeah, that’s a thing.

Via r/functionalprint