Road Apology/Gratitude Emitter Car LED Sign

Sometimes, when you’re driving, a simple wave when someone lets you in can go unnoticed and sometimes you make a mistake and a simple wave just isn’t enough. [Noapparentfunction] came up with a nice project to say ‘Thanks’ and ‘My Bad’ to his fellow drivers.

The display uses four Max 7219 LED matrix displays, so the total resolution is 32 by 8. [Noapparentfunction] came up with an inspired idea: using a glasses case to hold the LED matrices and Raspberry Pi. It’s easy to get into if necessary, stays closed, and provides a nice finished look. Having little knowledge of electronics and no programming skills, [Noapparentfunction] had to rely on cutting and pasting Python code as well as connecting a mess of wires together, but the end result works, and that’s what matters.

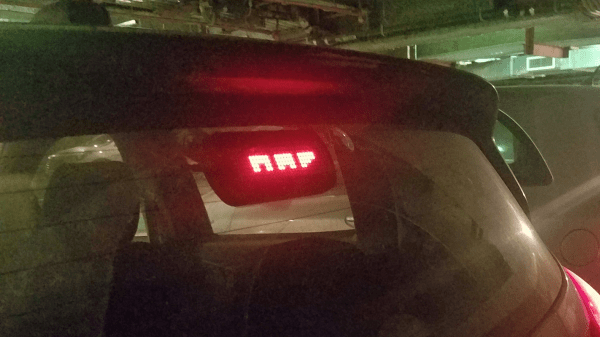
A network cable runs from the glasses case suction cupped to the rear window to another project box under the dashboard. There, the network cable is connected to two buttons and the power. No network information is passed, the cable is just a convenient collection of wires with which to send signals. Each of the buttons shows a different message on the display.

Depending on where you live, this might not be legal, and we’re sure many of our readers (as well as your author) could come up with some different messages to display. However, this is a cool idea and despite [Noapparentfunction]’s admitted limitations, is a nice looking finished product. Also, its name is Road Apology Gratitude Emitter. Here are some other car mod articles: This one adds some lighting to the foot well and glove compartment and this one on the heinousness of aftermarket car alarms.

Pi Pico Powers Parts-Bin Audio Interface

USB audio is great, but what if you needed to use it and had no budget? Well, depending on the contents of your parts bin, you might be able to use [Veyniac]’s Pico-Audio-Interface as a free (and libre! It’s GPL3.0) sound capture device.

In the project’s Reddit thread, [Veyniac] describes needing audio input for his homemade synth, but having no budget. Necessity being the mother of invention, rather than beg borrow or steal a device with a working sound card, he hacked together this lovely device. It shows up as a USB Audio Class 2.0 device so should work with just about anything, and offers 12-bit resolution and 4x oversampling to try and deal with USB noise with its 2-channel, 44.1 kHz sample rate.

Aside from the Pico, all you need is an LM324 op-amp IC and a handful of resistors and capacitors — [Veyniac] estimates about $10 to purchase the whole BOM. He claims that the captured audio sounds okay in his use, but can’t guarantee it will  be for anyone else, noise being the fickle beast that it is. We figure that sounding “Okay” has got to be pretty good, given that you usually get what you pay for — and again, [Veyniac] did build this in a cave with a box of scraps. Well, except for the cave part. Probably.

While the goal here was not to rival a commercial USB sound card, we have seen projects to do that. We’re quite grateful to [Omadeira] for the tip, because this really is a hack. If you, too, want a share of our undying gratitude (which is still worth its weight in gold, despite fluctuations in the spot price of precious metals), send in a tip of your own.

Crowdsourcing SIGINT: Ham Radio At War

I often ask people: What’s the most important thing you need to have a successful fishing trip? I get a lot of different answers about bait, equipment, and boats. Some people tell me beer. But the best answer, in my opinion, is fish. Without fish, you are sure to come home empty-handed.

On a recent visit to Bletchley Park, I thought about this and how it relates to World War II codebreaking. All the computers and smart people in the world won’t help you decode messages if you don’t already have the messages. So while Alan Turing and the codebreakers at Bletchley are well-known, at least in our circles, fewer people know about Arkley View.

The problem was apparent to the British. The Axis powers were sending lots of radio traffic. It would take a literal army of radio operators to record it all. Colonel Adrian Simpson sent a report to the director of MI5 in 1938 explaining that the three listening stations were not enough. The proposal was to build a network of volunteers to handle radio traffic interception.

That was the start of the Radio Security Service (RSS), which started operating out of some unused cells at a prison in London. The volunteers? Experienced ham radio operators who used their own equipment, at first, with the particular goal of intercepting transmissions from enemy agents on home soil.

At the start of the war, ham operators had their transmitters impounded. However, they still had their receivers and, of course, could all read Morse code. Further, they were probably accustomed to pulling out Morse code messages under challenging radio conditions.

Over time, this volunteer army of hams would swell to about 1,500 members. The RSS also supplied some radio gear to help in the task. MI5 checked each potential member, and the local police would visit to ensure the applicant was trustworthy. Keep in mind that radio intercepts were also done by servicemen and women (especially women) although many of them were engaged in reporting on voice communication or military communications.

Continue reading “Crowdsourcing SIGINT: Ham Radio At War”

ESPer-CDP Plays CDs And Streams In Style

What do you get when you combine an ESP32, a 16-bit DAC, an antique VFD, and an IDE CD-ROM drive? Not much, unless you put in the work, which [Akasaka Ryuunosuke] did to create ESPer-CDP, a modern addition for your hi-fi rack.

It plays CDs (of course), but also can also scrobb the disks to Last.fm, automatically fetch track names and lyrics for CDs, and of course stream internet radio. It even acts as a Bluetooth speaker, because when you have an ESP32 and a DAC, why not? Of course we cannot help but award extra style points for the use of a VFD, a salvaged Futaba GP1232A02.  There’s just something about VFDs and stereo equipment that makes them go together like milk and cookies.

close up of front of machine showing VFD.
Between the panel and the VFD, this could almost pass as vintage Sony.

In terms of CD access, it looks like the IDE interface is being used to issue ATAPI commands to the CD-ROM drive to get audio out via S/PDIF.  (Do you remember when you had to hook your CD drive to your sound card to play music CDs?) This goes through a now-discontinued WM8805 receiver — a sign this project has been in the works for a while — that translates S/PDIF into an I2S stream the ESP32 can easily work with.

Work with it it does, with the aforementioned scrobbing, along with track ID and time-sinked lyrics via CDDB or  MusicBrainz. The ESP32 should have the computing power to pull data through the IDE bus and decode it, but we have to admit that this hack gets the job done — albeit at the expense of losing the ability to read data CDs, like MP3 or MIDI. [Akasaka Ryuunosuk] has plans to include such functionality into v2, along with the ability to use a more modern SATA CD-ROM drive. We look forward to seeing it, especially if it keeps the VFD and classic styling. It just needs to be paired with a classic amplifier, and maybe a DIY turntable to top off the stack.

Thanks to [Akasaka Ryuunosuke] for the tip. If you also crave our eternal gratitude (which is worth its weight in gold, don’t forget), drop us a tip of your own. We’d love to hear from you.

LED Layer Makes Plywood Glow

Plywood is an interesting material: made up of many layers of thin wood plys, it can be built up into elegantly curved shapes. Do you need to limit it to just wood, though? [Zach of All Trades] has proved you do not, when he embedded a light guide, LEDs, microcontrollers and touch sensors into a quarter inch (about six millimeter) plywood layup in the video embedded below.

He’s using custom flexible PCBs, each hosting upto 3 LEDs and the low-cost PY32 microcontroller. The PY32 drives the RGB LEDs and handles capacitive touch sensing within the layup. In the video, he goes through his failed prototypes and what he learned: use epoxy, not wood glue, and while clear PET might be nice and bendy, acrylic is going to hold together better and cuts easier with a CO2 laser. Continue reading “LED Layer Makes Plywood Glow”

Booting A Desktop PDP-11

Ever heard of VENIX? There were lots of variants of Unix back in the day, and VENIX was one for the DEC Professional 380, which was — sort of — a PDP 11. The 1982 machine normally ran the unfortunately (but perhaps aptly) named P/OS, but you could get VENIX, too. [OldVCR] wanted to put one of these back online and decided the ST-506 hard drive was too risky. A solid-state drive upgrade and doubling the RAM to a whole megabyte was the plan.

It might seem funny to think of a desktop workstation that was essentially a PDP-11 minicomputer, but in the rush to corner the personal computer market, many vendors did the same thing: shrinking their legacy CPUs. DEC had a spotty history with small computers. [Ken Olsen] didn’t think anyone would ever want a personal computer, and the salespeople feared that cheap computers would eat into traditional sales. The Professional 350 was born out of DEC’s efforts to catch up, as [OldVCR] explains. He grabbed this one from a storage unit about to be emptied for scrap.

The post is very long, but you get a lot of history and a great look inside this vintage machine. Of course, the PDP-11 couldn’t actually handle more than 64K without tricks and you’ll learn more about that towards the end of the post, too.

Just as a preview, the story has a happy ending, including a surprising expression of gratitude from the aging computer. DEC didn’t enjoy much success in the small computer arena, eventually being bought by Compaq, which, in turn, was bought by Dell HP. During their heyday, this would have been unthinkable.

The PDP/11 did have some success because it was put on a chip that ended up in several lower-end machines, like the Heathkit H11. Ever wonder how people programmed the PDP computers with switches and lights?

Programming Ada: Atomics And Other Low-Level Details

Especially within the world of multi-threaded programming does atomic access become a crucial topic, as multiple execution contexts may seek to access the same memory locations at the same time. Yet the exact meaning of the word ‘atomic’ is also essential here, as there is in fact not just a single meaning of the word within the world of computer science. One type of atomic access refers merely to whether a single value can be written or read atomically (e.g. reading or writing a 32-bit integer on a 32-bit system versus a 16-bit system), whereas atomic operations are a whole other kettle of atomic fish.

Until quite recently very few programming languages offered direct support for the latter, whereas the former has been generally something that either Just Worked™ if you know the platform you are on, or could often be checked fairly trivially using the programming language’s platform support headers. For C and C++ atomic operations didn’t become supported by the language itself until C11 and C++11 respectively, previously requiring built-in functions provided by the toolchain (e.g. GCC intrinsics).

In the case of Ada there has been a reluctance among the language designers to add support for atomic operations to the language, with the (GNU) toolchain offering the same intrinsics as a fallback. With the Ada 2022 standard there is now direct support in the System.Atomic_Operations library, however.

Continue reading “Programming Ada: Atomics And Other Low-Level Details”