Repairing A Samsung 24″ LCD Monitor With Funky Color Issues

The old cable in place on the Samsung monitor. (Credit: MisterHW)

Dumpster diving is one of those experiences that can net you some pretty cool gear for a reasonable price. Case in point the 24″ Samsung S24E650XW LCD monitor that [MisterHW] saved from being trashed. Apparently in very good condition with no visible external damage, the unit even powered up without issues. It seemed like a golden find until he got onto the Windows desktop and began to notice quaint red shimmering in darker areas and other issues that made it clear why the monitor had been tossed. Of course, the second best part about dumpster diving is seeing whether you can repair such issues.

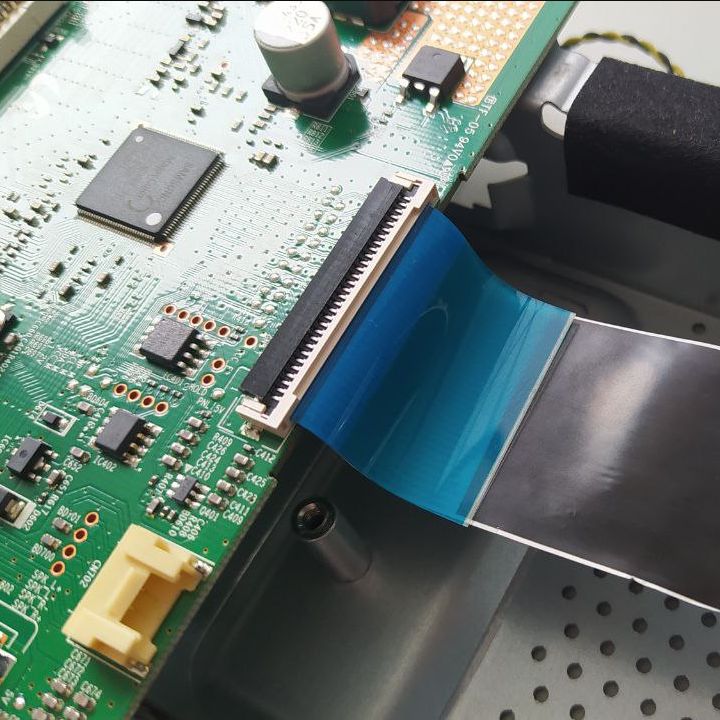
Prior to disassembly it had been noted that percussive maintenance and bending of the frame changed the symptoms, suggesting that something was a bit loose inside. After taking the back cover and shielded enclosure off, a quick visual inspection of the boards and cables quickly revealed the likely suspect: broken traces on one of the cables.

Apparently somewhere during the assembly step in the factory the cable had been pushed against the PCB’s edge, causing the initial damage. Based on the listed assembly date the monitor had only been in use for a few years before it was tossed, so likely the symptoms would have begun and worsened as one after another of the traces gradually cracked and broke due to vibrations, thermal expansion, etc.

This issue made fixing the monitor very simple, however, assuming a suitable replacement cable could be found. The broken cable is a 30P 1.0 pitch PFC, with EBay throwing up a cable with similar specs for a Thomson brand TV. One purchase and anxious wait later, the replacement cable was installed as in the featured image alongside the old cable. Perhaps unsurprisingly it restored the monitor to full working order, demonstrating once again that dumpster diving is totally worth it.

Carnarvon’s Decommissioned NASA Satellite Dish Back In Service After 40 Years

The OTC Station 29.8 meter dish at Carnarvon, Australia, in need of a bit of paint. (Credit: ABC News Australia)

Recently the 29.8 meter parabolic antenna at the Australian OTC (overseas telecommunications commission) station came back to life again after nearly forty years spent in decommissioning limbo.

This parabolic dish antenna shares an illustrious history together with the older 12.8 meter Casshorn antenna in that together they assisted with many NASA missions over the decades. These not only include the Apollo 11 Moon landing with the small antenna, but joined by the larger parabolic dish (in 1969) the station performed tracking duty for NASA, ESA  and many other missions. Yet in 1987 the station was decommissioned, with scrapping mostly averted due to the site being designated a heritage site, with a local museum.

Then in 2022 the 29.8 meter parabolic dish antenna was purchased by by ThothX Australia, who together with the rest of ThothX’s world-wide presence will be integrating this latest addition into a satellite tracking system that seems to have the interest of various (military, sigh) clients.

Putting this decommissioned dish back into service wasn’t simply a matter of flipping a few switches. Having sat mostly neglected for decades it requires extensive refurbishing, but this most recent milestone demonstrates that the dish is capable of locking onto a satellites. This opens the way for a top-to-bottom refurbishment, the installation of new equipment and also a lick of paint on the dish itself, a process that will still take many years but beats watching such a historic landmark rust away by many lightyears.

Featured image: OTC Earth Station. (Credit: Paul Dench)

2024: As The Hardware World Turns

With 2024 now officially in the history books, it’s time to take our traditional look back and reflect on some of the top trends and stories from the past twelve months as viewed from the unique perspective Hackaday affords us. Thanks to the constant stream of tips and updates we receive from the community, we’ve got a better than average view of what’s on the mind of hardware hackers, engineers, and hobbyists.

This symbiotic relationship is something we take great pride in, which is why we also use this time of year to remind the readers just how much we appreciate them. We know it sounds line a line, but we really couldn’t do it without you. So whether you’ve just started reading in 2024 or been with us for years, everyone here at Hackaday thanks you for being part of something special. We’re keenly aware of how fortunate we are to still be running a successful blog in the era of YouTube and TikTok, and that’s all because people like you keep coming back. If you keep reading it, we’ll keep writing it.

So let’s take a trip down memory lane and go over just a handful of the stories that kept us talking in 2024. Did we miss your favorite? Feel free to share with the class in the comments.

Continue reading “2024: As The Hardware World Turns”

2024 Brought Even More Customization To Boxes.py

If you have access to a laser cutter, we sincerely hope you’re aware of boxes.py. As the name implies, it started life as a Python tool for generating parametric boxes that could be assembled from laser-cut material, but has since become an invaluable online resource for all sorts of laser projects. Plus, you can still use it for making boxes.

But even if you’ve been using boxes.py for awhile, you might not know it was actually an entry in the Hackaday Prize back in 2017. Creator [Florian Festi] has kept up with the project’s Hackaday.io page all this time, using it as a sort of development blog, and his recent retrospective on 2024 is a fascinating read for anyone with an eye towards hot photonic action.

Continue reading “2024 Brought Even More Customization To Boxes.py”

Playing Around With The MH-CD42 Charger Board

If you’ve ever worked with adding lithium-ion batteries to one of your projects, you’ve likely spent some quality time with a TP4056. Whether you implemented the circuit yourself, or took the easy way out and picked up one of the dirt cheap modules available online, the battery management IC is simple to work with and gets the job done.

But there’s always room for improvement. In a recent video, [Det] and [Rich] from Learn Electronics Repair go over using a more modern battery management board that’s sold online as the MH-CD42. This board, which is generally based on a clone of the IP5306, seems intended for USB battery banks — but as it so happens, plenty of projects that makers and hardware hackers work on have very similar requirements.

So not only will the MH-CD42 charge your lithium-ion cells when given a nominal USB input voltage (4.5 – 5 VDC), it will also provide essential protections for the battery. That means looking out for short circuits, over-charge, and over-discharge conditions. It can charge at up to 2 A (up from 1 A on the TP4056), and includes a handy LED “battery gauge” on the board. But perhaps best of all for our purposes, it includes the necessary circuitry to boost the output from the battery up to 5 V.

If there’s a downside to this board, it’s that it has an automatic cut-off for when it thinks you’ve finished using it; a feature inherited from its USB battery bank origins. In practice, that means this board might not be the right choice for projects that aren’t drawing more than a hundred milliamps or so.

Continue reading “Playing Around With The MH-CD42 Charger Board”

close up of a TI-84 Plus CE running custom software

Going Digital: Teaching A TI-84 Handwriting Recognition

You wouldn’t typically associate graphing calculators with artificial intelligence, but hacker [KermMartian] recently made it happen. The innovative project involved running a neural network directly on a TI-84 Plus CE to recognize handwritten digits. By using the MNIST dataset, a well-known collection of handwritten numbers, the calculator could identify digits in just 18 seconds. If you want to learn how, check out his full video on it here.

The project began with a proof of concept: running a convolutional neural network (CNN) on the calculator’s limited hardware, a TI-84 Plus CE with only 256 KB of memory and a 48 MHz processor. Despite these constraints, the neural network could train and make predictions. The key to success: optimizing the code, leveraging the calculator’s C programming tools, and offloading the heavy lifting to a computer for training. Once trained, the network could be transferred to the calculator for real-time inference. Not only did it run the digits from MNIST, but it also accepted input from a USB mouse, letting [KermMartian] draw digits directly on the screen.

While the calculator’s limited resources mean it can’t train the network in real-time, this project is a proof that, with enough ingenuity, even a small device can be used for something as complex as AI. It’s not just about power; it’s about resourcefulness. If you’re into unconventional projects, this is one for the books.

Continue reading “Going Digital: Teaching A TI-84 Handwriting Recognition”