Peering Into A Running Brain: SDRAM Refresh Analyzed From Userspace

Over on the Cloudflare blog, [Marek] found himself wondering about computer memory, as we all sometimes do. Specifically, he pondered if he could detect the refresh of his SDRAM from within a running program. We’re probably not ruining the surprise by telling you that the answer is yes — with a little more than 100 lines of C and help from our old friend the Fast Fourier Transform (FFT), [Marek] was able to detect SDRAM refresh cycles every 7818.6 ns, lining right up with the expected result.

The “D” in SDRAM stands for dynamic, meaning that unless periodically refreshed by reading and writing, data in the memory will decay. In this kind of memory, each bit is stored as a charge on a tiny capacitor. Given enough time (which varies with ambient temperature), this charge can leak away to neighboring silicon, turning all the 1s to 0s, and destroying the data. To combat this process, the memory controller periodically issues a refresh command which reads the data before it decays, then writes the data back to fully charge the capacitors again. Done often enough, this will preserve the memory contents indefinitely. SDRAM is relatively inexpensive and available in large capacity compared to the alternatives, but the drawback is that the CPU can’t access the portion of memory being refreshed, so execution gets delayed a little whenever a memory access and refresh cycle collide.

Chasing the Correct Hiccup

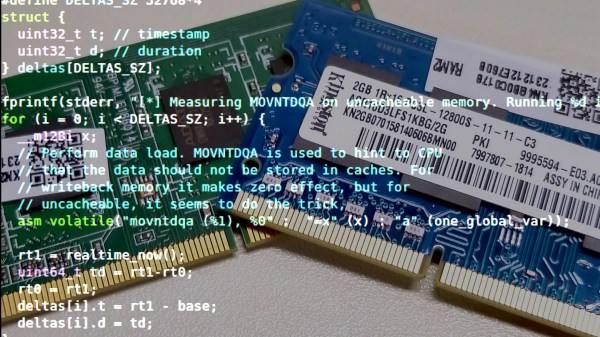
[Marek] figured that he could detect this “hiccup,” as he calls it, by running some memory accesses and recording the current time in a tight loop. Of course, the cache on modern CPUs would mean that for a small amount of data, the SDRAM would never be accessed, so he flushes the cache each time. The source code, which is available on GitHub, outputs the time taken by each iteration of the inner loop. In his case, the loop typically takes around 140 ns.

Hurray! The first frequency spike is indeed what we were looking for, and indeed does correlate with the refresh times.

The other spikes at 256kHz, 384kHz, 512kHz and so on, are multiplies of our base frequency of 128kHz called harmonics. These are a side effect of performing FFT on something like a square wave and totally expected.

As [Marek] notes, the raw data doesn’t reveal too much. After all, there are a lot of things that can cause little delays in a modern multitasking operating system, resulting in very noisy data. Even thresholding and resampling the data doesn’t bring refresh hiccups to the fore. To detect the SDRAM refresh cycles, he turned to the FFT, an efficient algorithm for computing the discrete Fourier transform, which excels at revealing periodicity. A few lines of python produced the desired result: a plot of the frequency spectrum of the lengthened loop iterations. Zooming in, he found the first frequency spike at 127.9 kHz, corresponding to the SDRAMs refresh period of 7.81 us, along with a number of other spikes representing harmonics of this fundamental frequency. To facilitate others’ experiments, [Marek] has created a command line version of the tool you can run on your own machine.

If this technique seems familiar, it may be because it’s similar the the Rowhammer attack we covered back in 2015, which can actually change data in SDRAM on vulnerable machines by rapidly accessing adjacent rows. As [Marek] points out, the fact that you can make these kinds of measurements from a userspace program can have profound security implications, as we saw with the meltdown and spectre attacks. We have to wonder what other vulnerabilities are lying inside our machines waiting to be discovered.

Thanks to [anfractuosity] for the tip!

Hack My House: Running Raspberry Pi Without An SD Card

Many of us have experienced the pain that is a Raspberry Pi with a corrupted SD card. I suspect the erase-on-write nature of flash memory is responsible for much of the problem. Regardless of the cause, one solution is to use PXE booting with the Raspberry Pi 3. That’s a fancy way to say we’ll be booting the Raspberry Pi over the network, instead of from an SD card.

What does this have to do with Hacking My House? As I discussed last time, I’m using Raspberry Pi as Infrastructure by building them into the walls of every room in my house. You don’t want to drag out a ladder and screwdriver to swap out a misbehaving SD card, so booting over the network is a really good solution. I know I promised we’d discuss cabling and cameras. Think of this as a parenthetical article — we’ll talk about Ethernet and ZoneMinder next time.

So let’s dive in and see what the Preboot Execution Environment (PXE) is all about and how to use PXE with Raspberry Pi.

Continue reading “Hack My House: Running Raspberry Pi Without An SD Card”

Join Hackaday And Tindie This Thursday At Open Hardware Summit

This weekend Hackaday and Tindie will be trekking out to beautiful Cambridge, Massachusetts, for the greatest congregation of Open Source hardware enthusiasts on the planet. This is the Open Hardware Summit. It’s every year, most of the time in different places, and this year it’s back in the hallowed halls of MIT. Somebody put a car on the roof before we do.

The schedule for this year’s Open Hardware Summit is stuffed to the gills with interesting presentations sure to satiate every hardware nerd. We’ve got talks on Open Source Software Defined Radio, and the people behind the Hackaday Prize entry Programmable Air will be there talking about controlling soft robotics.

Really, though, this is an extravaganza filled with the people who make things, and here you’re not going to find a better crew. At every Open Hardware Summit we’ve attended, you can’t turn your head without locking eyes with someone with an interesting story of hardware heroics to tell.

This is, without a doubt, the greatest gathering of the people behind all your favorite hardware designs. The greats of 3D printing will be there, we’re going to get an update on the now two-year-old Open Hardware Certification program (hint: great success!), and there’s an awesome badge, as always. There will be some extra-special Hackaday swag in the goodie bags, sure to be a collectable. We’re going to be there with boots on the ground, but it’s still not too late to get tickets if you’re in the Boston area.

A BCD Clock For Your Desk

We see so many clocks here at Hackaday, and among those we see our fair share of binary clocks. But to see one that at first sight looks as though it might be a commercial product when it is in fact a one-off project is something special. That’s just what [Tobi4sDE] has done though, with his desktop BCD binary LED clock.

The front panel is a black PCB on which sit the LEDs that form the binary display, and its back holds an ATMega328P microcontroller and DS3231 real-time clock. A smart desktop case is 3D-printed, and while the clock is USB-powered it features a CR2032 coin cell as a backup to hold the time while the USB is disconnected.

Unexpectedly he’s used a mini USB socket rather than the expected micro USB, but the rest of the clock is one we’d probably all have on our desks given the chance. We’d even go so far as to say we’d have this one as a kit if it were available.

Of course, regular readers will notice that this isn’t the only high-standard BCD timepiece you’ll have seen recently, though the other one was a wristwatch.

Teardown Of A Fingerprint Padlock

We wouldn’t mind tearing down a fingerprint scanner, but we hate to bust up our expensive laptop or cell phone. [Julian], however, got a hold of a fingerprint scanning padlock and was willing to tear it apart for our benefit. The video appears below.

The padlock is a simple enough little device with a cable lock instead of a solid metal shackle, although we have seen similar devices with traditional shackles. Initially, the lock’s fingerprint storage is empty and it will open for any fingerprint. The first task is to set an administrator fingerprint. You’ll need that fingerprint to set up other fingerprints or to reset the unit. Of course, what we are really interested in is what’s inside.

Continue reading “Teardown Of A Fingerprint Padlock”

Homebrew SDR Ham Radio In 9 Parts

It used to be homebrew ham gear meant something simple. A couple of active devices that could send CW. Maybe a receiver with a VFO. But only the most advanced builders could tackle a wide range SSB transceiver. Today, that goal is still not trivial, but it is way easier due to specialty ICs, ready access to high-speed digital signal processing, and advances in software-defined radio techniques. [Charlie Morris] decided to build an SSB rig that incorporated these technologies and he shared the whole process from design to operation in a series of nine videos. You can see the first one below.

The NE612 is a child of the popular NE602 chip, which contains a Gilbert-cell mixer, and an oscillator that makes building a receiver much easier than it has been in the past. The chips are set up as direct conversion receivers and feed a Teensy which does the digital signal processing on the recovered audio.

Continue reading “Homebrew SDR Ham Radio In 9 Parts”

Dual SDR Receives Two Bands At Once

There was a time when experimenting with software defined radio (SDR) was exotic. But thanks to cheap USB-based hardware, this technology is now accessible to anyone. While it is fun to play with the little $20 USB sticks, you’ll eventually want to move up to something better and there are a lot of great options. One of these is SDRPlay, and they recently released a new piece of hardware — RSPduo — that incorporates dual tuners.

We’ve talked about using the SDRPlay before as an upgrade from the cheap dongles. The new device can tune either a single 10 MHz band over the range of 1 kHz to 2 GHz, or you can select two 2 MHz bands. This opens up a lot of applications where you need to pick up signals in different areas of the spectrum (e.g., monitoring both sides of a cross-band repeater).

Continue reading “Dual SDR Receives Two Bands At Once”