Hands On With Boondock Echo

Perhaps no words fill me with more dread than, “I hear there’s something going around.” In my experience, you hear this when some nasty bug has worked its way into the community and people start getting whatever it is. I’m always on my guard when I hear about something like this, especially when it’s something really unpleasant like norovirus. Forewarned is forearmed, after all.

Since I work from home and rarely get out, one of the principal ways I keep apprised of what’s going on with public health in my community is by listening to my scanner radio. I have the local fire rescue frequencies programmed in, and if “there’s something going around,” I usually find out about it there first; after a half-dozen or so calls for people complaining of nausea and vomiting, you get the idea it’s best to hunker down for a while.

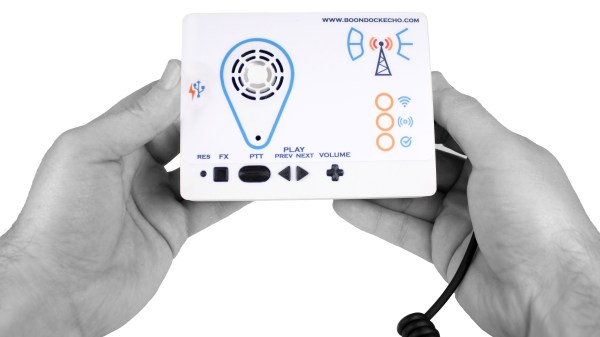
I manage to stay reasonably well-informed in this way, but it’s not like I can listen to my scanner every minute of the day. That’s why I was really excited when my friend Mark Hughes started a project he called Boondock Echo, which aims to change the two-way radio communications user experience by enabling internet-backed recording and playback. It sounded like the perfect system for me — something that would let my scanner work for me, instead of the other way around. And so when Mark asked me to participate in the beta test, I jumped at the chance.

Continue reading “Hands On With Boondock Echo”

Creating A New Metal Rohde & Schwarz EB200 Miniport Receiver Dial Knob

Recently [Roberto Barrios] got his hands on a Rohde & Schwarz EB200 monitoring and surveillance receiver that, despite its late 90s vintage, was in mint condition. Aside from damage to the main dial, that is, which was very much broken. With no off-the-shelf replacement available in 2023, the obvious answer was to get a close-enough dial knob with the rough proportions and use a lathe to machine it into shape. Initially, [Roberto] had used some filler material to replace the front of the original knob that was missing, but this was a decidedly inferior tactile experience with questionable long-term reliability.

Dimensions of the Rhode & Schwarz EB200 dial knob. (Credit: Roberto Barrios)

The challenge in replacing the original knob with a proper replacement was in how the dial knob is mounted on the receiver, as an internally threaded shell that goes on the internal dial encoder assembly. With a lathe at his behest, taking an off-the-shelf dial knob that accepts a 6 mm shaft and turning it into a compatible knob was a straightforward affair. Removing the excess material and creating the internal 1 mm pitch thread allowed the newly made knob to fit on the receiver like an OEM part. The only niggle was having to remove 1.8 mm off the face of the brass body to get the knob to sit close to the front panel.

Unlike the old patched-up knob, this new one is fully out of metal and has the absolutely essential feature of the recessed area for easy fine-tuning. Although perhaps not the most exciting fix for old gear, it’s decidedly essential to keep it functional.

PC Case Makes Portable Power Supply

Recently, we’ve seen a lot of semi-portable power stations. These have some big rechargeable battery and various connection options. [Dereksgc] wanted to make his own and decided the perfect housing would be a small PC tower case. (Video, embedded below.) It makes sense. There are plenty of easy-to-work front panel inserts, a power supply box with an AC cord (the power supply is long gone), and it is big enough to fit the battery. You can see the result in the video below.

The bulk of the work was installing power supply modules and a charge controller on floppy disk blank panels. The battery — a 50 Ah LiFePO4 unit — fits nicely in the bottom. Some of the buttons and connectors find use in the new incarnation.

Continue reading “PC Case Makes Portable Power Supply”

2023 Hackaday Supercon Badge: Welcome To The Vectorscope

This year, the Supercon badge goes analog! (Or at least fakes it pretty convincingly.) Taking inspiration from the phosphor scopes of yesteryear, the 2023 Vectorscope badge is part analog audio playground, part art project, and all about prototyping. Who doesn’t like the warm glow and lovely green fade of an old Tektronix tube scope? That’s what we’re after.

Conceptually, the badge is two separate devices in one. Most obvious is the vectorscope, which takes in voltages in the 0 V – 3 V range and plots them out in X-Y mode in glorious fake-phosphor effect on the lovely round IPS screen. We’ve also tied an audio amplifier to the Y input that plays whatever waveform you’re watching.

But you don’t have to bring your own waveforms with you – the other half of the badge is an arbitrary programmable waveform generator that drives two channels. Off the bat, it’s configurable with the front panel controls, so you’re obviously invited to make Lissajous figures and store them in the program memories.

Combining the two halves lets you draw in voltages and time, but not until you connect them together, naturally. You see, this isn’t an analog simulation – it’s the programmable equivalent of the real deal, courtesy of the AK4619 ADC/DAC. Voltages go out on one set of pins and come back in on the other.

And you get to play around with these voltages in through-hole space too, because we’ve included a very generous prototyping board for your analog explorations. Does this instantly suggest a curve tracer to you? Be our guest! Other forms of analog video-mangling? We want to see what you come up with. Make an audio filter and watch it work on the screen in front of your very eyes.

Of course we’re not leaving you code monkeys out in the cold. MicroPython puts the “programming” in the programmable waveform generator. If you’re not content with the four stock waveforms, you’re invited to write your own. And this is where it gets artsy.

You can upload your own repetitive waveforms to the onboard direct digital synth routine, but why stop there? We’ve left most of the processing power of the underlying RP2040 untouched, for you to use. And four buttons on the front panel let you store and play back your code, so you have space to stash your demos, and a sweet joystick with a custom keycap gives you control.

Continue reading “2023 Hackaday Supercon Badge: Welcome To The Vectorscope”

Atari Introduces A New Old Console

Readers of a certain age no doubt remember the Atari 2600 — released in 1977, the 8-bit system helped establish the ground rules for gaming consoles as we know them today, all while sporting a swanky faux wood front panel designed to make the system look at home in contemporary living rooms.

Now, nearly 50 years later, the Atari 2600 is back. The new system, imaginatively named the 2600+, looks exactly like the original system, albeit at around 80% scale. It will also work the same way, as the system will actually be able to play original Atari 2600 and 7800 cartridges. This is something of a surprise when compared to the previously released retro consoles from the likes of Sony and Nintendo, as they were all limited to whatever games the company decided to pack into them. Of course, this probably has something to do with the fact that Atari has been selling newly manufactured 2600 games for some time now.

Although it will play original cartridges, it’s still an emulated console at heart. There aren’t a lot of technical details on the product page, but it does say the 2600+ is powered by a Rockchip 3128 SoC with 256 MB of DDR3 RAM and 256 MB eMMC flash. Some quick searching shows this to be a pretty common board for set-top gadgets, and wildly overpowered considering the meager requirements for emulating a game console from 1977. We wouldn’t be surprised to find it’s running some kind of minimal Linux install and using one of the existing open source emulators.

While the 2600+ sports the same 9-pin D-sub controller connectors as the original console, it thankfully embraces modern display technology and outputs over HDMI. Each console will come with a “10-in-1” cartridge that contains some of the console’s most popular titles, as well as a modernized version of the original single-button joystick. (Unlike the original, the 2600+ comes with only a single joystick — the other is sold separately.)

Atari won’t start shipping the 2600+ until this fall, but they’re currently taking preorders for the $130 system. We’re eager to see somebody pull it apart, as the earlier “mini” consoles ended up being ripe for hacking.

Continue reading “Atari Introduces A New Old Console”

Review: WAINLUX K8, A Diode Laser That’s Ready To Work

Rarely a week goes by that some company doesn’t offer to send us their latest and greatest laser. You know the type — couple of aluminum extrusions, Class 4 diode flopping around in the breeze, and no enclosure to speak of unless you count the cardboard box they shipped it in. In other words, an accident waiting to happen. Such gracious invitations get sent to the trash without a second thought.

Now don’t get me wrong, I have no doubt that the average Hackaday reader would be able to render such a contraption (relatively) safe for use around the shop. Build a box around it, bolt on a powerful enough fan to suck the smoke out through the window, and you’ve turned a liability into a legitimate tool. But the fact remains that we simply can’t put our stamp on something that is designed with such a blatant disregard for basic safety principles.

The earlier WAINLUX JL4 — lucky rabbit foot not included.

That being the case, a recent email from WAINLUX nearly met the same fate as all those other invitations. But even at a glance it was clear that this new machine they wanted to send out, the K8, was very different from others we’d seen. Different even from what the company themselves have put out to this point. This model was fully enclosed, had a built-in ventilation fan, an optional air filter “sidecar”, and yes, it would even turn off the laser if you opened the door while it was in operation. After reading through the promotional material they sent over, I had to admit, I was intrigued.

It seemed like I wasn’t the only one either; it was only a matter of days before the Kickstarter for the WAINLUX K8 rocketed to six figures. At the time of this writing, the total raised stands at just under $230,000 USD. There’s clearly a demand for this sort of desktop laser, the simplicity of using a diode over a laser tube is already appealing, but one that you could actually use in a home with kids or pets would be a game changer for many people.

But would the reality live up to the hype? I’ve spent the last couple of weeks putting a pre-production WAINLUX K8 through its paces, so let’s take a look and see if WAINLUX has a winner on their hands.

Continue reading “Review: WAINLUX K8, A Diode Laser That’s Ready To Work”

A Mainframe Computer For The Modern Age

The era of mainframe computers and directly programming machines with switches is long past, but plenty of us look back on that era with a certain nostalgia. Getting that close to the hardware and knowing precisely what’s going on is becoming a little bit of a lost art. That’s why [Phil] took it upon himself to build this homage to the mainframe computer of the 70s, which all but disappeared when PCs and microcontrollers took over the scene decades ago.

The machine, known as PlasMa, is not a recreation of any specific computer but instead looks to recreate the feel of computers of this era in a more manageable size. [Phil] built the entire machine from scratch, and it can be programmed directly using toggle switches to input values into registers and memory. Programs can be run or single-stepped, and breakpoints can be set for debugging. The internal workings of the machine, including the program counter, instruction register, accumulator, and work registers, are visible in binary lights. Front panel switches let you control those same items.

The computer also hosts three different microcodes, each providing a unique instruction set. Two are based on computers from Princeton, Toy-A, and Toy-B, used as teaching tools. The third is a more advanced instruction set that allows using things like emulated peripherals, including storage devices. If you want to build one or just follow along as the machine is constructed, programmed, and used, [Phil] has a series of videos demonstrating its functionality, and he’s made everything open-source for those more curious. It’s a great way to get a grasp on the fundamentals of computing, and the only way we could think of to get even more into the inner workings of a machine like this is to build something like a relay computer.

Continue reading “A Mainframe Computer For The Modern Age”