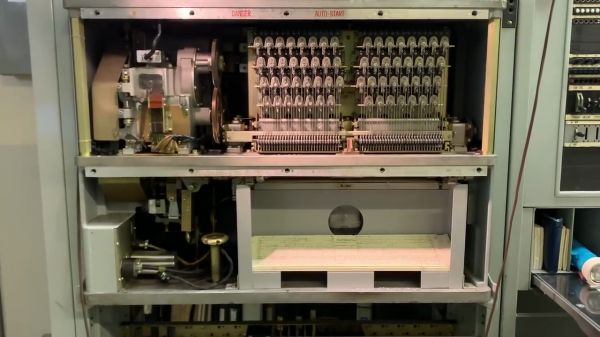
TickTag, a tiny GPS logger with 3d printed case, LiPo battery and a 1 Euro coin for size reference

Tiny GPS Logger For The Internet Of Animals

[Trichl] has created a tiny GPS logger, called ‘TickTag’, designed as an inexpensive location tracking option for animal studies. The low cost, tiny form factor, and large power density of the LiPo battery give it the ability to track large populations of small animals, including dogs and bats.

The TickTag is capable of getting 10,000 GPS fixes from its 30 mAh cell. Each unit is equipped with an L70B-M39 GPS module controlled by an Atmel ATtiny1626 microcontroller and sports a tiny AXE610124 10-pin connection header for programming and communication. GPS data is stored on a 128 kB EEPROM chip with each GPS location fix using 25 bits for latitude, 26 bits for longitude, and 29 bits for a timestamp. Add it all up and you get 10 bytes per GPS data point (25+26+29=80), giving the 10k GPS fix upper bound.

To record higher quality data and extend battery life, the TickTag can be programmed to record GPS location data using variable frequency intervals or when geofencing bounds have been crossed.

Continue reading “Tiny GPS Logger For The Internet Of Animals”

TRS-80 Model II Lives Again

A lot of people had a Radio Shack TRS-80 Model I. This was a “home computer” built into a keyboard that needed an external monitor or TV set. Later, Radio Shack would update the computer to a model III which was a popular “all in one” option with a monitor and even space for — gasp — floppy disks. But the Model II was not nearly as common. The reason? It was aimed at businesses and priced accordingly. [Adrian] got a Model II that was in terrible shape and has been bringing it back to life. You can see the video of how he’s done with it, below.

The Model II was similar to the older “Trash 80” which had been used — to Radio Shack’s surprise — quite often by businesses. But it had more sophisticated features including a 4MHz CPU — blistering speed for those days. It also had an 80×25 text display and a 500K 8-inch floppy drive. There were also serial and printer ports standard.

There were a few interesting features. The floppy drive’s spindle ran on AC power and if the computer was on, the disk was spinning. In addition, there was bank switching so you could go beyond 64K and also you didn’t have to share your running memory with the video display. In theory, the machine could go beyond 64K since half the memory was bank switchable. In practice, the early models didn’t have enough expansion space to handle more than 64K physically.

Continue reading “TRS-80 Model II Lives Again”

The CPSC Says Plug To Socket, Not Plug To Plug, Please

When the power goes out, it goes without saying that all the lights and sockets in a house stop working. Savvy rural homeowners stock up with candles, batteries, LED lights, and inverters.  More foolhardy folks simply hook up their home electrical system to a generator using a mains lead with a plug on one end between the generator and a wall socket. This should be so obviously dangerous as to be unnecessary, but it’s become widespread enough that the US Consumer Product Safety Commission has issued a warning about the practice. In particular, they’re concerned that there’s not even a need to wire up a lead, as they’re readily available on Amazon.

The dangers they cite include electrocution, fire hazard from circumventing the house electrical protection measures, and even carbon monoxide poisoning because the leads are so short that the generator has to be next to the socket. Hackaday readers won’t need telling about these hazards, even if in a very few and very special cases we’ve seen people from our community doing it. Perhaps there’s a flaw in the way we wire our homes, and we should provide a means to decouple our low-power circuits when there’s a power cut.

It’s likely that over the coming decades the growth of in-home battery storage units following the likes of the Tesla Powerwall will make our homes more resilient to power cuts, and anyone tempted to use a plug-to-plug lead will instead not notice as their house switches to stored or solar power. Meanwhile, some of us have our own ways of dealing with power outages.

Plug image: Evan-Amos, Public domain.

DIY Haptic-Enabled VR Gun Hits All The Targets

This VR Haptic Gun by [Robert Enriquez] is the result of hacking together different off-the-shelf products and tying it all together with an ESP32 development board. The result? A gun frame that integrates a VR controller (meaning it can be tracked and used in VR) and provides mild force feedback thanks to a motor that moves with each shot.

But that’s not all! Using the WiFi capabilities of the ESP32 board, the gun also responds to signals sent by a piece of software intended to drive commercial haptics hardware. That software hooks into the VR game and sends signals over the network telling the gun what’s happening, and [Robert]’s firmware acts on those signals. In short, every time [Robert] fires the gun in VR, the one in his hand recoils in synchronization with the game events. The effect is mild, but when it comes to tactile feedback, a little can go a long way.

The fact that this kind of experimentation is easily and affordably within the reach of hobbyists is wonderful, and VR certainly has plenty of room for amateurs to break new ground, as we’ve seen with projects like low-cost haptic VR gloves.

[Robert] walks through every phase of his gun’s design, explaining how he made various square pegs fit into round holes, and provides links to parts and resources in the project’s GitHub repository. There’s a video tour embedded below the page break, but if you want to jump straight to a demonstration in Valve’s Half-Life: Alyx, here’s a link to test firing at 10:19 in.

There are a number of improvements waiting to be done, but [Robert] definitely understands the value of getting something working, even if it’s a bit rough. After all, nothing fills out a to-do list or surfaces hidden problems like a prototype. Watch everything in detail in the video tour, embedded below.

Continue reading “DIY Haptic-Enabled VR Gun Hits All The Targets”

3D Printed Strain-Wave Gearbox Turns Up The Torque

3D printers are good for a lot of things, but making parts for power transmission doesn’t seem to be one of them. Oh sure, some light-duty gears and timing belt sprockets will work just fine when printed, but oftentimes squooshed plastic parts are just too compliant for serious power transmission use.

But that’s not a hard and fast rule. In fact, this 3D-printed strain-wave transmission relies on the flexibility of printed parts to work its torque amplification magic. In case you haven’t been briefed, strain-wave gearing uses a flexible externally toothed spline nested inside an internally toothed stationary gear. Inside the flexible spline is a wave generator, which is just a symmetrical cam that deforms the spline so that it engages with the outside gear. The result is a high ratio gear train that really beefs up the torque applied to the wave generator.

It took a couple of prototypes for [Brian Bocken] to dial in his version of the strain-wave drive. The PLA he used for the flexible spline worked, but wasn’t going to be good for the long haul. A second version using TPU proved better, but improvements to the motor mount were needed. The final version proved to pack a punch in the torque department, enough to move a car. Check it out in the video below.

Strain-wave gears have a lot of applications, especially in robotic arms and legs — very compact versions with the motor built right in would be great here. If you’re having trouble visualizing how they work, maybe a Lego version will clear things up.

Continue reading “3D Printed Strain-Wave Gearbox Turns Up The Torque”

3D Printable Bearings That Actually Work, No CAD Tweaking Required

3D printing bearings with an FDM printer can be an iffy endeavor, but it doesn’t have to be that way. [Matvey Kukuy]’s Ultimate 608 Bearing with Calibration Kit is everything you’ll need to dial in and print functional 608-style print-in-place bearings on your 3D printer.

Calibration pieces have a handy label attached for identification.

[Matvey] found that there are two key tolerances to get right. And by “get right” he means “empirically determine which works best with your filament and printer”. But don’t worry, there’s no need to get into CAD work to make that happen. [Matvey] has exported a staggering 64 slightly different calibration models (and their matching production versions) along with a printable testing tool. With the help of a step-by-step process that resembles a sort of binary search, one can take the Goldilocks approach to find just the right model for one’s filament and printer in a minimum of steps.

There’s one more tip as well: [Matvey] says that once you determine the best model to use, don’t fill the print bed with copies, unless you want a bed full of possibly non-working bearings! Why is this? A 3D printer prints a bed full of objects slightly differently than it prints a single one, and since the margin for error on the perfectly-selected bearing is so small, that can be enough to keep it from working. To print more than one bearing at a time, position them far from each other and use something like PrusaSlicer’s sequential printing, which is an option to print each object completely before starting the next one.

[Matvey]’s own best results came from printing with PLA at a layer height of 0.16 mm. He also used grease in the bearing to improve performance and extend its life. He doesn’t specify what kind of grease he used, but we’d recommend a plastic-safe grease like PTFE-based Super Lube.

Have you used 3D printed bearings in a project? Would [Matvey]’s design be helpful to you? Let us know all about it in the comments.

Why Can’t We Have Pretty Things?

I was reading [Al Williams]’ great rant on why sometimes the public adoption of tech moves so slowly, as exemplified by the Japanese Minister of Tech requesting the end of submissions to the government on floppy diskettes. In 2022!

Along the way, [Al] points out that we still trust ballpoint-pen-on-paper signatures more than digital ones. Imagine going to a bank and being able to open an account with your authentication token! It would be tons more secure, verifiable, and easier to store. It makes sense in every way. Except, unless you’ve needed one for work, you probably don’t have a Fido2 (or whatever) token, do you?

Same goes for signed, or encrypted, e-mail. If you’re a big cryptography geek, you probably have a GPG key. You might even have a mail reader that supports it. But try requesting an encrypted message from a normal person. Or ask them to verify a signature.

Honestly, signing and encrypting are essentially both solved problems, from a technical standpoint, and for a long time. But somehow, from a societal point of view, we’re not even close yet. Public key encryption dates back to the late 1970’s, and 3.5” diskettes are at least a decade younger. Diskettes are now obsolete, but I still can’t sign a legal document with my GPG key. What gives?