30-Year-Old Macintosh SE/30 Gets A Brand New Logic Board

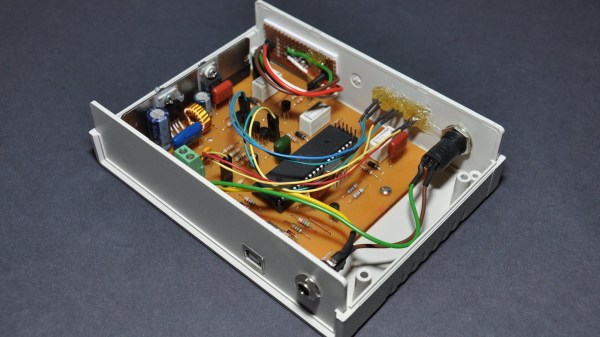
Some time ago, [Bolle] got the idea to redraw the Macintosh SE/30 schematics in Eagle. Progress was initially slow, but over the past month (and with some prodding and assistance from fellow forum frequenter [GeekDot]), he’s taken things a step further by creating a fully functional replacement Macintosh SE/30 logic board PCB.

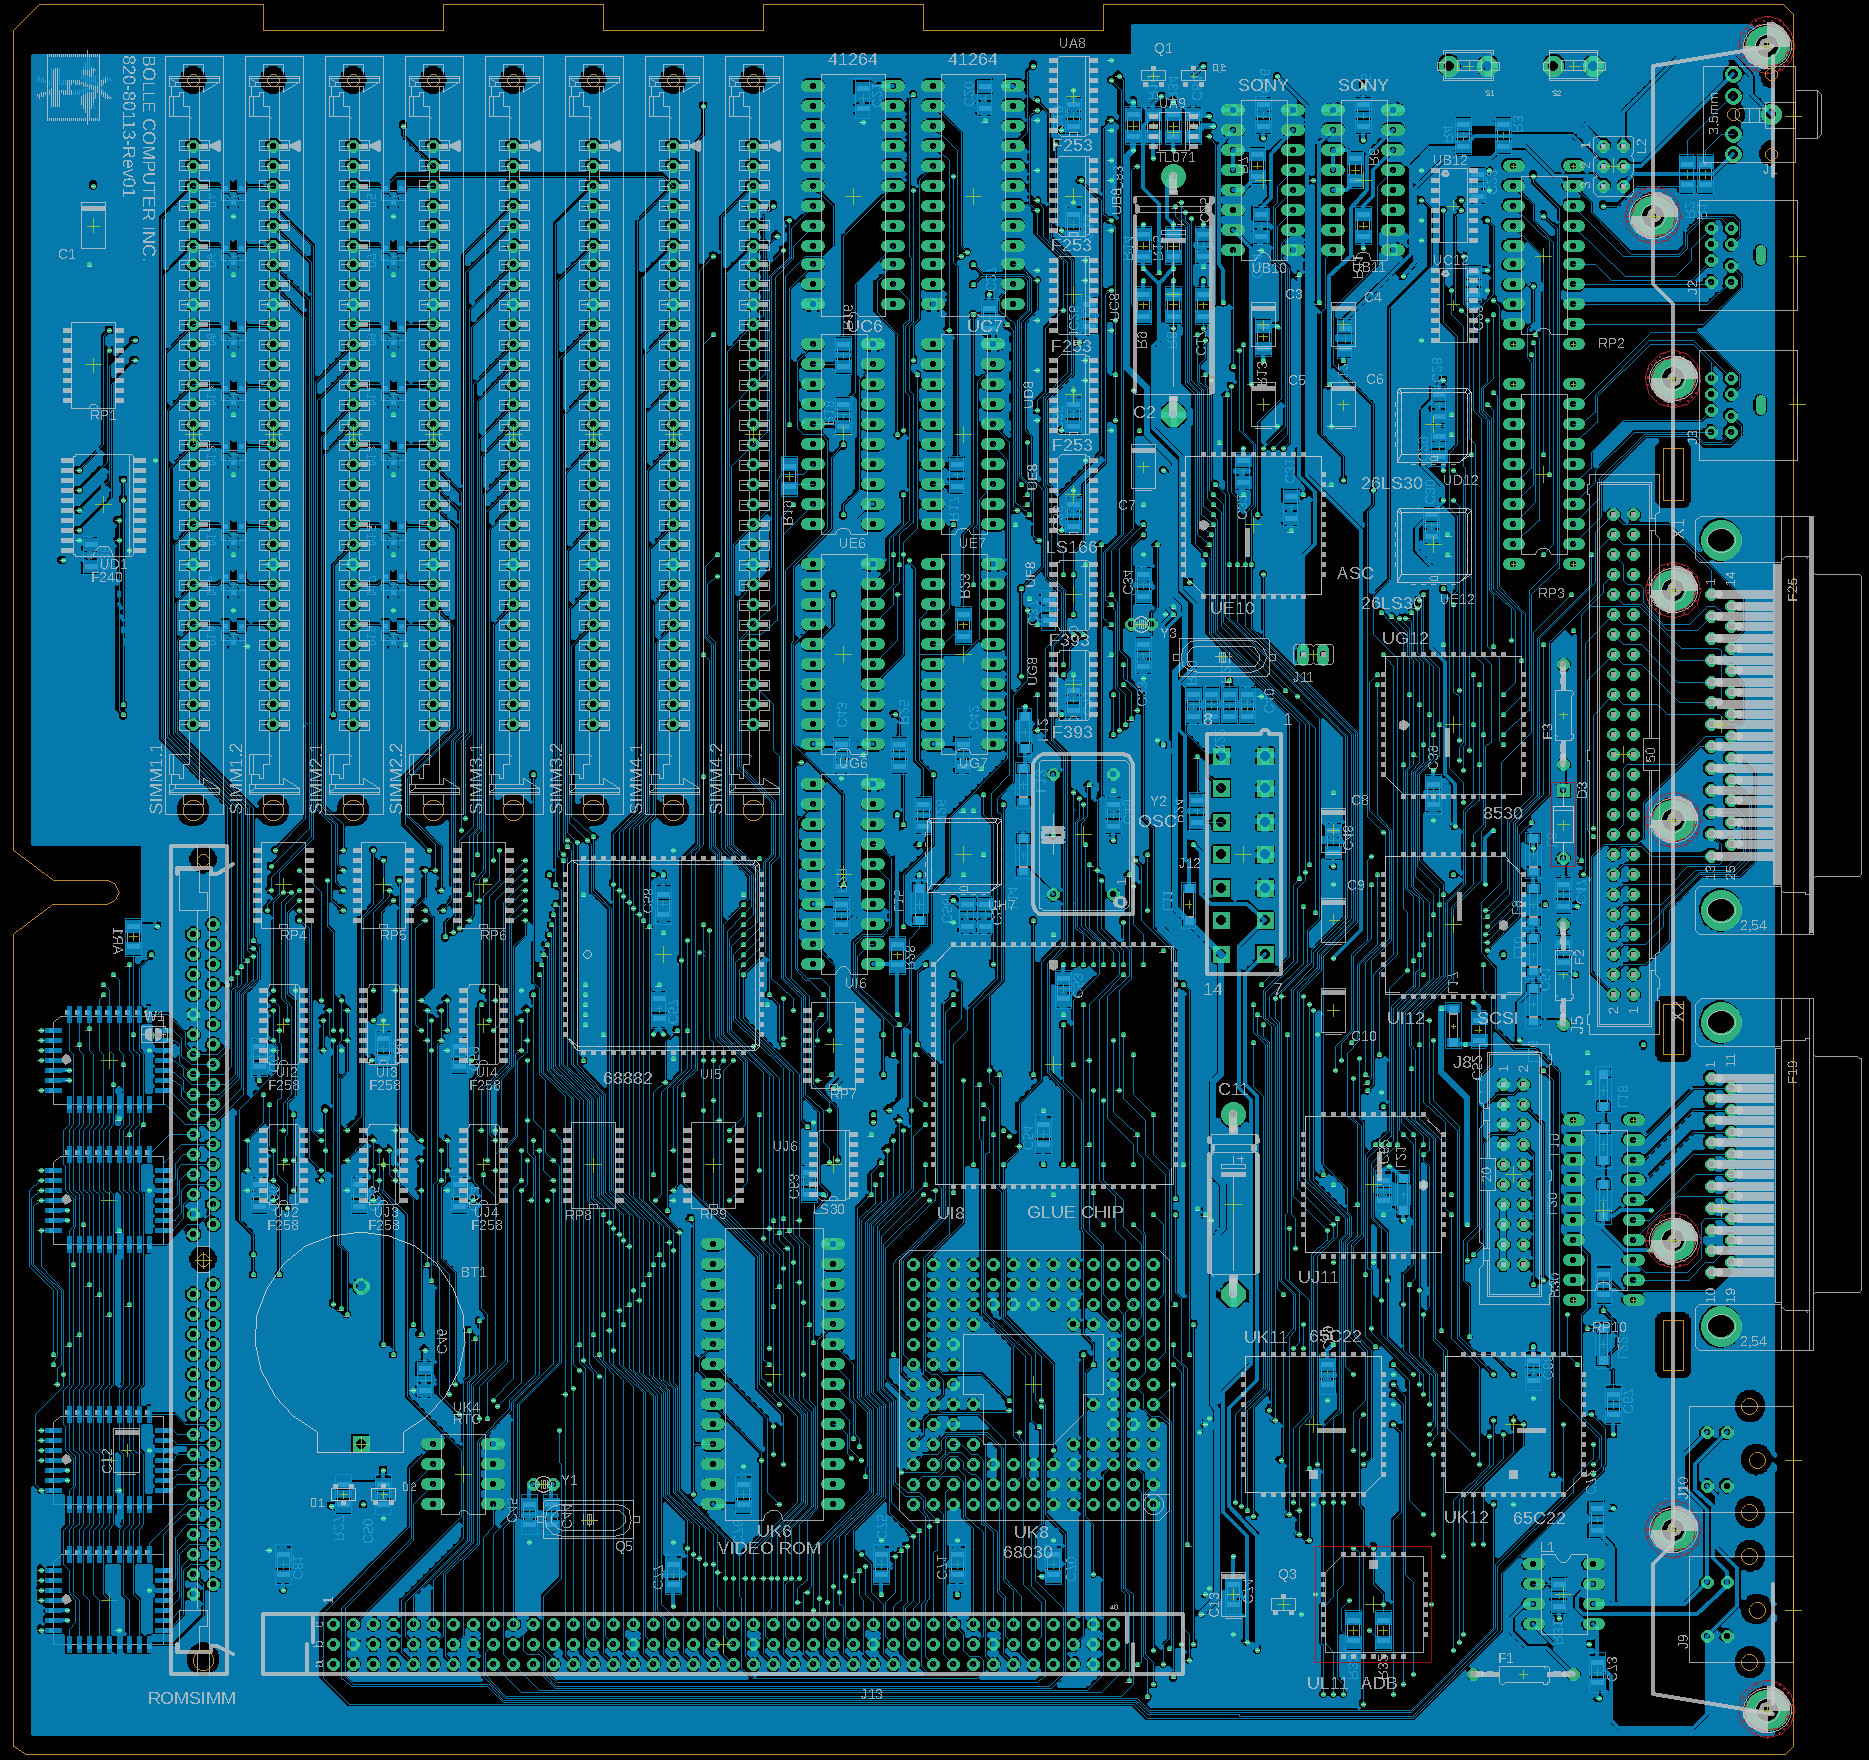
By using the available schematics, the project didn’t even require much reverse engineering. Though he plans for more modernization in later iterations, this design is largely faithful to the original components and layout, ensuring that it is at least basically functional. He did update the real time clock battery to a CR2032 and, as a benefit of redrawing all the traces, he was able to use a 4-layer PCB in place of the costly 6-layer from Apple’s design.

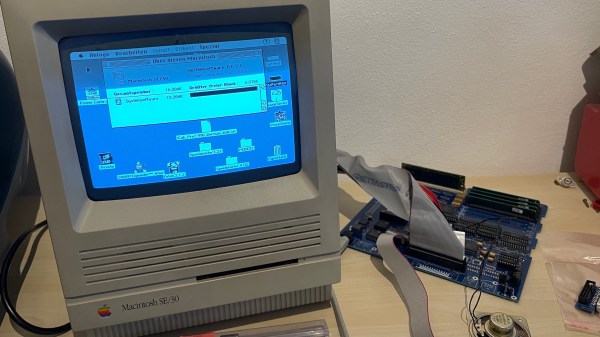
The board came back from fabrication looking beautiful in blue; and, once he had it soldered up and plugged in, the old Mac booted on the very first try! A copy-paste mistake with the SCSI footprints led to some jumper wire bodging in order to get the hard drive working, but that problem has already been fixed in the next revision. And, otherwise, he’s seen no differences from the original after a few hours of runtime.

Recreating old Macintosh logic boards almost seems like its own hobby these days. With the design and fabrication capabilities now accessible to hobbyists, even projects that were once considered professional work are in reach. If you’re interested in making your own PCB designs, there are many resources available to help you get started. Alternatively, we have seen other ways to modernize your classic Macs.

[Thanks to techknight for the tip!]

Ask Hackaday: How Do You Prepare?

Last month, large parts of the southern United States experienced their coldest temperatures since the 1899 Blizzard. Some of us set new all-time lows, and I was right in the middle of the middle of it here in Southwestern Oklahoma. Since many houses in Texas and Oklahoma are heated with electricity, the power grids struggled to keep up with the demand. Cities in Oklahoma experienced some short-term rolling blackouts and large patches of the Texas grid were without power for several days. No juice, no heat.

In places where the power was out for an extended period of time, the water supply was potentially contaminated, and a boil order was in effect. Of course, this only works when the gas and power are on. In some places, the store shelves were empty, a result of panic buying combined with perishables spoiling without the power to keep them cold. For some, food and drinkable water was temporarily hard to come by.

There have been other problems, too. Houses in the south aren’t built for the extreme cold, and many have experienced frozen pipes, temporarily shutting off their water supply. In some cases, those frozen pipes break open, flooding the house once the water starts flowing again. For instance, here’s an eye-witness account of the carnage from The 8-bit Guy, who lives at ground zero in the DFW area.
Continue reading “Ask Hackaday: How Do You Prepare?”

How The LIGO Observatory Detects Gravitational Waves

Gravity is one of the more obvious forces in the universe, generally regarded as easily noticeable by the way apples fall from trees. However, the underlying mechanisms behind gravity are inordinately complex, and the subject of much study to this day.

A major component of this study is around the concept of gravitational waves. First posited by Henri Poincaré in 1905, and later a major component of Einstein’s general theory of relativity, they’re a phenomena hunted for by generations of physicists ever since. For the team at the Laser Interferometer Gravitational-wave Observatory, or LIGO, finding direct evidence of gravitational waves is all in a day’s work.

Continue reading “How The LIGO Observatory Detects Gravitational Waves”

Open Source Motion Controller For DIY Drones

DJI recently introduced a slick motion controller that eschews the traditional dual-stick transmitter and allows you to fly their new “FPV Drone” with just one hand. The fact that it looks like it could double as the control stick for an X-Wing is just an added bonus. Unfortunately, that single model is the only thing the $199 USD controller is currently compatible with. Unwilling to get locked into the DJI ecosystem, [Paweł Spychalski] has developed an open source work-alike motion controller that brings gesture flying to home-built quadcopters and airplanes.

Now to be clear, you’ll still need a traditional transmitter to use this device. Rather than trying to reinvent the wheel, [Paweł] decided to implement his motion controller as an add-on for OpenTX hardware like the RadioMaster TX16S. It simply plugs into the trainer port on the back of the transmitter and acts as a secondary input. This greatly simplifies the design, as it essentially just needs to read angle data from its MPU-6050 gyro/accelerometer and forward it along to OpenTX over the serial port. Plus the fact that it’s connected to the trainer port means you can disable it and return to traditional controls in an instant if anything goes wrong.

Outside of the motion sensing gear, the ESP32-powered peripheral also has a thumb stick and a pair of push buttons nestled into its 3D printed frame. An OLED display provides some user feedback, and a holder for a 18650 cell is mounted to the back side as the controller will need its own power source when [Paweł] gets around to making its connection to the transmitter wireless.

In the video below, [Paweł] takes the motion controller for a test flight and comes away largely satisfied with the results. Some tweaks are in the works as you might expect for a first attempt, but nothing that would prevent you from building your own version today and experiencing what might be the next evolution of RC flying.

Continue reading “Open Source Motion Controller For DIY Drones”

South Korean Mapping Satellite Reaches Orbit

South Korea’s space program achieved another milestone yesterday with the launch of the first Compact Advanced Satellite 500 (CAS500) in a planned series of five vehicles. A second-generation Russian Soyuz 2.1a lifted the Korean-made CAS500-1 from historic Baikonur Cosmodrome in southern Kazakhstan and successfully placed it into a 500 km sun-synchronous orbit, inclined by 97.7 degrees or 15 orbits/day. Living up to its reputation as a workhorse, the Soyuz then proceeded to deposit multiple other satellites into 600 km and 550 km orbits. The satellite is pretty substantial, being 2.9 m tall and 1.9 m diameter and topping the scales at 500 kg. (Don’t be confused, like we were, by this Wikipedia article that says it is a 1.3 kg CubeSat.)

South Korea already has over a dozen satellites in orbit, and the CAS500 adds a modular space platform to the mix. It was designed by the Korea Aerospace Research Institute (KARI) to provide a core backbone which can be easily adapted to other missions, not unlike a car manufacturer that sells several different models all based on the same underlying chassis. Another down-to-earth goal of the CAS500 program was to foster the transfer of core technologies from state-owned KARI to private industry. We wonder how such figures are calculated, but reportedly 91.3% of CAS500-1 was made in Korea. Subsequent flights will further involve local services and industry.

The purpose of the first two satellites is to provide images to the private sector, for example, online mapping and navigation platforms. How popular this will be is yet to be determined — as one local newspaper notes, the 2 meter image resolution (50 cm in monochrome) pales in comparison to Google’s advertised 15 cm resolution. The next three satellites will focus on space science imagery.

The Soyuz launch is shown below, and this short video clip from KARI shows a nice animation of the satellite. Try not to cringe at the simulated whooshing sound as two satellites pass each other in the vacuum of space — turn down the volume if you need to.

Continue reading “South Korean Mapping Satellite Reaches Orbit”

Traffic Jam In The Suez Canal; Container Ship Run Aground

A vital shipping lane has been blocked in Egypt, as a 220,000 ton container ship, the MV Ever Given, became lodged sideways in the channel Tuesday morning local time. The Suez Canal, long a region of trading and strategic importance, has been blocked to travel in both directions as authorities make frantic efforts to free the ship.

Live tracking shows a flurry of activity around the stricken vessel. If you find yourself transiting the Suez Canal next week, don’t do this. Everyone’s patience is going to be pretty thin.

The Ever Given is carrying goods from China to Rotterdam, making a northward journey through the canal. The exact reason for grounding remains unclear, though such incidents are often due to mechanical malfunction or navigational errors in the tight confines of the channel. Like many important waterways, the Suez Canal requires transiting vessels to take on a pilot. This is to ensure that ships passing through the canal have someone onboard with experience of navigating the 673-foot wide passage. However, incidents still happen, as with huge container ships, there is minimal room for error.

A flotilla of tugboats dispatched to the area have begun working to free the ship, working in concert with excavators on the banks of the canal. This photo taken by [Julianne Cona] at the incident shows the sheer scale of the problem — with the excavator digging at the bow a tiny speck in the shadow of the gigantic ship.

We’re sure shipping firms and residents of the Netherlands are eager for a quick resolution, whether its to avoid costly delays or simply to get those online purchases sooner. If you live near the canal and want to keep an eye on what’s happening, you could always grab a software-defined radio and track things in real time. Alternatively, watch the progress on Vessel Finder. And, if you’ve got strong opinions on the proper procedure for navigating the Suez Canal, sound off in the comments!

DIY I2C Tester

[Dilshan] built a dedicated I2C tester which allows for I2C bus control over USB using simple commands such as init, read, write, etc. The Linux kernel has had I2C driver support for a couple of decades, but you’ll be hard pressed to find a computer or laptop with a I2C connector (excluding Bunnie Huang’s Novena hacker’s laptop, of course). This tester does require a Linux host, and his programs use libusb on the computer side and V-USB on the embedded side.

[Dilshan] put a lot of time into building this project, and it shows in the build quality and thorough documentation. With its single-sided PCB and all thru-hole construction, it makes a great beginner project for someone just getting into the hobby. At the heart of the tester is an ATmega16A in a 40-pin PDIP package (despite the Microchip overview page calling it a 44-pin chip), supported by a handful of resistors and transistors. Schematics are prepared in KiCad, code is compiled using gcc and avr-gcc, and he provides a label for the enclosure top. The only thing missing is information on the enclosure itself, but we suspect you can track that down with a little sleuthing (or asking [Dilshan] himself).

If you use I2C quite a lot, give this project a look. Easy to build, useful in the lab, and it looks nice as well. We have featured [Dilshan]’s work over the years, including this logic pattern generator and his two-transistor-on-a-breadboard superheterodyne receiver.