Ceiling Tiles Give It Up For Christmas LED Ornaments

The great thing about holidays is that they always seem to require some shiny things. The modern version of shiny things seems to be LEDs and advances in technology being what they are, we now have amazing programmable LEDs. And programmable LEDs mean animated shiny things! Years ago, [wpqrek] made an LED ornament using discrete components. This year he revisited his ornament and decided to make a new, animated, RGB ornament.

[Wpqrek]’s build is based around five WS2812b strips connected to an Arduino Pro Mini. The ornament itself is a thick styrofoam ceiling tile cut into a star shape with a red-painted wooden frame. Decorated with baubles and stars, the LED strips start in the center and end up at each point in the star. With each strip connected in parallel to the Pro Mini, [wpqrek] used the Arduino Light Animation library to handle the animations.

[Wpqrek] says the result is too big for his tree, so he uses it as a stand-alone ornament. Perhaps using lighter materials would help — or getting a bigger tree! Check out the Arduino lighting controller or the Trompe-l’oeil Menorah for more holiday hacks.

Continue reading “Ceiling Tiles Give It Up For Christmas LED Ornaments”

These Ornaments Measure Christmas Cheer

The ornament projects we post around here tend to be simple, stand-alone projects. We are, however, well into the era of the Internet of Things (like it or not) and holiday ornaments need not be single, unconnected blinking objects. For Christmas this year, [Sean Hodgins]  came up with some connected DIY ornaments that respond to Christmas cheer.

[Sean Hodgins] had some beautiful PCBs done up in festive shapes and he hand-pastes and oven-solders the SMD components on both sides. Each one is battery powered and controlled by an ESP8266. LEDs and a button on the front of each ornament comprise the user interface. When the button is pressed, data is sent to a Phant server and a “Christmas Cheer” counter is incremented. Other ornaments, so long as they can connect to the Phant server, will periodically check the counter. If the Christmas Cheer has increased, the ornaments will play a tune and flash some lights.

The ornaments are open-source — [Sean Hodgins] posted the code and PCB designs on GitHub. They look great, and would be a good way to let people know you’re thinking of them over the holidays. Check out this light-up menorah or these lighted acrylic ornaments for more holiday fun!

Continue reading “These Ornaments Measure Christmas Cheer”

Merry Christmas! Rip And Tear!

If you want a little mayhem on your Christmas tree, you can check out [Sprite_tm]’s tiny PC Christmas ornament. With 3D printing, that isn’t such a tall order, but [Sprite]’s does have a unique ability: it plays DOOM, as you can see in the video below.

The device uses an ESP32, and while [Sprite] had ported the iconic shooter to the microcontroller before, he decided to use a Game Boy port that is more lightweight instead. There were a few reasons for the choice, including the ability to do Bluetooth so you could connect controllers so you can play the game. The only catch was he had to pull off the flash memory and replace it with a larger one (see the second video below).

Granted, the screen is tiny, so it is sort of a novelty. But if you want to have a go, the files are all there. As you might expect, there is a tiny battery and the circuitry required to recharge it, as well. We’d probably make an adapter to let it charge from the Christmas lights, but that can wait for version 2.

The input device handling is a bit strange. Bluetooth BLE devices will automatically grab an input device that is in pairing mode. There is no provision for connecting using the “normal” Bluetooth mechanism. A fun project and you could use the case for some other tiny projects, too. A larger flash on an ESP32 has lots of possibilities, as well.

If you need a primer on the ESP32, we got it. If you want to play DOOM on something truly strange, try seven-segment displays.

Continue reading “Merry Christmas! Rip And Tear!”

USB LED Christmas Tree Is Making Spirits Bright

[Piotr SB] knows there is no way out of the holidays; the only path is through. You’ve got to find cheer wherever and however you can, so why not cater to your own interests and build the cutest little LED Christmas tree you ever did see? And did we mention it’s USB and absolutely free (as in carols, not eggnog)?

This O-Christmas tree is made up of concentric rings that are built into a tier as you solder the LEDs. And of course you’re supposed use the LED legs as supports! One leg from each LED — 18 green and a red one for the top. Because the PCB is not quite thick enough, you’ll need to add a plastic spacer to get it to stay in the USB port. Not only is this a nice design, the snowflakes and snowman on the silkscreen totally seal the cuteness deal.

Ever get so frustrated with your Christmas tree that you want to just empty a few rounds into the thing? No? Well, you’d have a good reason to if you built this Duck Hunt ornament.

Christmas tree PCB with Blinky Circuit

Is It Finally Time For Christmas Decorations?

[Arnov] is trying to get into the holiday spirit and is doing so the way he knows how. He was thinking of some cool decorations for his Christmas tree and decided the best decorations are the ones you make yourself, so he made his own blinky Christmas tree ornament.

The famed “blinky circuit” is certainly one that we are no strangers to here at Hackaday. Some of our readers will be very pleased to see that he did in fact use a 555 timer and not an Arduino. The 555 timer is wired to drive the clock pin of the CD4017 decade counter and the outputs of the decade counter are wired to the LEDs. The LEDs are lit up sequentially upon each low to high transition of the clock pulse though you may try getting creative with your LED wiring scheme to achieve different blinking effects.

What readers might really take away from this build is [Arnov] detailing how to import images into his CAD tool of choice, OrCAD in his case. We know that can be a bit tricky sometimes. Finally, we love that this project doubles as PCB art and a soldering challenge. It would definitely make for a good demo project at your next beginner soldering workshop.

Cool project [Arnov!]

Continue reading “Is It Finally Time For Christmas Decorations?”

Rheoscopic Holiday Ornaments

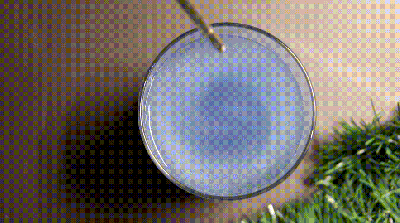
We had to look it up on Wikipedia – “Rheoscopic fluid means ‘current showing’ fluid. Such fluids are effective in visualizing dynamic currents in fluids, such as convection and laminar flow. They have microscopic crystalline platelets such as mica, metallic flakes, or fish scales, in suspension in a fluid such as water or glycol stearate.” And so it seems [Will Donaldson] has figured out a great way to Animate Christmas Ornaments using Rheoscopic Fluid, just in time for the holiday season.

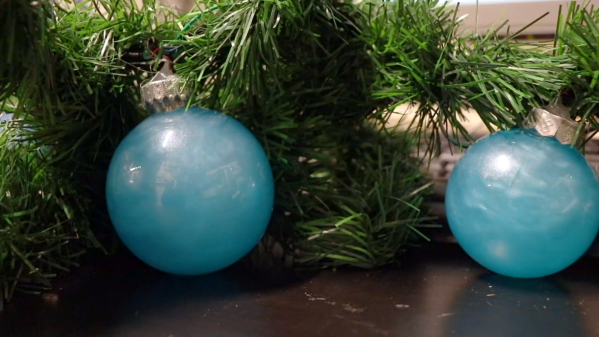
Making the fluid is pretty simple, and uses just a few readily available materials – distilled water, rheoscopic fluid concentrate and your choice of food colouring. The hardware is dead simple too – clear, spherical baubles with lids and core-less DC motors such as used in mini and nano drones, to agitate the fluid. You can use cell phone vibration motors too, but [Will]’s experimentation suggests that the level of agitation is not a lot.

To make a bauble, you fill it with the fluid, hot glue the motor to the lid, close the lid such that the motor and its agitator are dunked in the fluid, and dab a generous amount of hot melt glue to seal it all shut. Then, hook it up to a suitable power supply and get enchanted by the mesmerising movements of the rheoscopic fluid in the bauble. The agitator is just a plain ol’ drone propeller forced in to a shape that is narrow enough to be pushed through the neck of the bauble. It’s a seasonal ornament, so don’t expect the motors to last long being submerged in the rheoscopic fluid. [Will]’s contraptions have not yet failed after a couple of days, and it may be safe to estimate that the motors may last about a week or two at most. Of course, YMMV depending on if you used distilled water or plain tap water and other factors.

As [Will] suggests, if you prefer slower swirls, or random agitation, then it’s best to hook up a micro-controller and motor driver for fancy effects. At this point, it may be tempting to think of embedding LED’s inside the baubles, but doing so reduces the rheoscopic effect since it relies on reflecting light shining on it from the outside. The video embedded after the break has all the build details.

It’s a great way to teach some science to the kids during the holidays and maybe even get them to help with the project. And don’t assume this is just a cheap Christmas trick. Artist Paul Matisse has invented an art device/technique based on rheoscopic fluids which he calls “Kalliroscope©”. He patented it in 1968, and has sold Kalliroscope artworks throughout the world since then. From his website “A Kalliroscope is a device for viewing fluid currents. Kalliroscopes are both works of art and intuitively educational displays of the scientific principles of fluid dynamics. They are glass and steel constructions containing a current-visualizing fluid.” We’re not sure how priceless those works of art are, but it’s safe to assume you need deep pockets to buy one. So go ahead, turn your Christmas Tree in to a work of Art !

Continue reading “Rheoscopic Holiday Ornaments”

Sierpinski PCB Christmas Tree

It’s holiday time again! And that means it’s time to break out the soldering iron and the RGB LEDs! If you’re going to make a custom PCB to put those LEDs on, you’ll notice that you get few copies of your PCB in your order, so, might as well design it such that you can combine them all together into a single Sierpinski Christmas Tree, just like [Landon Carter] did.

Each PCB “tree” has three connections which can be used as either inputs or outputs by soldering one of two bridge connections on the PCB. The power and signal goes up and down through the tree, rather than across, so the connections go one on the top of the tree and two on the bottom. This way, each tree in the triangle can easily be connected, and each triangle can be easily connected to another. Each individual tree has three WS2812b-mini addressable RGB LEDs and the tree is controlled by an external Arduino.

The first order of 10 PCBs came in, which makes a 9 member tree – next up is a 27 member tree. After that, you’re going to need some pretty high vaulted ceilings in order to put these on the wall. On the upside, though, once the holidays are over, everything can be easily disconnected and packed away with the rest of the decorations. If you, too, are interested in RGB LED decorations, there are a few on the site for your perusal.