Bubble Displays Make A Neat Retro Clock

In 2025 we are spoiled for choice when it comes to displays, with affordable LCDs, OLEDs, TFTs, and e-ink panels of all sizes only a few clicks away. But in decades past, such exotica were not on the menu for casual construction. Instead there were a range of LED seven segment displays which have now largely passed out of use.

Among them were HP’s bubble displays, assemblies of miniature LEDs on a PCB, topped with plastic bubble lenses. If you had a calculator in the 1970s it probably had one, but in the present, [Joshua Coleman] has incorporated one into a pleasingly retro digital clock.

Inside the 3D printed case is an ESP32 with a pair of 74HC595 shift registers to drive the display, and an 18650 battery with all associated charging and protection circuitry. It’s a surprisingly simple circuit, and the code is provided on the page. He makes an apology to non-Americans for his use of US date formats, but we think few readers will be unable to change it to reflect the only date format which really matters.

If you find a bubble display, hang on to it. They’re certainly something we’ve seen before here a few times.

A woman in a ball cap and black tank top holds a black and white image of the Moon printed on black acrylic. It can fold and is mounted on a black plastic mechanism with turning knobs affixed to the ends. There are out-of-focus shelves in the background with various items and books on them.

Moon Phase Flip Clock Is Fantastic

We love clocks, but we especially love unusual timepieces that aren’t just about showing the hour of the day. [Simone Giertz] built a flip clock moon phase tracker for a friend.

While in Egypt for Cairo Maker Faire, [Giertz] and [dina Amin] found some old flip clocks at a flea market and had to have them. [Amin] mentioned wanting to make a moon phase tracker with one, and [Giertz] decided to try her hand at making her own version. A side quest in more comfortable flying is included with the price of admission, but the real focus is the process of figuring out how to replicate the flip clocks original mechanism in a different size and shape.

[Giertz] cut out 30 semi-circle flaps from polystyrene and then affixed vinyl cut-outs to the flaps. The instructions for the assembly suggest that this might not be the best way to do it, and that printing stickers to affix to the flaps might work better since the cut vinyl turned out pretty fiddly. We really like the part where she built a grid jig to determine the optimal placement of the beams to keep the flaps in the right position after a disheartening amount of difficulties doing it in a more manual way. Her approach of letting it rest for twenty minutes before coming back to it is something you might find helpful in your own projects.

Best of all, if you want to build your own, the files are available for the flip moon station on the Yetch website. You’ll have to come up with your own method to drive it though as that isn’t in the files from what we saw.

Continue reading “Moon Phase Flip Clock Is Fantastic”

A Neat E-Paper Digit Clock (or Four)

[sprite_tm] had a problem. He needed a clock for the living room, but didn’t want to just buy something off the shelf. In his own words, “It’s an opportunity for a cool project that I’d rather not let go to waste.” Thus started a project to build a fun e-paper digit clock!

There were several goals for the build from the outset. It had to be battery driven, large enough to be easily readable, and readily visible both during the day and in low-light conditions. It also needed to be low maintenance, and “interesting,” as [sprite_tm] put it. This drove the design towards an e-paper solution. However, large e-paper displays can be a bit pricy. That spawned a creative idea—why not grab four smaller displays and make a clock with separate individual digits instead?

The build description covers the full design, from the ESP32 at the heart of things to odd brownout issues and the old-school Nokia batteries providing the juice. Indeed, [sprite_tm] even went the creative route, making each individual digit of the clock operate largely independently. Each has its own battery, microcontroller, and display. To save battery life, only the hours digit has to spend energy syncing with an NTP time server, and it uses the short-range ESPNow protocol to send time updates to the other digits.

It’s an unconventional clock, to be sure; you could even consider it four clocks in one. Ultimately, though, that’s what we like in a timepiece here at Hackaday. Meanwhile, if you’ve come up with a fun and innovative way to tell time, be sure to let us know on the tipsline!

[Thanks to Maarten Tromp for the tip!]

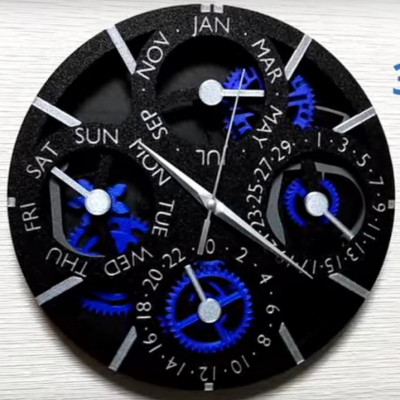
Printed Perpetual Calendar Clock Contains Clever Cams

At Hackaday, it is always clock time, and clock time is a great time to check in with [shiura], whose 3D Printed Perpetual Calendar Clock is now at Version 2. A 3D printed calendar clock, well, no big deal, right? Grab a few steppers, slap in an ESP32 to connect to a time server, and you’re good. That’s where most of us would probably go, but most of us aren’t [shiura], who has some real mechanical chops.

The front face of the perpetual calendar clock.
There’s also a 24-hour dial, because why not?

This clock isn’t all mechanical. It probably could be, but at its core it uses a commercial quartz movement — you know, the cheap ones that take a single double-A battery. The only restriction is that the length of the hour axis must be twelve millimeters or more. Aside from that, a few self-tapping screws and an M8 nut, everything else is fully 3D printed.

From that simple quartz movement, [shiura]’s clock tracks not only the day of the week, the month and date — even in Febuary, and even compensating for leap years. Except for the inevitable drift (and battery changes) you should not have to adjust this clock until March 2100, assuming both you and the 3D printed mechanism live that long. Version one actually did all this, too, but somehow we missed it; version two has some improvements to aesthetics and usability. Take a tour of the mechanism in the video after the break.

We’ve featured several of [shiura]’s innovative clocks before, from a hybrid mechanical-analog display, to a splitless flip-clock, and a fully analog hollow face clock. Of course [shiura] is hardly our only clock-making contributor, because it it always clock time at Hackaday. Continue reading “Printed Perpetual Calendar Clock Contains Clever Cams”

ESP32-Powered Clock Brings Aviation Style To Your Desk

There’s something cool about the visual design language used in the aviation world. You probably don’t get much exposure to it if you’re not regularly flying a plane, but there are other ways you can bring it into your life. A great example would be building an aviation-themed clock, like this stylish timepiece from [oliverb.]

The electronic heart of the build is an ESP32. This wireless-capable microcontroller is a popular choice for clock builds these days. This is because it can contact network time servers out of the box, which allows you to build an incredibly capable and accurate clock without any additional parts. No real-time-clock needed—just have the ESP32 buzz the Internet for an accurate update on the regular!

As for the display itself, three gauges show hours, minutes, and seconds on aviation-like gauges. They’re 3D-printed, which means you can build them from scratch. That’s a touch easier than having to go out and source actual surplus aviation hardware. Each gauge is driven by a NEMA17 stepper motor. There’s also an ATMEGA328 on hand to drive a 7-segment gauge on the seconds display, and a PIR sensor which shuts the clock down when nobody is around to view it.

It’s a tidy build, and one with a compelling aesthetic at that. We’ve seen some similar builds before using real aviation gauges, too. Video after the break.

Continue reading “ESP32-Powered Clock Brings Aviation Style To Your Desk”

Atomic Clock Trades Receiver For An ESP8266

The advantage of a radio-controlled clock that receives the time signal from WWVB is that you never have to set it again. Whether it’s a little digital job on your desk, or some big analog wall clock that’s hard to access, they’ll all adjust themselves as necessary to keep perfect time. But what if the receiver conks out on you?

Well, you’d still have a clock. But you’d have to set it manually like some kind of Neanderthal. That wasn’t acceptable to [jim11662418], so after he yanked the misbehaving WWVB receiver from his clock, he decided to replace it with an ESP8266 that could connect to the Internet and get the current time via Network Time Protocol (NTP).

Continue reading “Atomic Clock Trades Receiver For An ESP8266”

Malfunctional Timekeeping With The Vetinari Clock

Lord Vetinari from the Discworld series is known for many things, but perhaps most of all a clock that doesn’t quite keep continuous time. Instead, it ticks away at random increments to infuriate those that perceive it, whilst keeping regular time over the long term. [iracigt] decided to whip up a real world version of this hilarious fictional timepiece.

The clock itself is an off-the-shelf timepiece purchased from Target for the princely sum of $5. However, it’s been deviously modified with an RP2040 microcontroller hidden away inside. The RP2040 is programmed to tick the clock at an average of once per second. But each tick itself is not so exact. Instead, there’s an erraticness to its beat – some ticks are longer, some shorter, in the classic Vetinari style. [iracigt] explains the nitty gritty of how it all works, from creating chaos with Markov chains to interfacing the RP2040 electronically with the cheap quartz clock movement.

If you’ve ever wanted to build one of these amusements yourself, [iracigt’s] writeup is a great place to start. Even better, it was inspired by an earlier post on these very pages! We love to see the community riff on a theme, and we’d love to see yours, too – so keep the tips coming, yeah? Video after the break.

Continue reading “Malfunctional Timekeeping With The Vetinari Clock”