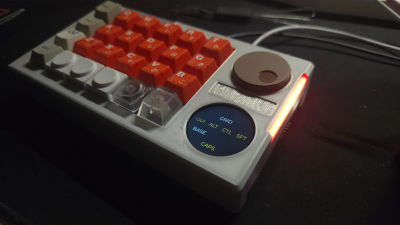
Micro Macro Keyboard Makes A Major Difference

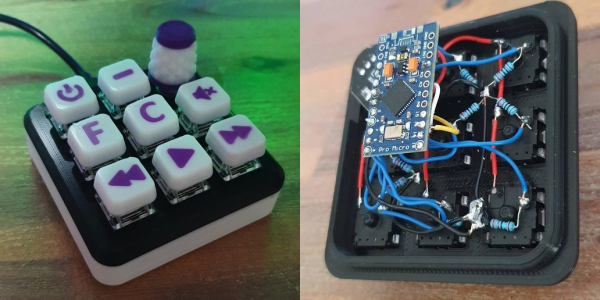
Media keyboards are nice in theory. But in practice they never have all the keys you want, and they almost always have a few you don’t. Sure, you could maybe reassign the ones you don’t use, but then the caps are wrong, and it’s a whole thing. So really, the only winning move is to make a micro macro keyboard as [littleSilvr] did to make all your shortcuts one-button accessible.

This lovely input has an Arduino Pro Micro for a brain, and Gateron browns for brawn. That knob there is a rotary encoder, not a potentiometer, because endless volume knob twiddling is just so much nicer. In case you’re wondering, those shortcuts open Fusion 360 and Cura, but we’re still not sure what the hyphen does.

Can we talk about those keycaps, though? [littleSilvr] used [Make Anything]’s process of of printing in multi-color with a single extruder. The technique involves building a vector for each color, each of which gets its own STL file. Then you add retraction as you go up through the layers, slow the print speed, change filament colors while the nozzle and bed are still warm, and voila, a vibrant canvas of colors.

If you don’t have a printer and you don’t mind a bit of compromise on the number of inputs, try basing your build on an existing input, like an old rotary telephone dialer.

Via r/duino

A Macro Keyboard In A Micro Package

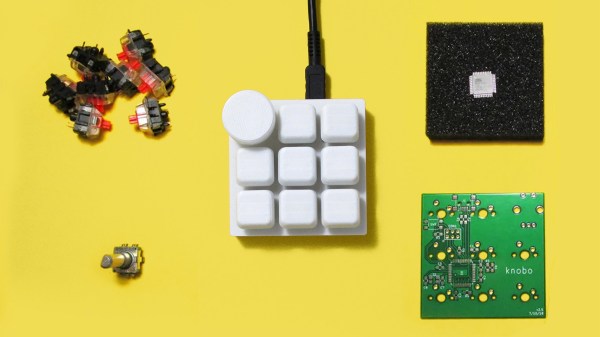
Remember back in the early-to-mid 2000s when pretty much every cheap USB keyboard you could find started including an abundance of media keys in its layout? Nowadays, especially if you have a customized or reduced-sized mechanical keyboard, those are nowhere to be seen. Whenever our modern selves need those extra keys, we have to turn to external peripherals, and [Gary’s] Knobo is one that looks like it could’ve come straight out of a fancy retail package.

The Knobo is a small macro keypad with 8 mechanical Cherry-style keys and a clickable rotary encoder knob as its main feature. Each key and knob gesture can be customized to any macro, and with five gestures possible with the knob, that gives you a total of thirteen inputs. On top of that, the build and presentation look so sleek and clean we’d swear this was a product straight off of Teenage Engineering’s money-printing machine.

The actions you can do with those inputs range from simple media controls with a volume knob all the way to shortcuts to make a Photoshop artist’s life easier. Right now you can only reprogram the Knobo’s Arduino-based firmware with an In-Circuit Serial Programmer to change what the inputs do, but [Gary] is currently working on configuration software so that users without any programming knowledge will be able to customize it too.

Knobs are just one of those things that everyone wants to use to control their computers, much like giant red buttons. Alternative input devices can range from accessibility-designed to just downright playful. Whatever the inspiration is for them, it’s always nice to see the creativity of these projects.

Continue reading “A Macro Keyboard In A Micro Package”

Software Shortcut Keyboard Registers Many Macros

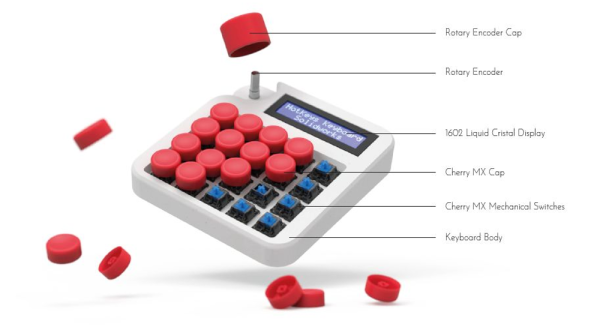
[FabroLabs Technologies] is an industrial designer who uses several creative-type software programs in a given day. Unfortunately, they all have slightly different shortcut schemes, and trying to remember all the different modifiers is a waste of time better spent elsewhere.

This lovely little macro keyboard is every bit as useful as it is cool looking. Spinning the rotary encoder cycles through a menu of programs on the 16×2 LCD, and the key map just updates automatically for the chosen program. At the heart of this build is an Arduino Pro Micro and 20 of the loudest key switches ever made — Cherry MX blues. We like that it manages to look like toy cash register and a serious peripheral all at once — it probably has something to do with those way-cool circular keycaps that were made on a resin printer.

We’re glad that [FabroLabs] laid down such a comprehensive and open build guide during the process of making this macro keyboard. The average hacker can learn a lot from industrial designers who show their work. Remember the time [Eric Strebel] showed us all how to improve our foam board design game?

KanaChord Is A Macro Pad For Japanese Input

There are various situations that warrant additional keyboards on your desk, and inputting a second language is definitely a good one. That’s the idea behind KanaChord, which generates Unicode macros to render Japanese Kana characters using chords — pressing multiple keys at once as you would on a piano.

The Japanese writing system is made up of Kanji (Chinese characters), Hirigana, and Katakana. Without going into it too much, just know that Hirigana and Katakana are collectively known as the Kana, and there’s a table that lays out the pairing of vowels and consonants. To [Mac Cody], the layout of the Kana table inspired this chording keyboard.

Continue reading “KanaChord Is A Macro Pad For Japanese Input”

A “Full” Keyboard For $5*

Sure, we’ve all seen PCB business cards at this point, but what about giving away a full-blown keyboard at meetups and such? That’s just how cost-effective the idawgz32 keyboard is. How on Earth can it cost so little? [sporewoh] used the CH552 microcontroller, which comes in around a dollar and only needs a couple of capacitors to get it up and running. The firmware is FAK.

As [sporewoh] writes in this blog post about the keyboard, they did some analysis and realized that most of the cost of their previous tiny board came from the switches. In addition to switching up the switches, [sporewoh] performed a few tricks to get the cost down, like making the key spacing 9 mm x 9 mm so that the overall board is less than 100 mm x 100 mm (which triggers a deal at a certain board house).

Unfortunately, the switches turned out not to be so good. They had greater travel and required more actuation force than the ones [sporewoh] was used to with previous board. The switches were also scratchy, which was solved with a little Krytox. But ultimately, they are pretty unreliable, so the next revision will use Panasonic EVQP0N02Bs.

If this seems familiar, you may be recalling this $3 macro pad which uses the same chip, or maybe the fact that we’ve covered the CH552 in detail.

*Thanks to the current CAD to USD exchange rate.

Illustrated Kristina with an IBM Model M keyboard floating between her hands.

Keebin’ With Kristina: The One With The Really Snazzy Folding Keyboard

Sometimes you just have to throw your hat in the ring, and throw it hard. Here is [mkdxdx]’s rockin’ EVH 5150-esque take on the keyboard business. The Mriya foldable keyboard aims to be and sport a number of things, and it does all of them in great style. I could totally see my fingers flying over this thing somewhere in the wild, with robots fighting in the distance.

Image by [mkdxdx] via Hackaday.IO
I have to say I really like the fact that [mkdxdx] uses thumb keys here for what I can only assume are Enter, Space, and Backspace. It’s a nice compromise between compactness and ergonomics. I also really like the totally impractical but quite cool-looking connector that runs between the top and bottom.

If the color scheme looks familiar, you’re probably remembering [mkdxdx]’s first-place-winning entry into the 2023 Cyberdeck Contest. This RP2040-based keyboard might just end up as part of a larger project, but it’s already an outstanding peripheral. We can’t wait to see the next phase, should there be one for this keyboard.

Continue reading “Keebin’ With Kristina: The One With The Really Snazzy Folding Keyboard”

Illustrated Kristina with an IBM Model M keyboard floating between her hands.

Keebin’ With Kristina: The One With The Foot Keyboard

[crispernaki]’s opening comments to this VCR head scroll wheel project lament that overall technical details aren’t “complex, ground-breaking, or even exciting.” Since when does that matter? The point is that not only did the thing finally, eventually get built, it gets daily use and it sparks joy in its owner.

This feel-good story is one of procrastination, laziness, and one aha! moment, and it’s roughly twelve years in the making. Inspired by an Instructable from long ago, [crispernaki] ran straight to the thrift store to get a VCR and take it apart.

The original plan was to just reuse the VCR head’s PCB and hide it in an enclosure, and then figure out way to block and unblock the path between an IR emitter/receiver pair. After many disemboweled mice and fruitless attempt, the project was once again shelved.

But then, [crispernaki] remembered the magnetic rotary encoder demo board that was just sitting around, along with various microcontrollers and Altoids tins. And it all quickly came together with a Teensy 2.0 and some bits and bobs, including a magnet glued on the shaft of the VCR head. A chip on the demo board does all the heavy lifting, and of course, the Teensy does the work of emulating an HID.

Continue reading “Keebin’ With Kristina: The One With The Foot Keyboard”