Roll Your Own SDR

If you have software-defined radio hardware and you are only using someone elses’ software, you are missing out on half of the fun. [Tech Minds] shows you how easy it can be to roll your own software using GNU Radio Companion in a recent video.

GNU Radio usually uses Python, but with the companion software you rarely need to know any actual Python. Instead, you simply drag blocks around to represent filters, DSP processing, and other functions you need to create the processing for your application.

Continue reading “Roll Your Own SDR”

Hacker Tactic: Internal ESD Diode Probing

Humans are walking high voltage generators, due to all the friction with our surroundings, wide variety of synthetic clothes, and the overall ever-present static charges. Our electronics are sensitive to electrostatic discharge (ESD), and often they’re sensitive in a way most infuriating – causing spurious errors and lockups. Is there a wacky error in your design that will repeat in the next batch, or did you just accidentally zap a GPIO? You wouldn’t know until you meticulously check the design, or maybe it’s possible for you to grab another board.

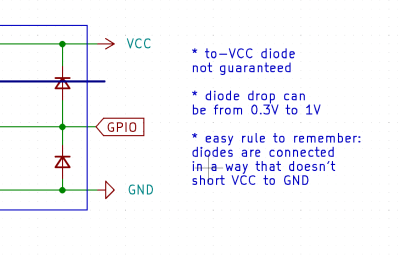
Thankfully, in modern-day Western climates and with modern tech, you are not likely to encounter ESD-caused problems, but they were way more prominent back in the day. For instance, older hackers will have stories of how FETs were more sensitive, and touching the gate pin mindlessly could kill the FET you’re working with. Now, we’ve fixed this problem, in large part because we have added ESD-protective diodes inside the active components most affected.

These diodes don’t just help against ESD – they’re a general safety measure for protecting IC and transistor pins, and they also might help avoid damaging IC pins if you mix. They also might lead to funny and unexpected results, like parts of your circuit powering when you don’t expect them to! However, there’s an awesome thing that not that many hackers know — they let you debug and repair your circuits in a way you might not have imagined.

Continue reading “Hacker Tactic: Internal ESD Diode Probing”

The Clock, Another Way To Modify The Sound Of A Synth Chip

The Philips SAA1099 is perhaps one of the lesser-known among the crop of 1980s-era 8-bit sound generator chips, but with three stereo voices onboard it makes a capable instrument for chiptune experimentation. It’s attracted the attention of [Folkert van Heusden], who’s tried the novel experiment of seeing what happens when a sound chip’s clock is varied.

A quick search of the internet reveals that the chip, which appeared in early Sound Blaster cards, is intended to have an 8 MHz clock. He’s hooked it up to an Arduino as a variable clock source, which surprised us but it seems an ATmega328’s timer is faster than we expected.

There are a couple of WAV files, and as expected the clock frequency has a significant effect on the pitch. The samples just sweep up and down without much attempt at making a sound you’d want to hear, but it does raise an interesting possibility of adding a further pitch bending ability to the capabilities already in the chip. When these circuits were new we couldn’t control a clock on a whim with the 8-bit processors of the day, so of course none of us thought to try this at the time. He’s tried it, so you don’t have to.

The SAA1099 has been mentioned in these pages only once, as a chip used in peripherals for 1980s Czech computers.

Clock Project Doesn’t Require A Decision

You decide to build a clock. The first thing you have you determine if it is going to be digital or analog. Or is it? If you build [Ivanek240267]’s clock, you can have both.

The digital portion uses an OLED display. The analog portion contains two rings of smart LEDs. The WiFi configuration is always an issue in projects like this, and this clock also offers options. In addition, the Raspberry Pi Pico-based clock also sets itself via NTP.

You can, of course, compile the WiFi credentials into the code, and assuming you don’t plan on changing networks, that’s fine. But if you’re in a more dynamic situation, the clock can also read its configuration from a memory card.

The analog clock uses colors. The green LEDs represent quarter hours. The blue LEDs are for minutes, while the red ones are full hours. Of course, reading the OLED doesn’t require any special interpretation.

When debugging, the timing doesn’t drive the smart LEDs. That means if you need to work on that part of the code, you won’t be able to count on debugging support.

We’ve mentioned before that digital clocks are all analog, anyway. If you want to use fewer LEDs, you can get by with only five.

FOSDEM 2023: An Open-Source Conference, Literally

Every year, on the first weekend of February, a certain Brussels university campus livens up. There, you will find enthusiasts of open-source software and hardware alike, arriving from different corners of the world to meet up, talk, and listen. The reason they all meet there is the conference called FOSDEM, a long-standing open-source software conference which has been happening in Belgium since 2000. I’d like to tell you about FOSDEM because, when it comes to conferences, FOSDEM is one of a kind.

FOSDEM is organized in alignment with open-source principles, which is to say, it reminds me of an open-source project itself. The conference is volunteer-driven, with a core of staff responsible for crucial tasks – yet, everyone can and is encouraged to contribute. Just like a large open-source effort, it’s supported by university and company contributions, but there’s no admission fees for participants – for a conference, this means you don’t have to buy a ticket to attend. Last but definitely not least, what makes FOSDEM shine is the community that it creates.

FOSDEM’s focus is open software – yet, for hackers of the hardware world, you will find a strong hardware component to participate in, since a great number of FOSDEM visitors are either interested in hardware, or even develop hardware-related things day-to-day. It’s not just that our hardware can’t live without software, and vice-versa – here, you will meet plenty of pure software, a decent amount of pure hardware, and a lot of places where the two worlds are hard to distinguish. All in all, FOSDEM is no doubt part of hacker culture in Europe, and today, I will tell you about my experience of FOSDEM 2023. Continue reading “FOSDEM 2023: An Open-Source Conference, Literally”

An alarm clock with a Nixie tube display

Retro Alarm Clock With Nixies Is Thoroughly Modern Inside

We feature a lot of clocks here at Hackaday, but alarm clocks seem to be less popular for some reason. Maybe that’s because no-one enjoys being woken up in the morning, or simply because everyone uses their smartphone for that purpose already. In any case, we’re delighted to bring you [Manuel Tosone]’s beautiful Nixie tube alarm clock that cleverly combines modern and classic technologies in a single package.

An alarm clock with a Nixie tube display, openedThe clock and alarm functionalities are implemented by a PIC24 microcontroller on a custom mainboard. It keeps track of time through its real-time clock with battery backup, and plays a song from an SD card when it’s time to wake up. A 2 x 3 W class D audio amplifier plus a pair of stereo speakers should be able to wake even the heaviest sleepers.

Of course, the real party piece is the clock’s display: four IN-4 Nixie tubes show the time, with neon tubes indicating the day of the week. The 180 V needed for the Nixies is generated by an MC34063A-based boost converter, which also powers the neon tubes.

Instead of using the standard current-limiting resistor for each Nixie tube, [Manuel] designed an array of transistor-based current sources: this enables linear control of the tubes’ brightness, and should keep the amount of light constant even as the tubes age. The individual segments are switched by SN75468 Darlington arrays, with no need for those hard-to-find SN74141 drivers.

The mainboard and the display are housed inside a 3D-printed case that mimics the style of 1980s digital alarm clocks, but with a nice 1970s twist courtesy of those Nixie tubes. [Manuel]’s GitHub page has all the schematics as well as extensive documentation describing the circuit’s operation — an excellent resource if you’re planning to build a Nixie project yourself. If Nixies aren’t your thing, you can also make an alarm clock with a VFD tube, or even roll your own luminous analog dial.

Continue reading “Retro Alarm Clock With Nixies Is Thoroughly Modern Inside”

Snooping On Starlink With An RTL-SDR

With an ever-growing constellation of Starlink satellites whizzing around over our heads, you might be getting the urge to start experimenting with the high-speed internet service. But at $100 or more a month plus hardware, the barrier to entry is just a little daunting for a lot of us. No worries, though — if all you’re interested in is tracking [Elon]’s birds, it’s actually a pretty simple job.

Now, we’re not claiming that you’ll be able to connect to Starlink and get internet service with this setup, of course, and neither is the delightfully named [saveitforparts]. Instead, his setup just receives the beacon signals from Starlink satellites, which is pretty interesting all by itself. The hardware consists of his “Picorder” mobile device, which sports a Raspberry Pi, a small LCD screen, and a host of sensors, including an RTL-SDR dongle. To pick up the satellite beacons, he used a dirt-cheap universal Ku-band LNB, or low-noise block downconverter. They’re normally found at the focal point of a satellite TV dish, but in this case no dish is needed — just power it up with a power injector and point it to the sky. The signals show up on the Picorder’s display in waterfall mode; curiously, the waterfall traces look quite similar to the patterns the satellites make in the night sky, much to the consternation of astronomers.

Of course, you don’t have to have a Picorder to snoop in on Starlink — any laptop and SDR should work, despite [saveitforparts]’ trouble in doing so. You shouldn’t have much trouble replicating the results by following the video below, which also has a few tips on powering an LNB for portable operations.

Continue reading “Snooping On Starlink With An RTL-SDR”