Screenshot of the code decompiled after these patches are applied, showing that all the register writes are nicely decompiled and appropriate register names are shown in the code

Making Ghidra Play Nice With RP2040

Developing firmware for RP2040 is undeniably fun, what’s with all these PIOs. However, sometimes you will want to switch it around and reverse-engineer some RP2040 firmware instead. If you’ve ever tried using Ghidra for that, your experience might have been seriously lackluster due to the decompiled output not making sense when it comes to addresses – thankfully, [Wejn] has now released patches for Ghidra’s companion, SVD-Loader, that turn it all around, and there’s a blog post to go with these.

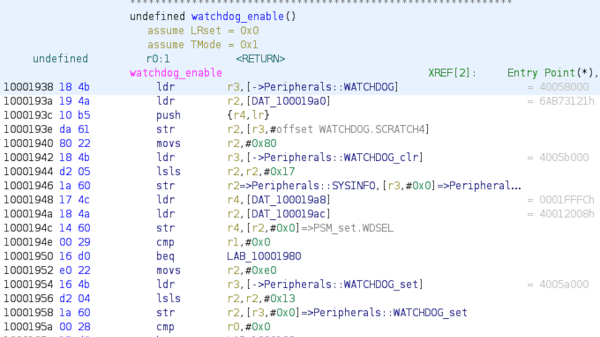
SVD-Loader, while an indispensable tool for ARM work, didn’t work at all with the RP2040 due to a bug – fixed foremost. Then, [Wejn] turned to a pecularity of the RP2040 – Atomic Register Access, that changes addressing in a way where the usual decompile flow will result in nonsense addresses. Having brought a ton of memory map data into the equation, [Wejn] rewrote the decoding and got it to a point where peripheral accesses now map to nicely readable register writes in decompiled code – an entirely different picture!

You can already apply the patches yourself if you desire. As usual, there’s still things left in TODO for proper quality of life during your Ghidra dive, but the decompiled code makes way more sense now than it did before. Now, if you ever encounter a RP2040-powered water cooler or an air quality meter, you are ready to take a stab at its flash contents. Not yet familiar with the Ghidra life? Well, our own HackadayU has just the learning course for you!

A grey car sits in the background out of focus, its front facing the camera. It sits over an asphalt roadway with a metal rail extending from the foreground to behind the car in the distance. The rail has a two parallel slots and screws surrounding the slots running down the rail.

What Happened To Sweden’s Slot Car EV Road?

Many EVs can charge 80% of their battery in a matter of minutes, but for some applications range anxiety and charge time are still a concern. One possible solution is an embedded electrical rail in the road like the [eRoadArlanda] that Sweden unveiled in 2016.

Overhead electrical wires like those used in trolleys have been around since the 1800s, and there have been some tests with inductive coils in the roadway, but the 2 km [eRoadArlanda] takes the concept of the slot car to the next level. The top of the rail is grounded while the live conductor is kept well underground beneath the two parallel slots. Power is only delivered when a vehicle passes over the rail with a retractable contactor, reducing danger for pedestrians, animals, and other vehicles.

One of the big advantages of this technology being in the road bed is that both passenger and commercial vehicles could use it unlike an overhead wire system that would require some seriously tall pantographs for your family car. Testing over several Swedish winters shows that the system can shed snow and ice as well as rain and other road debris.

Unfortunately, the project’s website has gone dark, and the project manager didn’t respond when we reached out for comment. If there are any readers in Sweden with an update, let us know in the comments!

We’ve covered both overhead wire and embedded inductive coil power systems here before if you’re interested in EV driving with (virtually) unlimited range.

Continue reading “What Happened To Sweden’s Slot Car EV Road?”

A closeup of the faulty section of the dial - you can spot the plastic rivets that broke off

The Tale Of Two Broken Flukes

Some repairs happen as if by pure luck, and [Sebastian] shows us one such repair on Hackaday.io. He found two Fluke 175 meters being sold on eBay, with one having a mere beeper issue, and another having a “strange error”. Now, theoretically, swapping beepers around would give you one working meter and a kit of spare parts – but this is Fluke we’re talking about, and [Sebastian] wasn’t satisfied leaving it there.

First, he deduced that the beeper issue could be fixed by repositioning the piezo disk – and indeed, that brought the meter number one to working order. This left the mysterious error – the meter would only power up in certain rotations of the dial, and would misbehave, at that. Disassembly cleared things up – the dial mechanics failed, in that a half of the metal contacts came detached after all the plastic rivets holding the metal piece in place mysteriously vanished. The mechanics were indeed a bit intricate, and our hacker hoped to buy a replacement, but seeing the replacement switch prices in three-digit range, out came the epoxy tube.

An epoxy fix left overnight netted him two perfectly working Fluke meters, and while we don’t know what the listing price was for these, such a story might make you feel like taking your chances with a broken Fluke, too. The tale does end with a word of caution from [Sebastian], though – apparently, cleaning the meters took longer than the repairs themselves. Nevertheless, this kind of repair is a hobbyist’s dream – sometimes, you have to design a whole new case for your meter if as much as a wire breaks, or painstakingly replace a COB with a TQFP chip.

Self-Destructing USB Drive Releases The Magic Smoke

There were some that doubted the day would ever come, but we’re happy to report that the ambitious self-destructing USB drive that security researcher [Walker] has been working on for the last 6+ months has finally stopped working. Which in this case, is a good thing.

Readers may recall that the goal of the Ovrdrive project was to create a standard-looking flash drive that didn’t just hide or erase its contents when accessed by an unauthorized user, but actively damaged itself to try and prevent any forensic recovery of the data in question. To achieve this, [Walker] built a voltage doubler circuit into the drive that produces 10 volts from the nominal 5 VDC coming from the USB port. At the command of an onboard microcontroller, that 10 V is connected to the circuit’s 3.3 V rail to set off the fireworks.

Early attempts only corrupted some of the data, so [Walker] added some more capacitance to the circuit to build up more of a charge. With the revised circuit the USB controller IC visibly popped, but even after it was replaced, the NAND flash was still unresponsive. Sounds pretty dead to us.

Too user friendly, needs more buttons

Unfortunately, there’s still at least one issue that’s holding back the design. As we mentioned previously, [Walker] was having trouble getting the computer to actually acknowledge his homebrew drive had any free space available. It turns out that the SM3257EN USB controller IC he’s using needs to be initialized by some poorly documented Windows XP software, which might not be such a big deal if the goal was just to build one of them, but could obviously be a hindrance when going into production.

He hopes further reverse engineering will allow him to determine which commands the XP software is giving to the IC so that he can duplicate them in a less ancient environment. Sounds like a job for Wireshark to us — with any luck he should be able to capture the commands being sent to the hardware and replay them.

While we can understand some readers may have lingering doubts about the drive’s spit-detection authentication system, it’s clear [Walker] has made some incredible progress here. This project demonstrates that not only can an individual spin up their own sold state storage, but that should they ever need to, they can also destroy it in an instant.

A Thoroughly Modern Serial Terminal

The humble desktop serial terminal may have long disappeared from the world of corporate IT, but there are still plenty of moments when professionals and enthusiasts alike need to hook up to a serial port. Many of us use a serial port on our laptops or other mobile devices, but [Neil Crawforth] has gone one better than that with the VT2040. It’s an old-style serial terminal in a super-handy portable format, and as one might guess from the name, it has an RP2040 microcontroller at its heart.

Attached to the chip is a rather nice keyboard, and an ILI9488 480×320 LCD display. The software is modular, providing a handy set of re-usable libraries for the different functions including a PIO-based serial port. His main application seems to be talking to an ESP8266, but we’re guessing with a MAX232 or other level shifter chip it could drive a more traditional port. Everything can be found in the project’s GitHub repository, allowing anyone to join the fun.

As long-time readers will know, we’ve been partial to a few serial terminals in the past. Particularly beloved is this extremely retro model with vintage dot matrix LEDs.

The Die Is Cast!

We all know the basics of how metal casting works, a metal is heated up to melting point and the resulting liquid metal is poured into a mold. When the metal sets, it assumes the shape of the mold. It’s a straightforward way to reliably replicate a metal item many times over, and the basics are the same whether the metal is a low-temperature alloy in a silicone mould or a crucible of molten steel poured into a sand mould.

The mould is black sand in a cast iron box, and the pattern piece is half submerged in it
A sand mould being formed around a pattern. Lukas Stavek, CC BY-SA 3.0 .

What we all understood as casting in our conversation was sand casting. Sand is packed around a pattern of the piece to be cast, and then the pattern is removed leaving a cavity in its shape which becomes the mould. There are refinements to this process and the mould is frequently formed in two halves, but it’s something that’s even practical to do in a hackerspace level setting.

A refinement of sand casting is so-called lost-wax casting, in which a hollow wax model of the piece to be cast is packed around with sand, and when the metal is poured onto the top of it the wax melts and the wax is melted out before pouring the metal in to take its place. A variation on this appears here from time to time, so-called lost-PLA casting, where the wax model is replaced with a PLA 3D print.

Injection Molding For Metals

Diagram of a die casting machine
A die casting machine. Ahmed elbhje, Public domain.

Where our confusion crept in was with die casting. We could recognise a die-cast piece, but just what is die-casting, and how is a die-casting made? The answer there lies in mass-production, because a snag with sand casting is that  a sand mould can be labour intensive to produce. Much better to come up with a quick-turnaround process that re-uses the same mould over and over, and save all that time!

Enter the die-casting, to metalwork what injection moulding is to polymers. The die is a mould made out of metal, usually with liquid cooling, and the casting is done not by pouring but by forcing the molten metal into the mould under pressure. The whole process becomes much quicker, meaning that it can become a piece of process machinery spitting out castings rather than a labour-intensive individual task. The metals used for die-casting are the lower temperature ones such as aluminium, zinc, and their alloys, but  you will find die-castings in all conceivable places.

It’s obvious that Hackaday editors are not experienced foundrymen even if some of us grew up around metalwork, but we know that among our readers lie genuine experts in all sorts of fields. If that’s you and you operate a die-casting machine, please take a moment to tell us about it, we really would like to know more!

Header: Constantin Meunier, Public domain.

Morse Code Clock For Training Hams

It might seem antiquated, but Morse code still has a number of advantages compared to other modes of communication, especially over radio waves. It’s low bandwidth compared to voice or even text, and can be discerned against background noise even at extremely low signal strengths. Not every regulatory agency requires amateur operators to learn Morse any more, but for those that do it can be a challenge, so [Cristiano Monteiro] built this clock to help get some practice.

The project is based around his favorite microcontroller, the PIC16F1827, and uses a DS1307 to keep track of time. A single RGB LED at the top of the project enclosure flashes the codes for hours in blue and minutes in red at the beginning of every minute, and in between flashes green for each second.

Another design goal of this build was to have it operate with as little power as possible, so with a TP4056 control board, single lithium 18650 battery, and some code optimization, [Cristiano] believes he can get around 60 days of operation between charges.

For a project to help an aspiring radio operator learn Morse, a simple build like this can go a long way. For anyone else looking to build something similar we’d note that the DS1307 has a tendency to drift fairly quickly, and something like a DS3231 or even this similar Morse code clock which uses NTP would go a long way to keeping more accurate time.

Continue reading “Morse Code Clock For Training Hams”