EPROM-based Enigma Machine

The Enigma machine is perhaps one of the most legendary devices to come out of World War II. The Germans used the ingenious cryptographic device to hide their communications from the Allies, who in turn spent an incredible amount of time and energy in finding a way to break it. While the original Enigma was a complicated electromechanical contraption, [DrMattRegan] recently set out to show how its operation can be replicated with an EPROM.

The German Enigma machine was, for the time, an extremely robust way of coding messages. Earlier versions proved somewhat easy to crack, but subsequent machines added more and more complexity rendering them almost impenetrable. The basis of the system was a set of rotors which encrypted each typed letter to a different one based on the settings and then advanced one place in their rotation, ensuring each letter was encrypted differently than the last. Essentially this is a finite-state machine, something perfectly suited for an EPROM. With all of the possible combinations programmed in advance, an initial rotor setting can be inputted, and then each key press is sent through the Enigma emulator which encrypts the letter, virtually advances the rotors, and then moves to the next letter with each clock cycle.

[DrMattRegan]’s video, also linked below, goes into much more historical and technical detail on how these machines worked, as well as some background on the British bombe, an electromechanical device used for decoding encrypted German messages. The first programmable, electronic, digital computer called Colossus was also developed to break encrypted Enigma messages as well, demonstrating yet another technology that came to the forefront during WWII.

Continue reading “EPROM-based Enigma Machine”

3D Print Yourself A Split Flap Display

Split flap displays! They’re mechanical, clickety-clackity, and largely commercially irrelevant in our screen-obsessed age. That doesn’t mean you can’t have a ball making one of your own, though! [Morgan Manly] did just that, with tidy results.

An ESP32 C3 SuperMini serves as the boss of the operation, running the whole display. The display is designed to be modular, so you can daisy chain multiple characters together to spell longer words. Each module has 37 characters, so it can display the alphabet, numerals 0 to 9, and a blank. Each module contains a 28BYJ-48 stepper motor for controlling the flaps, and a ULN2003 driver board to run it and a PCF8575 IO expander to handle communciation. An A3144 hall effect sensor is also used for positional feedback to ensure the display always shows the right character. The flap mechanism itself is relatively straightforward—a drum with all 37 flaps is until the correct character is reached, with the blank flaps hosting a magnet to trigger the aforementioned hall effect sensor. The flaps themselves are 3D-printed, with filament changes used to color the characters against the background.

If you’ve ever dreamed of building a flap-display clock or ticker, you needn’t dream of finding the perfect vintage example. You can just build your own! The added bonus is that you can make it as big or as small as you like. We’ve seen some interesting variations on the split flap concept recently, too. If you’re cooking up your own kooky electromechanical displays, don’t hesitate to let us know!

PCB Design Review: M.2 SSD Splitter

Today’s PCB design review is a board is from [Wificable]. iI’s a novel dual-SSD laptop adapter board! See, CPUs and chipsets often let you split wide PCIe links into multiple smaller width links. This board relies on a specific laptop with a specific CPU series, and a BIOS mod, to put two M.2 NVMe SSDs into a single SSD slot of a specific series’ laptop.

This board has two crucial factors – mechanical compatibility, and electrical function. Looking into mechanics, it’s a 0.8 mm thick PCB that plugs into a M.2 socket, and it has sockets for two SSDs on it – plenty of bending going on. For electronics, it has a PCIe REFCLK clock buffer, that [Wificable] found on Mouser – a must have for PCIe bifurcation, and a must-work for this board’s core! Apart from that, this is a 4-layer board, it basically has to be for diffpairs to work first-try.

Of course, the clock buffer chip is the main active component and the focus of the board, most likely mistakes will happen there – let’s look at the chip first.

Continue reading “PCB Design Review: M.2 SSD Splitter”

Springs And Things Make For A Unique Timepiece

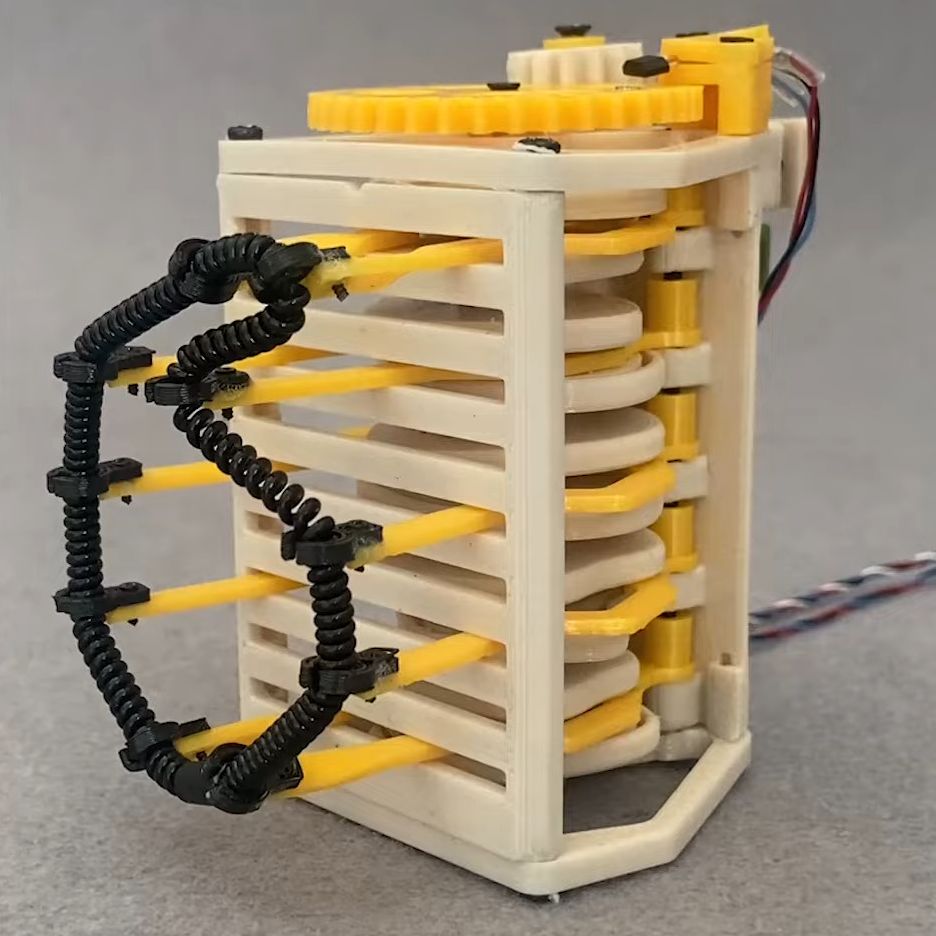
You never know when inspiration is going to strike, and for [Ekaggrat Singh Kalsi], it struck while he was playing with one of his daughter’s hair ties. The result is a clock called “Bezicron” and it’s a fascinating study in mechanical ingenuity.

The hair ties in question are simple objects, just a loose polymer coil spring formed into a loop that can be wrapped around ponytails and the like. In Bezicron, though, each digit is formed by one of these loops fixed to the ends of five pairs of arms. Each pair moves horizontally thanks to a cam rotating between them, changing the spacing between them and moving the hair tie. This forms each loop into an approximation of each numeral, some a little more ragged than others but all quite readable. The cams move thanks to a geared stepper motor on the rightmost digit of the hours and minutes section of the clock, with a gear train carrying over to the left digit. In between is the colon, also made from springy things pulsing back and forth to indicate seconds. The video below shows the clock going through its serpentine motions.

For our money, the best part of this build is the cams. Coming up with the proper shape for those had to be incredibly tedious, although we suspect 3D printing and rapid iterative design were a big help here. Practice with cam design from his earlier Eptaora clock probably helped too.

Continue reading “Springs And Things Make For A Unique Timepiece”

Disc Film,When Kodak Pushed Convenience Too Far

Having a penchant for cheap second-hand cameras can lead to all manner of interesting equipment. You never know what the next second-hand store will provide, and thus everything from good quality rangefinders an SLRs to handheld snapshot cameras can be yours for what is often a very acceptable price. Most old cameras can use modern film in some way, wither directly or through some manner of adapter, but there is one format that has no modern equivalent and for which refilling a cartridge might be difficult. I’m talking about Kodak’s Disc, the super-compact and convenient snapshot cameras which were their Next Big Thing in the early 1980s. In finding out its history and ultimate fate, I’m surprised to find that it introduced some photographic technologies we all still use today.

Easy Photography For The 1980s

Since their inception, Kodak specialised in easy-to-use consumer cameras and films. While almost all the film formats you can think of were created by the company, their quest was always for a super-convenient product which didn’t require any fiddling about to take photographs. By the 1960s this had given us all-in-one cartridge films and cameras such as the Instamatic series, but their enclosed rolls of conventional film made them bulkier than required. The new camera and film system for the 1980s would replace roll film entirely, replacing it with a disc of film that would be rotated between shots to line up the lens on an new unexposed part of its surface. Thus the film cartridge would be compact and thinner than any other, and the cameras could be smaller, thinner, and lighter too. The Disc format was launched in 1982, and the glossy TV adverts extolled both the svelteness of the cameras and the advanced technology they contained. Continue reading “Disc Film,When Kodak Pushed Convenience Too Far”

Analog Shift Register Revealed

Nowadays, if you want to delay an audio signal for, say, an echo or a reverb, you’d probably just do it digitally. But it wasn’t long ago that wasn’t a realistic option. Some devices used mechanical means, but there were also ICs like the TCA350 “bucket brigade” device that [10maurycy10] shows us in a recent post.

In this case, bucket brigade is a euphemism calling to mind how firemen would pass buckets down the line to put out a fire. It’s a bit of an analog analogy. The “bucket” is a MOSFET and capacitor. The “water” is electrical charge stored in the cap.  All those charges are tiny snippets of an analog signal.

Continue reading “Analog Shift Register Revealed”

2024 Supercon: Third Round Of Super Speakers

The third and final round of the 2024 Supercon talks announcements brings us to the end, and the full schedule is now up on Hackaday.io.

With Supercon just a couple weeks away, we hope you have your tickets already! Stay tuned tomorrow for a badge reveal.

Continue reading “2024 Supercon: Third Round Of Super Speakers”