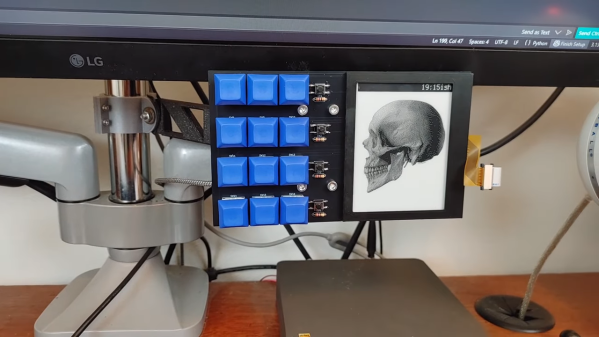
The build is based around an Adafruit RP2040 Feather ThinkInk devboard, chosen because it plugs straight into a readily-available 4.2 inch e-ink. The display is tasked with showing icons that correspond to the macro assignments for the 3 x 4 array of mechanical keyboard switches. Everything is wrapped up in a 3D printed frame, with an bracket to mount it to the monitor arms on the desk. The macropad is set up to talk to a custom Python app that runs on the host machine, which handles triggering actions and can also talk back to the pad itself.
Like many of you, I have a hard time getting rid of stuff. I’ve got boxes and boxes of weirdo bits and bobs, and piles of devices that I’ll eventually get around to stripping down into even more bits and bobs. Despite regular purges — I try to bring a car-load of crap treasure to local hackerspaces and meetups at least a couple times a year — the pile only continues to grow.
But the problem isn’t limited to hardware components. There’s all sorts of things that the logical part of me understands I’ll almost certainly never need, and yet I can’t bring myself to dispose of. One of those things just so happens to be documents. Anything printed is fair game. Could be the notes from my last appointment with the doctor, or fliers for events I attended years ago. Doesn’t matter, the stacks keep building up until I end up cramming it all into a box and start the whole process starts over again.
I’ve largely convinced myself that the perennial accumulation of electronic bric-à-brac is an occupational hazard, and have come to terms with it. But I think there’s a good chance of moving the needle on the document situation, and if that involves a bit of high-tech overengineering, even better. As such, I’ve spent the last couple of weeks investigating digitizing the documents that have information worth retaining so that the originals can be sent along to Valhalla in my fire pit.
The following represents some of my observations thus far, in the hopes that others going down a similar path may find them useful. But what I’m really interested in is hearing from the Hackaday community. Surely I’m not the only one trying to save some storage space by turn piles of papers into ones and zeros.
Walkie-talkies are great fun, and [RealCorebb]’s bbTalkie project takes the concept a step further by adding some extremely cool features to make a highly refined, self-contained ESP32-based communicator. bbTalkie completely does away with a push-to-talk button by implementing robust voice detection that works reliably even in noisy environments. It was all designed with cycling in mind, so hands-free operation that stands up to noise is a big plus.
Hands-free, wireless, self-contained digital walkie-talkies that can connect in a group. What’s not to like?
The core of communication is done over ESP-NOW, which is Espressif’s own protocol for direct device-to-device broadcasting. This removes the need to involve any sort of external service like SIM cards or internet access to transmit voice. Performance is best with an external antenna, naturally, but ESP-NOW doesn’t actually require anything other than the existing on-board hardware.
Because volume-based automatic triggers are highly susceptible to noise, voice detection is done with the help of VADNet, a neural network-based model implemented locally on the device. This system can reliably detect human speech, even in noisy environments. This lets bbTalkie switch between transmit and listen modes automatically and hands-free, without false triggers.
Even when doing all that, there’s still spare capability to play with. Further to the goal of making bbTalkie useful for cyclists in a group, [RealCorebb] added a system that can recognize specific voice commands (like “turn left” for example, or “wait for me!”) which trigger synchronized animations to play on the displays of all connected units. There’s even some experimental support for controlling a camera over Bluetooth, though currently it only supports hardware from Sony.
Watch a tour of it in the video below (Chinese language, English captions available). The OLED screens and animations are adorable, and are great visual feedback of what the unit is doing at any given moment.
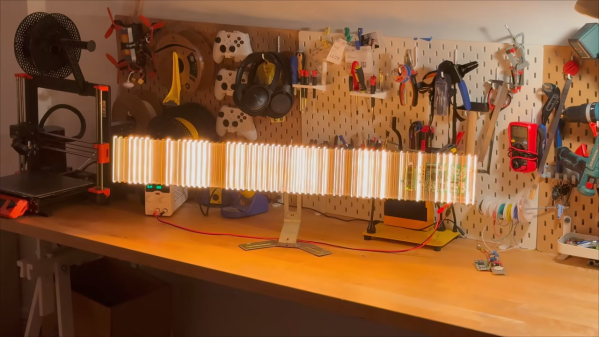
When it comes to electromagnetic waves, humans can really only directly perceive a very small part of the overall spectrum, which we call “visible light.” [rootkid] recently built an art piece that has perception far outside this range, turning invisible waves into a visible light sculpture.
The core of the device is the HackRF One. It’s a software defined radio (SDR) which can tune signals over a wide range, from 10 MHz all the way up to 6 GHz. [rootkid] decided to use the HackRF to listen in on transmissions on the 2.4 GHz and 5 GHz bands. This frequency range was chosen as this is where a lot of devices in the home tend to communicate—whether over WiFi, Bluetooth, or various other short-range radio standards.
The SDR is hooked up to a Raspberry Pi Zero, which is responsible for parsing the radio data and using it to drive the light show. As for the lights themselves, they consist of 64 filament LEDs bent into U-shapes over a custom machined metal backing plate. They’re controlled over I2C with custom driver PCBs designed by [rootkid]. The result is something that looks like a prop from some high-budget Hollywood sci-fi. It looks even better when the radio waves are popping and the lights are in action.
[Make Something] boasts he has made probably the fanciest picture frame you’ll ever see. He started with an original sign purchased on eBay and then made it to be bigger, brighter, and better. The frame is of solid walnut with back-lighting for the imagery all chasing that classic mid-century modern style. The backlit photo was taken the “hard way”, with an actual film camera and a road-trip to the picturesque site at Yellowstone. [Make Something] then developed the film himself in his home studio.
For the chimney [Make Something] used a new trick he learned in Autodesk Fusion: you take a photo of an object, convert to black and white, and then use the light/dark values to emboss or deboss a surface. To do this he took photos of the brick wall outside his shop and used that as the basis of the textured chimney he made with his 3D printer.
You’ve likely seen an X-cube, a dichroic prism used to split light into its constituent colours–you know, those fun little cubes you get when tearing apart a broken projector. Have you considered that the X-cube need not be a cube for its entire existence? [Matt] at “Matt’s Corner of Gem Cutting” on YouTube absolutely did, which is why he ground one into a 216-facet disco ball.
That’s the hack, really. He took something many of us have played with at our desks thinking “I should do something cool with this” and… did something cool with it that most of us lack the tools and especially skills to even consider. It’s not especially practical, but it is especially pretty. Art, in other words.
The shape he’s using is known specifically to gemologists as “Santa’s Little Helper II” though we’d probably describe it as a kind of isosphere. Faceting the cube is just a matter of grinding down the facets to create the isosphere, then polishing them to brilliance with increasingly finer grit. This is done one hemisphere at a time, so the other hemisphere can be safely held in place with the now-classic cyanoacrylate and baking soda composite. Yes, jewelers use that trick, too.
We were slightly worried when [Matt] dumped his finished disco ball in acetone to clean off the cyanoacrylate– we haven’t the foggiest idea what optical-quality glue is used to hold the four prisms of an X-cube together and were a little worried acetone might soften the joints. That turned out not to be an issue, and [Matt] now has the most eye-catching sun-catcher we think we’ve ever seen.
If you wanted to build a robot that chased light, you might start thinking about Raspberry Pis, cameras, and off-the-shelf computer vision systems. However, it needn’t be so complex. [Ed] of [Death and the Penguin] demonstrates this ably with a simple robot that finds the light the old-fashioned way.
The build is not dissimilar from many line-following and line chasing robots that graced the pages of electronics magazines 50 years ago or more. The basic circuit relies on a pair of light-dependent resistors (LDR), which are wrapped in cardboard tubes to effectively make their response highly directional. An op-amp is used to compare the resistance of each LDR. It then crudely steers the robot towards the brighter light between turning one motor hard on or the other, operating in a skid-steer style arrangement.
[Ed] then proceeded to improve the design further with the addition of a 555 timer IC. It’s set up to enable PWM-like control, allowing one motor to run at a lower speed than the other depending on the ratio between the light sensors. This provides much smoother steering than the hard-on, hard-off control of the simpler circuit. [Ed] notes that this is about the point where he would typically reach for a microcontroller if he hoped to add any additional sophistication.
In an era where microcontrollers seem to be the solution to everything, it’s nice to remember that sometimes you can complete a project without using a processor or any code at all. Video after the break.