We Didn’t Know The Sun Could Do Digital

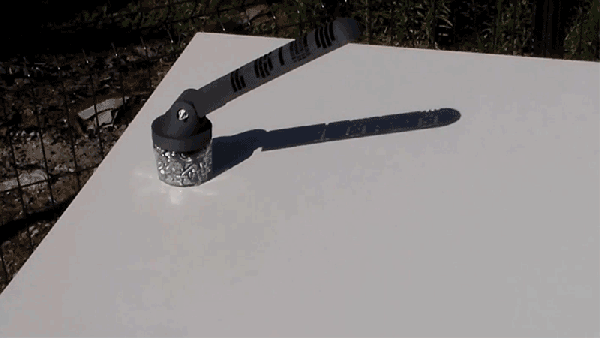
You don’t get much more old school than a sundial, and more new school than 3D printing. So, it is nice to see these two combined in this impressive project: the 3D printed digital sundial. We have seen a few sundial projects before, ranging from LED variants to 3D printed ones, but this one from [Julldozer] takes it to a new level.

In the video, he carefully explains how he designed the sundial. Rather than simply create it as a static 3D model, he used OpenSCAD to build it algorithmically, using the program to create the matrix for each of the numbers he wanted the sundial to show, then to combine these at the appropriate angle into a single, 3D printable model. He has open-sourced the project, releasing the OpenSCAD script for anyone who wants to tinker or build their own. It is an extremely impressive project, and there is more to come: this is the first in a new podcast series called Mojoptix from [Julldozer] that will cover similar projects. We will definitely be keeping an eye on this series.

Continue reading “We Didn’t Know The Sun Could Do Digital”

$50k In Play: Awarding 65 Stickvise This Week

Pushing your circuit boards around the bench while trying to solder the components is a fools game. Clamp that board in place with a Stickvise you won from Hackaday! This week we’ll choose 65 projects to receive one of these PCB clamps. You must submit your project as a Hackaday Prize entry to be eligible. Do it now and you’ll be considered for our weekly prizes all summer long — they total $50,000 that we’re putting into your hands.

We’re particularly proud of the Stickvise story. It was posted as a project on Hackaday.io and immediately caught our eye as an interesting idea. We worked with [Alex Rich] as he made his way through the process of getting it ready for manufacturing and it just became available in the Hackaday Store.

Regarding your entry to win one: find a problem facing your community and start a project that helps to solve it. We’ve seen many great entries so far, but with so many prizes your chances of winning are still really good! We recommend adding a project log each week that discusses your progress and perhaps mentions what you would use the Stickvise for while progressing toward a working prototype. Even if you don’t think your idea can win one of the big prizes, a great idea and solid write up is definitely a contender for our $50k in Play weekly prizes. Just look at the projects that won last week:

Last Week’s 20 Winners of a Bulbdial Clock Kit

bulbdial-clock-50k-in-play-prize-blogview

Congratulations to these 20 projects who were selected as winners from last week. You will receive a Bulbdial Clock Kit. It takes the concept of a sundial and recreates it using different colors of LEDs for each hand of the clock. This is our favorite soldering kit. It ventures a bit away from our mission of awarding tools and supplies to help with your entry, but sometimes you just need to have some fun!

Each project creator will find info on redeeming their prize as a message on Hackaday.io.


The 2015 Hackaday Prize is sponsored by:

Trek To Evil Mad Scientist Laboratories

I’ve been a huge fan of EMSL for quite some time now, and my recent field trip proved that it has earned the name Evil Mad Scientist Laboratories for a good reason. For instance, look at the reflection in the glass near the bottom and you’ll glimpse the hearse that [Lenore] and [Windell] have sitting in front of the shop. But stop at the threshold, inside there are delights that ate up a couple of hours without me even noticing. And they thought they were going to get work done that day.

Don’t judge me by my appearance. This is late afternoon on a summer Saturday in Sunnyvale. Why does that matter? Obviously summer Saturdays in Silicon Valley always start with the Electronics Swap Meet and Engineer’s breakfast! That was a ton of fun but if you’re doing it right it’s also a bit tiring. No worries, a shot of excitement came over me as soon as I walked in that front door.

Continue reading “Trek To Evil Mad Scientist Laboratories”

Meet The 2013 LayerOne Conference Badge

badge_2013-1838

The LayerOne security conference is fast approaching and [charliex] is doing his best to put the finishing touches on this year’s conference badge.

Around the perimeter of the badge is 48 LEDs driven by two LED drivers. This allows for some crazy hardware hacking to create anything from a TV-B-GONE to a bulbdial clock. There’s also a few extra switches and sensors that can be hacked to do some interesting things, but where this badge really shines is the addition of an OLED display, allowing it to transform into an XMEGA Xprotolab, a small oscilloscope, spectrum analyzer, and frequency generator. Yes, this badge can be hacked, but it’s also a tool for hacking.

There’s an impressive amount of work that went into this badge, a feat even more impressive given the fact that the LayerOne conference is this weekend and the PCBs for these badges won’t arrive until tomorrow. We’ll be the first to say we’re masters of procrastination, but [charliex] really cut it close here.

Router Jig For A Perfect Circle

router-jig-for-cutting-circles

We once enlisted a contractor to cut a plywood circle for a cat condo we were building. Now we’re embarrassed that we couldn’t come up with a solution as eloquent and easy to use as this circle cutting router jig which [Grays42] built.

He’s using a small trim router for the job. The jig is made up of two thick-walled pieces of PVC pipe. We don’t think the router is attached to jig. Instead you hold it against the wooden spacer which is on the outside edge of the cut. He doesn’t mention how he made the spacers, but we’d recommend cutting a hole the size of the pipes and then ripping down the middle to remove some of the material (tape the two spacers together during fabrication to ensure proper alignment). It just takes some nuts and bolts from the hardware store to assemble everything.

[Grays42] is using this to cut rings for his telescope build. We have our eye on it for making our own wooden Bulbdial clock.

[via Reddit]

BlokClok – Abstract Time Display

blokclok_abstract_time_display

Clocks made from blinking LEDs always make for fun projects. [Earthshine] built a clock that displays time abstractly using an 8×8 RGB LED matrix. The video embedded after the break illustrates how to read the time but here’s the gist of it: One LED is illuminated in the outside box of LEDs and moved in a clockwise motion to approximate seconds. Inside of this, there are four quadrants; upper left indicates hour-tens digit, upper right hour-ones, lower left minute-tens, and lower right minute-ones. This certainly makes for an interesting conversation piece!

There is no schematic and no code available but it’s really the concept that we’re interested in. If you must know, [Earthshine] bases this build around an Arduino. A DS1307 real time clock keeps the time, while four 74HC595 shift registers are utilized to control the three LED colors and the multiplexing.

Continue reading “BlokClok – Abstract Time Display”