Play Doom Or GTA V With Your Own Custom Controller And Xbox Emulator

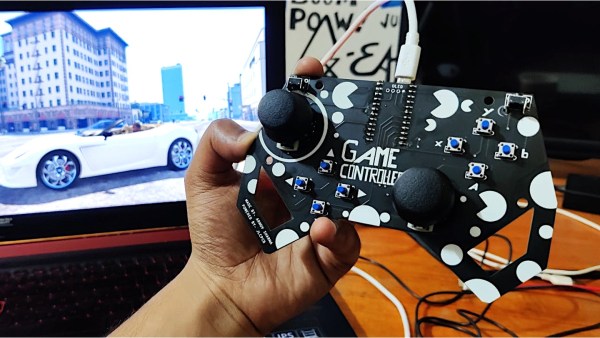
[Arnov] is bringing his own custom-made controller to the party and it is sure to impress. The design appears to have been inspired by the Xbox controller layout. Two joysticks for fine control of game characters, 4 face buttons, and two shoulder buttons. He opted for all through-hole components to make the assembly easier. No messing with tiny surface mount components here. We really appreciate the detail given to the silkscreen and the homage paid to a staple of retro gaming.

We were pretty impressed with how smoothly the controller translated to the game. He mentioned that was a huge improvement over his previous design. His original design had buttons instead of joysticks, but switching to joysticks gave him much better in-game control. That could also have a lot to do with the Xbox controller emulator running the background, but still.

Given that gift-giving season is upon us, you could really impress the video game enthusiast in your life with this as a custom gift. You could even run Retro games like Doom if you hook it up to a RetroPie. That ought to get a few people’s attention.

Continue reading “Play Doom Or GTA V With Your Own Custom Controller And Xbox Emulator”

Run UNIX On Microcontrollers With PDP-11 Emulator

C and C++ are powerful tools, but not everyone has the patience (or enough semicolons) to use them all the time. For a lot of us, the preference is for something a little higher level than C. While Python is arguably more straightforward, sometimes the best choice is to work within a full-fledged operating system, even if it’s on a microcontroller. For that [Chloe Lunn] decided to port Unix to several popular microcontrollers.

This is an implementation of the PDP-11 minicomputer running a Unix-based operating system as  an emulator. The PDP-11 was a popular minicomputer platform from the ’70s until the early 90s, which influenced a lot of computer and operating system designs in its time. [Chloe]’s emulator runs on the SAMD51, SAMD21, Teensy 4.1, and any Arduino Mega and is also easily portable to any other microcontrollers. Right now it is able to boot and run Unix but is currently missing support for some interfaces and other hardware.

[Chloe] reports that performance on some of the less-capable microcontrollers is not great, but that it does run perfectly on the Teensy and the SAMD51. This isn’t the first time that someone has felt the need to port Unix to something small; we featured a build before which uses the same PDP-11 implementation on a 32-bit STM32 microcontroller.

An Emulator For OBP, The Spaceflight Computer From The 1960s

[David Given] frequently dives into retrocomputing, and we don’t just mean he refurbishes old computers. We mean things like creating a simulator and assembler for the OBP spaceflight computer, which was used in the OAO-3 Copernicus space telescope, pictured above. Far from being a niche and forgotten piece of technology, the On-Board Processor (OBP) was used in several spacecraft and succeeded by the Advanced On-board Processor (AOP), which in turn led to the NASA Standard Spaceflight Computer (NSSC-1), used in the Hubble Space Telescope. The OBP was also created entirely from NOR gates, which is pretty neat.

One thing [David] learned in the process is that while this vintage piece of design has its idiosyncrasies, in general, the architecture has many useful features and is pleasant to work with. It is a bit slow, however. It runs at a mere 250 kHz and many instructions take several cycles to complete.

Sample of the natural-language-looking programming syntax for the assembler. (Example from page 68 of the instruction set manual for the OBP.)

One curious thing about the original assembler was documentation showing it was intended to be programmed in a natural-language-looking syntax, of which an example is shown here. To process this, the assembler simply mapped key phrases to specific assembly instructions. As [David] points out, this is an idea that seems to come and go (and indeed the OBP’s successor AOP makes no mention whatsoever of it, so clearly it “went”.) Since a programmer must adhere to a very rigid syntax and structure anyway to make anything work, one might as well just skip dealing with it and write assembly instructions directly, which at least have the benefit of being utterly unambiguous.

We’re not sure who’s up to this level of detail, but embedded below is a video of [David] coding the assembler and OBP emulator, just in case anyone has both an insatiable vintage thirst and a spare eight-and-a-half hours. If you’d prefer just the files, check out the project’s GitHub repository.

Continue reading “An Emulator For OBP, The Spaceflight Computer From The 1960s”

Arduino Nano Floppy Emulator For When Your Disk Is Not Accessible

Among the plethora of obsolete removable media there are some which are lamented, but it can be difficult to find those who regret the passing of the floppy disk. These flexible magnetic disks in hard plastic covers were a staple of computing until some time in the early 2000s, and their drives could be found by the crateload in any spares box. But what about today, when there’s a need for a real floppy drive and none is to be found? Enter [Acemi Elektronikci], with an Arduino Nano based floppy emulator, that plugs into the floppy port of a PC old enough to have one, and allows the easy use of virtual floppy disks.

Aside from the Nano it has an SD card and associated level shifter, and an SSD1306 i2c screen. Most of the Arduino’s lines drive the floppy interface, so the five-button control comes to a single ADC pin via a resistor ladder. He freely admits that it’s not a perfect cycle-exact emulator of original hardware and there may be machines or even operating systems that complain when faced with it, but for all that it is a useful tool. One of the machines that may have issues is the Amiga, but fortunately there’s a fix for that with a Raspberry Pi.

Hey, MiSTer Emulator, Gimme Almost Any Classic Platform!

I’m back with another of the talks from Hackerspace Gent’s NewLine conference, fresh from my weekend of indulgence quaffing fine Belgian food and beers while mixing with that country’s hacker community. This time it’s an overview from [Michael Smith] of the MiSTer project, a multi-emulator using an FPGA to swap out implementations of everything from an early PDP minicomputer to an 80486SX PC.

At its heart is a dev board containing an Intel Cyclone SoC/FPGA, to which a USB hub must be added, and then a memory upgrade to run all but the simplest of cores. Once the hardware has been taken care of it almost seems as though there are no classic platforms for which there isn’t a core, as a quick browse of the MiSTer forum attests. We are treated to seamless switching between SNES and NED platforms, and even switching different SID chip versions during a running Commodore 64 demo.

There are many different routes to a decent emulator set-up be they using hardware, software, or a combination of both. It’s unlikely that there are any as versatile as this one though, and we’re guessing that as it further evolves it will become a fixture below the monitor or TV of any gamer.  It’s a step up from single-platform FPGA emulators, that’s for certain!

Continue reading “Hey, MiSTer Emulator, Gimme Almost Any Classic Platform!”

An HP15-C emulator PCB

Calculate Like It’s 1989 With This HP15C Emulator

Back in the day, your choice of calculator said a lot about your chops, and nothing made a stronger statement than the legendary Hewlett-Packard Voyager series of programmable calculators. From the landscape layout to the cryptic keycaps to the Reverse Polish Notation, everything about these calculators spoke to a seriousness of purpose.

Sadly, these calculators are hard to come by at any price these days. So if you covet their unique look and feel, your best bet might be to do like [alxgarza] and build your own Voyager-series emulator. This particular build emulates the HP15C and runs on an ATMega328. Purists may object to the 192×64 LCD matrix display rather than the ten-digit seven-segment display of the original, but we don’t mind the update at all. The PCB that the emulator is built on is just about the right size, and the keyboard is built up from discrete switches that are as satisfyingly clicky as the originals. We also appreciate the use of nothing but through-hole components — it seems suitably retro. The video below shows that the calculator is perfectly usable without a case; a 3D-printed case is available, though, as is an overlay that replicates the keypad of the original.

We’ve seen emulators for other classic calculators of yore, including Sinclair, Texas Instruments, and even other HP lines. But this one has a really nice design that gets us going.

Continue reading “Calculate Like It’s 1989 With This HP15C Emulator”

An Emulator That Only Plays One Game

[Ben Smith] had previously implemented a GameBoy Color emulator but decided to make a new emulator that to play just one game called pokegb. The game is, of course, the popular blue edition of Pokemon. While this emulator could play other GameBoy games, the way it was implemented was to support only the opcodes and features that Pokemon Blue used. What’s perhaps even more amazing is that this full emulator is just 582 lines of C++ (using SDL for graphics and input). There is also an obfuscated version that comes in at just 68 lines and in the shape of three Pokeballs. All the code for pokegb can be found on GitHub.

[Ben] goes through a detailed listing of each opcode of the processor, memory, the graphics unit (PPU), and how it interacts with a modern operating system. We love the idea of implementing each opcode one by one and gradually seeing the emulator make it farther and farther through the ROM. The only feature that’s noticeably absent is sound, which would require a significant amount of code to emulate properly.

If you’re interested in a deep dive into the audio chips inside a Gameboy Color, [Ken Shirriff] has already done the research for you.