DIY Tube Lights Look Amazing For Just $50 A Piece

It’s the future. We should have weird glowy lights everywhere, all over our homes, cars, and businesses. In the automotive world, luxury automakers are doing their part with LED ambient lighting systems, but the rest of us have to step up. [Super Valid Designs] has developed an excellent modular DMX lighting rig that’s fit for this purpose; the rest of us just have to get to work and build our own!  (Video, embedded below.)

The design relies on hot-swapping powered bases that let a variety of different lights to be swapped in as needed. They use a custom four-pin socket designed by [Super Valid Designs] using PVC and ABS plumbing and conduit parts and tent pole springs from Home Depot. There’s a 3D-printable version, too, which is useful for those around the world that can’t get access to American standard gear easily. Anyone from the Nerf scene will understand this frustration well.

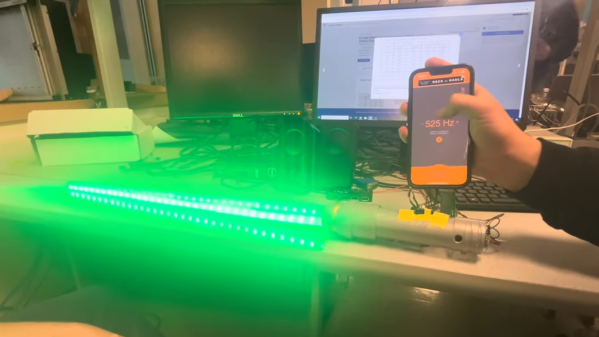
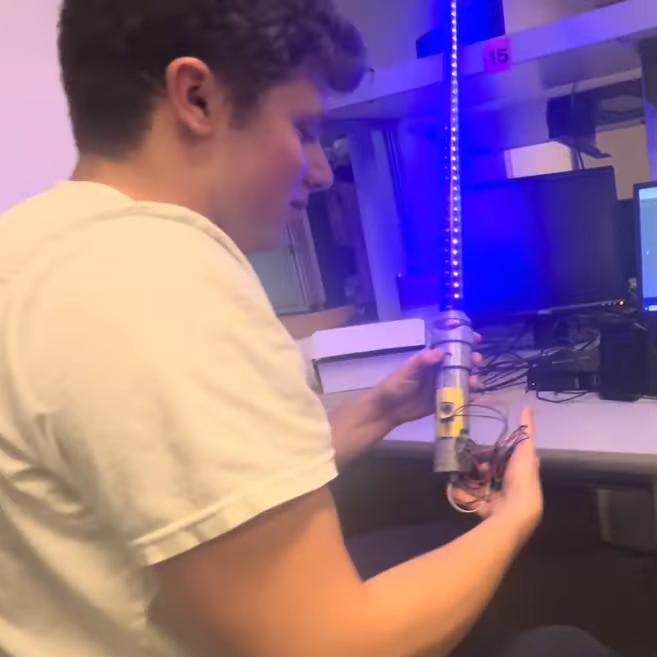
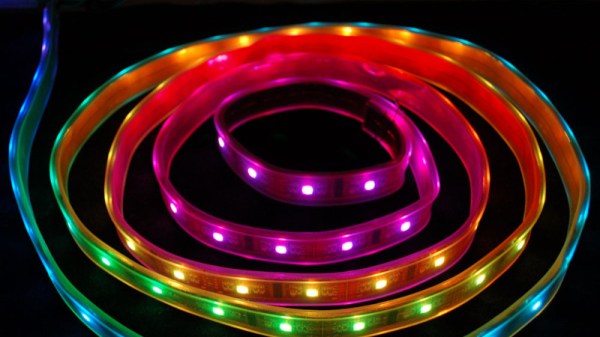
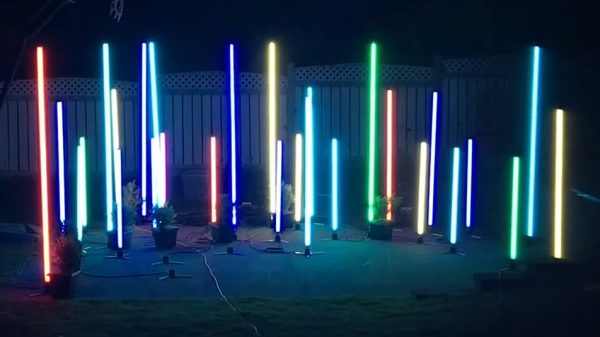
The real cool part of the modular rig, though, are the tube fixtures. There’s a ball design too, but they don’t look quite as future-cool as the tubes. They use fluorescent tube protectors as a cheap source of clear tubes, and use plumbing and conduit parts to make easy-insert connectors for pairing with the modular bases. Light is courtesy of old-school non-addressable RGB LED strips, attached to flat aluminium trim with their own adhesive combined with a wrap of clear packing tape as well. The LED strip is attached to one side of the tube, with parchment paper layered inside the tubes to act as a diffuser.

Building in quantities of 8 or more, [Super Valid Designs] reckons that the tubes can be built for $50 each or less. Of course, that adds up to a few hundred dollars in total, but the results speak for themselves.

If you’re thinking of tackling this project, but DMX is beyond your current skillset, fear not. We’ve got just the primer to get you started! Video after the break.

Continue reading “DIY Tube Lights Look Amazing For Just $50 A Piece”

37C3: When Apple Ditches Lightning, Hack USB-C

[Thomas Roth], aka [Ghidraninja], and author of the [Stacksmashing] YouTube channel, investigated Apple’s Lightning port and created a cool debugging tool that allowed one to get JTAG on the device. Then, Apple went to USB-C for their new phones, and all his work went to waste. Oh well, start again — and take a look at USB-C.

Turns out, though, that the iPhone 15 uses the vendor-defined messages (VDM) capability of USB-PD to get all sorts of fun features out. Others had explored the VDM capabilities on Mac notebooks, and it turns out that the VDM messages on the phone are the same. Some more fiddling, and he got a serial port and JTAG up and running. But JTAG is locked down in the production devices, so that will have to wait for an iPhone 15 jailbreak. So he went poking around elsewhere.

He found some other funny signals that turned out to be System Power Management Interface (SPMI), one of the horribly closed and NDA-documented dialects owned by the MIPI Alliance. Digging around on the Interwebs, he found enough documentation to build an open-source SPMI plugin that he said should be out on his GitHub soon.

The end result? He reworked his old Lightning hardware tool for USB-C and poked around enough in the various available protocols to get a foothold on serial, JTAG, and SPMI. This is just the beginning, but if you’re interested in playing with the new iPhone, this talk is a great place to start. Want to know all about USB-C? We’ve got plenty of reading for you.

Sound-Reactive Light Saber Flips Allegiance Via Vowel Sounds

Students [Berk Gokmen] and [Justin Green] developed an RP2040-based LED-illuminated lightsaber as a final project with a bit of a twist. It has two unusual sound-reactive modes: disco mode, and vowel detection mode.

Switching allegiances (or saber color, at least) is only a sound away.

Disco mode alters the color of the saber dynamically in response to incoming sounds. Color and brightness are altered in response to incoming frequencies picked up by the on-board microphone, making a dynamic light show that responds particularly well to music.

The second mode is vowel detection, and changes the lightsaber’s color depending on spoken sounds. The “ee” sound makes the saber red, and the “ah” sound turns it blue. This method requires a lot of processing and filtering, and in the end it works, but is quite dependent on individual speakers for calibration.

The sound functionality centers around FFTs (Fast Fourier Transforms) which are fundamental to processing signals like audio in a meaningful way, and is a method accessible to embedded devices like microcontrollers with ADCs.

The lightsaber is battery-powered and wireless, and there are loads of details about the finer points of the design (including challenges and tradeoffs) on the project page, and the source code is available on GitHub. A video demonstration and walkthrough is embedded below.

Continue reading “Sound-Reactive Light Saber Flips Allegiance Via Vowel Sounds”

Flashlight Door Lock Is A Bright Idea

There are many ways to lock a door. You could use a keypad, an RFID card, a fingerprint or retina scan, Wi-Fi, Bluetooth, the list goes on. You could even use a regular old metal key. But none of these may be as secure as [mircemk]’s Arduino-based door lock that employs a smartphone’s flashlight as a pass code.

At first blush, this seems horribly insecure. Use a plain old flashlight to open a door? Come on. But the key is in the software. In fact, between the typed-in pass code and the flash of light it generates, this lock kind of has two layers of security.

Here’s what’s going on: inside the accompanying smart phone application, there’s a list of passwords. Each of these passwords corresponds to a flash of light in milliseconds. Enter the correct password to satisfy the Arduino, and the phone’s flashlight is activated for the appropriate number of milliseconds to unlock the door.

As you’ll see in the video below, simply flashing the light manually doesn’t unlock the door, and neither does entering one of the other, bogus passwords. Although it does activate the flashlight each time, they don’t have the appropriate light-time length defined.

Hardware-wise, there is an Arduino Nano Every in charge of the LDR module that reads the flashlight input and the 12 V relay that unlocks the door. Be sure to check it out it the video after the break.

If you want to keep your critters from bringing wild critters back inside, check out this Wi-Fi cat door that lets you have a look at what might be dangling from their jaws before unlocking the door.

Continue reading “Flashlight Door Lock Is A Bright Idea”

The Dark Side Of Hacking XMas Lights, Literally

When looking at the piles of cheap RGB, Bluetooth-controlled LED strips you can find for sale just about anywhere these days, integrating them into a home-automation setup is very tempting. Normally these strips are controlled via a special smartphone app, that speaks whatever dodgy protocol was thrown together for the LED strip controller in question. Reverse-engineering this Bluetooth protocol is fairly easy these days, as [Will Cooke] describes in a recent tutorial, although for him there was a bit of a tragic ending with one particular RGB set.

With previous experiences reverse-engineering the Bluetooth protocol with Wireshark under his belt and having published the BJ_LED repository for LED strips that use the MohuanLED app, reverse-engineering this new LED strip with the associated “iDeal LED” app seemed fairly routine. Initially it was indeed routine, with just a curveball in the form of some encryption that the Jadx decompiler used on the app couldn’t help with. Fortunately the key ended up floating around on the internet, and the protocol was wide open. That’s when disaster struck.

While trying to throw payloads at the LED controller to find hidden modes and settings, [Will] found that he could indeed increase the brightness beyond what the app supported, but poking at lighting modes beyond the 10 presets gave a nasty shock. Modes 1 through 10 worked fine, 11 also did something new, but when the controller was asked to switch to mode 12, it shut off. Permanently. Whether this corrupted the firmware or caused some other issue is unknown, but it’s a clear warning that reverse-engineering comes with potentially fried hardware.

We hope that [Will] can get an autopsy performed on this controller to see the cause of this seemingly permanent failure that persisted across hard resets and disconnecting from power overnight. The protocol for this controller has been published on GitHub for those who’d like to take their chances.

LED lights: LadyAda, CC BY-SA 4.0.

Voyager 1 In Trouble As Engineers Scramble To Debug Issue With Flight Data System

Recently the team at JPL responsible for communication with the Voyager 1 spacecraft noticed an issue with the data it was returning from the Flight Data System (FDS). Although normally the FDS is supposed to communicate with the other subsystems via the telecommunications unit (TMU), this process seems to have broken down, resulting in no payloads from the scientific instruments or engineering sensors being returned any more, just repeating binary patterns. So far the cause of this breakdown is unknown, and JPL engineers are working through potential causes and fixes.

This situation is not unlike a similar situation on Voyager 2 back in 2010 when the returned data showed a data pattern shift. Here resetting the memory of the FDS resolved the garbled data issue and the engineers could breathe a sigh of relief. This time the fix does not appear so straightforward, as a reset of the FDS on Voyager 1 did not resolve the issue with, forcing the team to consider other causes. What massively complicates the debugging is that each transmission to and from the spacecraft takes approximately 22.5 hours each way, making for an agonizing 45 hour wait to receive the outcome of a command.

We wish the JPL engineers involved all the luck in the world and keep our collective appendages crossed for Voyager 1.

Qantas Flight 32: When A Few Millimeters Of Metal Invite Disaster

A common saying is that every disaster is caused by a chain of events, some of which can stretch back by years. Airplane disasters and near-disasters are no exception here, with all too often a small mechanical issue worsening until suddenly everything goes south. In the best case the flight crew is still able to work through the problems and figure out a way to put the aircraft down on firm soil in a single piece. This was the situation that the crew of Qantas Flight 32 (QF32) found themselves forced to deal with, as detailed in a recent article by [Kyra Dempsey], aka [Admiral Cloudberg].

When QF32 started its flight from London Heathrow in early November of 2010, everything seemed normal, but a mere four minutes after take-off from a layover at Singapore on its way to its final destination of Sydney, the #2 engine on the left wing of the Airbus A380 essentially exploded, launching shrapnel through the wing and fuselage. Although the A380 has four engines (numbered 1-4 from the left wing tip) and normally a single engine failure is not a major deal, the loss of systems that got destroyed in the explosion left the crew scrambling to diagnose the damage and implement a solution.

Continue reading “Qantas Flight 32: When A Few Millimeters Of Metal Invite Disaster”