[Mike] got his hands on this thermal imaging camera which is designed for use by Firefighters. As he’s demonstrating in the image above, it clips to a helmet and has a display what will let rescuers see through heavy smoke. But this one isn’t working right so he cracked it open and repaired the damaged board.
The hour-long video (embedded after the break) is quite interesting. He starts with a disassembly of the unit, before diving head-first into trouble shooting. There is a PCB inside that fills the entire U-shaped enclosure. The thermal sensor’s habit of cutting out seems to be a symptom of this design. There is one weak point where the board is very narrow. Flexing or vibrating that section will reset the sensor, and [Mike] ends up replacing a couple of components before the thing is fixed. These include a resistor and a ferrite bead both of which are suspected of having cracks due to that board flexing. The rest of the video is spent with an EEVblog-style look that the components and the construction.
[Udo Klein] was working with some 1N4148 transistors and was interested in the specs relating to their performance at different temperatures. The forward voltage actually changes quite a bit depending on temperature and wondered if this could be reliably measured. He hacked his own LED shield for the Arduino to use as a 1×20 thermal imaging system.
The screenshot above is mapping the voltage measurements from a row of diodes (see the video after the break to get the full picture). He’s holding an ice pack over the row of diodes and observing the change. The on-screen display is facilitated by a Python script which is pulling data from the Arduino. Since there aren’t enough analog inputs to read all twenty diodes separately they have been multiplexed. Four I/O pins each enable five of the diodes, readings are taken with five analog inputs before moving on to the next set.
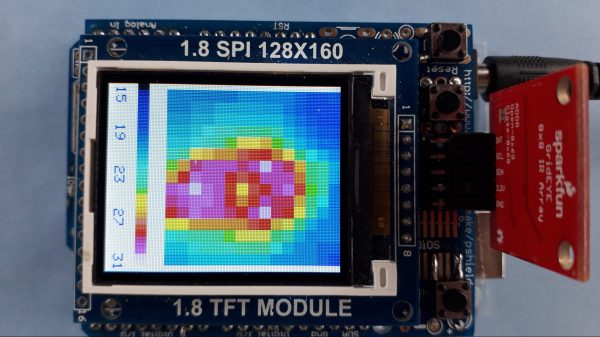
Thermal cameras can cost well into the five-figure range if you’re buying high-resolution models with good feature sets. New models can be so advanced that their export and use is heavily controlled by certain countries, including the USA. If you just want to tinker at the low end, though, you don’t have to spend a lot of scratch. You can even build yourself something simple based on an Arduino Uno!
The build uses Panasonic’s cheap “Grid-EYE” infrared array as the thermal sensor, in this case, a model with an 8×8 array of thermopiles. It’s not going to get you any fancy images, especially at long range, but you can use it to get a very blocky kind of Predator-vision of the thermal radiation environment. It’s a simple matter of hooking up the Grid-EYE sensor to the Arduino Uno over I2C, and then spitting out the sensor’s data in a nice visual form on a cheap TFT screen.
It’s a great introduction to the world of thermal imaging. There’s no better way to learn how something works by building a working example yourself. We’ve featured a few similar projects before, too; it’s all thanks to the fact that thermal sensors are getting cheaper and more accessible than ever!
Whenever phone-based thermal cameras are brought up here on Hackaday, we inevitably receive some comments about how they’re a bad investment compared to a standalone unit. Sure they might be cheaper, but what happens in a couple years when the app stops working and the manufacturer no longer feels like keeping it updated?
It’s a valid concern, and if we’re honest, we don’t like the idea of relying on some shady proprietary app just to use the camera in the first place. Which is why we’re so excited to see open source software being developed that allows you to use these (relatively) inexpensive cameras on your computer. [Les Wright] recently sent word that he’s been working on a project called PyThermalCamera which specifically targets the TOPDON TC001, which in turn is based on a project called P2Pro-Viewer developed by LeoDJ for the InfiRay P2 Pro.
Readers may recall we posted a review of the P2 Pro last month, and while the compact hardware was very impressive, the official Android software lacked a certain degree of polish. While these projects won’t help you on the mobile front in their current form, it’s good to know there’s at least a viable “Plan B” if you’re unwilling or unable to use the software provided from the manufacturer. Naturally this also opens up a lot of new possibilities for the camera, as being connected to a proper Linux box means you can do all sorts of interesting things with the video feed.
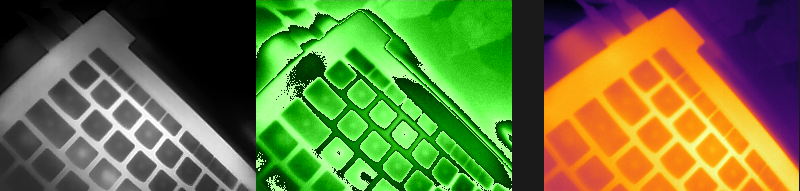
The two video feeds on the left are combined to produce the final thermal image.
Speaking of the video feed, we should say that both of these projects were born out of a reverse engineering effort by members of the EEVblog forums. They figured out early on that the InfiRay (and other similar models) were picked up as a standard USB video device by Linux, and that they provided two video streams: one being a B&W feed from the camera where the relative temperature is used as luminance, and the other containing the raw thermal data cleverly encoded into a green-tinted video. With a little poking they found an FFmpeg one liner that would combine the two streams, which provided the basis for much of the future work.
In the video below, you can see the review [Les] produced for the TOPDON TC001, which includes a demonstration of both the official Windows software and his homebrew alternative running on the Raspberry Pi. Here’s hoping these projects inspire others to join in the effort to produce flexible open source tools that not only unlock the impressive capabilities of these new thermal cameras but save us from having to install yet another smartphone application just to use a device we purchased.
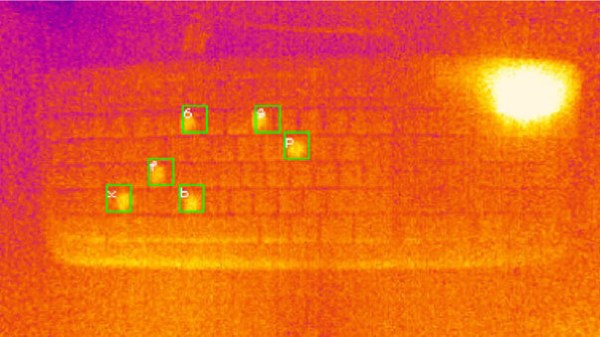
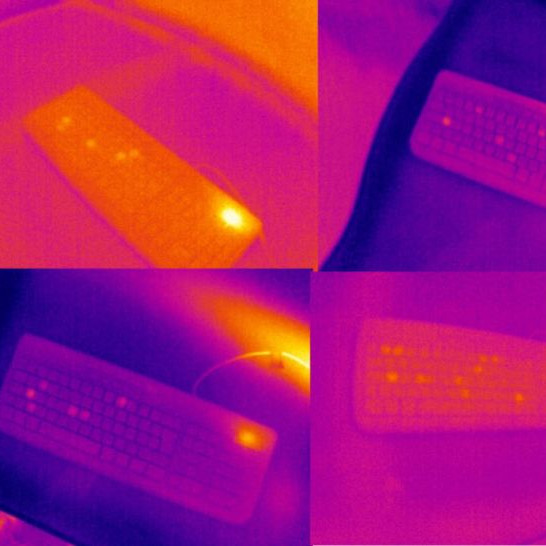
An age-old vulnerability of physical keypads is visibly worn keys. For example, a number pad with digits clearly worn from repeated use provides an attacker with a clear starting point. The same concept can be applied to keyboards by using a thermal camera with the help of machine learning, but it also turns out that some types of keys and typing styles are harder to read than others.
Researchers at the University of Glasgow show how machine learning can pull details from thermal images like these quickly and effectively.
Touching a key with a fingertip imparts a slight amount of body heat, and that small amount of heat can be spotted by a thermal sensor. We’ve seen this basic approach used since at least 2005, and two things have changed since then: thermal cameras gotten much more common, and researchers discovered that by combining thermal readings with machine learning, it’s possible to eke out slight details too difficult or subtle to spot by human eye and judgement alone.
Here’s a link to the research and findings from the University of Glasgow, which shows how even a 16 symbol password can be attacked with an average accuracy of 55%. Shorter passwords are much easier to decipher, with the system attacking 6 and 8 symbol passwords with an accuracy between 92% and 80%, respectively. In the study, thermal readings were taken up to a full minute after the password was entered, but sooner readings result in higher accuracy.
A few things make things harder for the system. Fast typists spend less time touching keys, and therefore transfer less heat when they do, making things a little more challenging. Interestingly, the material of the keycaps plays a large role. ABS keycaps retain heat far more effectively than PBT (a material we often see in custom keyboard builds like this one.) It also turns out that the tiny amount of heat from LEDs in backlit keyboards runs effective interference when it comes to thermal readings.
Amusingly this kind of highly modern attack would be entirely useless against a scramblepad. Scramblepads are vintage devices that mix up which numbers go with which buttons each time the pad is used. Thermal imaging and machine learning would be able to tell which buttons were pressed and in what order, but that still wouldn’t help! A reminder that when it comes to security, tech does matter but fundamentals can matter more.
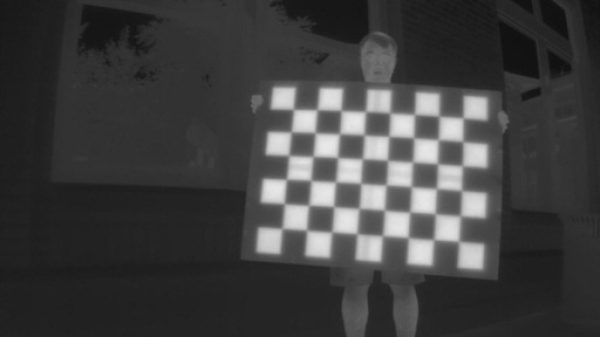
Thermal cameras are great if you want to get an idea of what’s hot and what’s not. If you want to use a thermal camera for certain machine vision tasks, though, you generally need to do a geometric calibration to understand what the camera is seeing and correct for lens distortion. [Henry Zhang] has shared various methods of doing just that.
It’s all about generating a geometrically-regular thermal pattern.
To calibrate a thermal camera, first you need a thermal pattern. This is like typical test image for a camera or screen, but with temperatures instead of colors. [Henry] explains several methods for doing this. One involves using a grid of nichrome wires to create a thermal pattern for calibration purposes. Another uses discs of cold aluminium inserted into a foam board. Even a simple checkerboard can work, with the black spaces heating up more from ambient sunlight than their neighbouring white spots. [Henry] then explains the mathematical techniques used for calibrating based on these patterns.
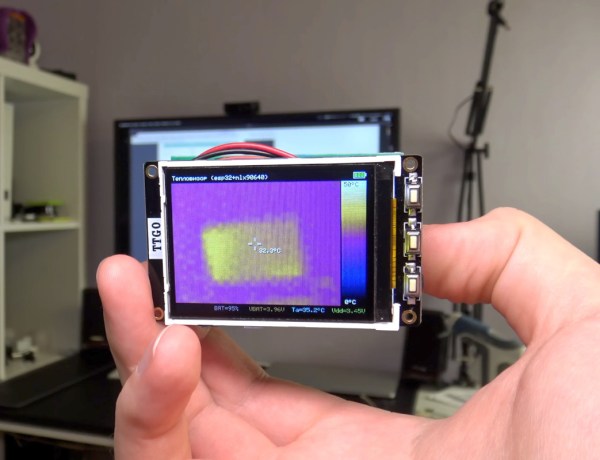
Just as the gold standard for multimeters and other instrumentation likely comes in a yellow package of some sort, there is a similar household name for thermal imaging. But, if they’re known for anything other than the highest quality thermal cameras, it’s excessively high price. There are other options around but if you want to make sure that the finished product has some sort of quality control you might want to consider building your own thermal imaging device like [Ruslan] has done here.
The pocket-sized thermal camera is built around a MLX90640 sensor from Melexis which can be obtained on its own, but can also be paired with an STM32F446 board with a USB connection in order to easily connect it to a computer. For that, [Ruslan] paired it with an ESP32 board with a companion screen, so that the entire package could be assembled together with a battery and still maintain its sleek shape. The data coming from the thermal imagining sensor does need some post-processing in order to display useful images, but this is well within the capabilities of the STM32 and ESP32.
With an operating time on battery of over eight hours and a weight under 100 grams, this could be just the thing for someone looking for a thermal camera who doesn’t want to give up an arm and a leg to one of the industry giants. If you’re looking for something even simpler, we’ve seen a thermal camera based on a Raspberry Pi that delivers its images over the network instead of on its own screen.