Pocket-Sized Thermal Imager

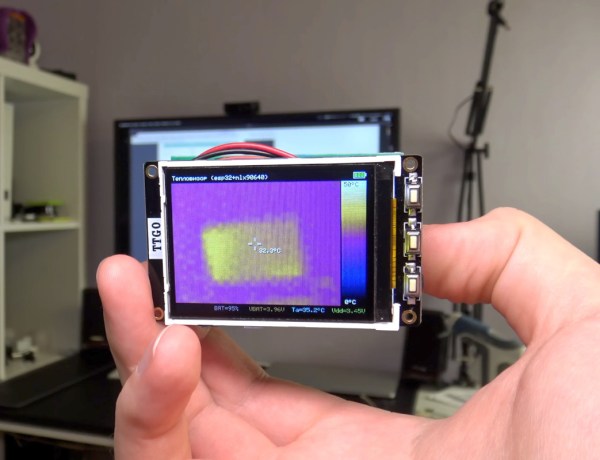
Just as the gold standard for multimeters and other instrumentation likely comes in a yellow package of some sort, there is a similar household name for thermal imaging. But, if they’re known for anything other than the highest quality thermal cameras, it’s excessively high price. There are other options around but if you want to make sure that the finished product has some sort of quality control you might want to consider building your own thermal imaging device like [Ruslan] has done here.

The pocket-sized thermal camera is built around a MLX90640 sensor from Melexis which can be obtained on its own, but can also be paired with an STM32F446 board with a USB connection in order to easily connect it to a computer. For that, [Ruslan] paired it with an ESP32 board with a companion screen, so that the entire package could be assembled together with a battery and still maintain its sleek shape. The data coming from the thermal imagining sensor does need some post-processing in order to display useful images, but this is well within the capabilities of the STM32 and ESP32.

With an operating time on battery of over eight hours and a weight under 100 grams, this could be just the thing for someone looking for a thermal camera who doesn’t want to give up an arm and a leg to one of the industry giants. If you’re looking for something even simpler, we’ve seen a thermal camera based on a Raspberry Pi that delivers its images over the network instead of on its own screen.

Pocket Computer Reminds Us Of PDAs

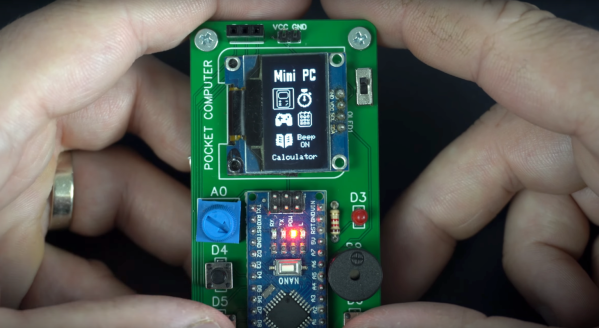
Before smartphones exploded on the scene in the late 00s, there was still a reasonable demand for pocket-sized computers that could do relatively simple computing tasks. Palm Pilots and other PDAs (Personal Digital Assistants) were all the rage in the ’90s and early ’00s, although for cutting-edge tech from that era plenty of these devices had astronomical price tags. This Arduino-based PDA hearkens back to that era, albeit with a much more accessible parts list.

The build is based around an Arudino Nano with an OLED screen and has the five necessary functions for a PDA: calculator, stopwatch, games, phonebook, and a calendar. With all of these components on such a small microcontroller, memory quickly became an issue when using the default libraries. [Danko] uses his own custom libraries in order to make the best use of memory which are all available on the project’s GitHub page. The build also includes a custom PCB to keep the entire pocket computer pocket-sized.

There are some other features packed into this tiny build as well, like the breakout game that can be played with a potentiometer. It’s an impressive build that makes as much use of the microcontroller’s capabilities as is possible, and if you enjoy projects where a microcontroller is used as if it is a PC take a look at this Arduino build with its own command-line interface.

Continue reading “Pocket Computer Reminds Us Of PDAs”

Send Old-Fashioned Pager Messages With New-Fashioned Hardware

In a world of always-connected devices and 24/7 access to email and various social media and messaging platforms, it’s sometimes a good idea to take a step away from the hustle and bustle for peace of mind. But not too big of a step. After all, we sometimes need some limited contact with other humans, so that’s what [EverestX] set out to do with his modern, pocket-sized communication device based on pager technology from days of yore.

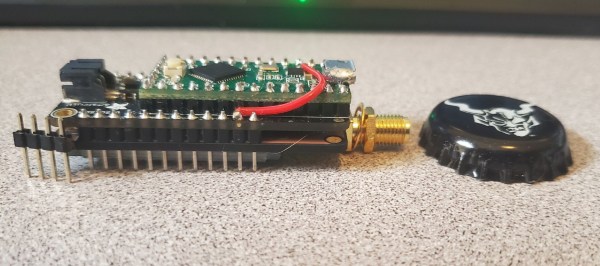
The device uses the POCSAG communications protocol, a current standard for pager communications that allows for an SMS-like experience for those still who still need (or want) to use pagers. [EverestX] was able to adapt some preexisting code and port it to an Atmel 32u4 microcontroller. With a custom PCB, small battery, an antenna, and some incredibly refined soldering skills, he was able to put together this build with an incredibly small footprint, slightly larger than a bottle cap.

Once added to a custom case, [EverestX] has an excellent platform for sending pager messages to all of his friends and can avoid any dreaded voice conversations. Pager hacks have been a favorite around these parts for years, and are still a viable option for modern communications needs despite also being a nostalgic relic of decades past. As an added bonus, the 32u4 microcontroller has some interesting non-pager features that you might want to check out as well.

Thanks to [ch0l0man] for the tip!

Many Uses For A Single Button

When building projects with a simple goal in mind, it’s not unheard of for us to add more and more switches, buttons, and complexity as the project goes through its initial prototyping stages. Feature creep like this tends to result in a tangled mess rather than a usable project. With enough focus, though, it’s possible to recognize when it’s happening and keep to the original plans. On the other hand, this single-button project with more than one use seems to be the opposite of feature creep. (YouTube, embedded below.)

[Danko]’s project has one goal: be as useful as possible while only using a single button and a tiny screen. Right now the small handheld device can be used as a stopwatch, a counter, and can even play a rudimentary version of flappy bird. It uses an Arduino Pro Mini, a 64×48 OLED screen running on I2C, and has a miniscule 100 mAh 3.7V battery to power everything. The video is worth watching if you’ve never worked with this small of a screen before, too.

Getting three functions out of a device with only one button is a pretty impressive feat, and if you can think of any other ways of getting more usefulness out of something like this be sure to leave it in the comments below. [Danko] is no stranger to simple projects with tiny screens, either. We recently featured his homebrew Arduino calculator that uses an even smaller screen.

Continue reading “Many Uses For A Single Button”

Beats An Extension Cord

What does your benchtop power supply have that [Pete Marchetto]’s does not? Answer: an extension cord draped across the floor. How often have you said to yourself, “I just need to energize this doodad for a couple seconds,” then you start daisy chaining every battery in the junk drawer to reach the necessary voltage? It is not uncommon to see battery packs with a single voltage output, but [Pete] could not find an adjustable one, so he built his own and put it on Tindie.

Presumably, the internals are not going to surprise anyone: an 18650 battery, charging circuit, a voltage converter, display, adjustment knob, and a dedicated USB charging port. The complexity is not what intrigues us, it is the fact that we do not see more of them and still wind up taping nine-volt batteries together. [Editor’s note: we use one made from an old laptop battery.]

This should not replace your benchtop power supply, it does not have the bells and whistles, like current regulation, but a mobile source of arbitrary voltage does most of the job most of the time. And it’s what this build hasn’t got (a cord) that makes it most useful.

Hacklet 70 – Calculator Projects

Hackers, makers, and engineers have long had a love affair with number crunching. Specifically with the machines that make crunching numbers easier. Today it may be computers, smart watches, and smartphones, but that wasn’t always the case. In the 50’s and 60’s, Slide rules were the rage. Engineers would carry them around in leather belt pouches. By the early 70’s though, the pocket calculator revolution had begun. Calculators have been close at hand for hackers and engineers ever since. This week’s Hacklet celebrates some of the best calculator projects on Hackaday.io!

calc1We start with [Joey Shepard] and RPN Scientific Calculator. No equals sign needed here; [Joey] designed this calculator to work with Reverse Polish notation, just like many of HP’s early machines. Stacks are pretty important for RPN calculators, and this one has plenty of space with dual 200 layer stacks. The two main processors are MSP430s from Texas Instruments. The user interface are a 4 line x 20 character LCD and 42 hand wired buttons. The two processors are pretty ingenious. They communicate over a UART. One processor handles the keyboard and display, while the other concentrates on crunching the numbers and storing data in an SRAM. The case for this calculator is made from soldered up copper clad board. It’s mechanically strong especially since [Joey] added a bead of solder along each joint. If you want to learn more about this technique check out this guide on FR4 enclosures.

[Joey] definitely improved his solder skills with this project. Every wire and connection, including the full SRAM address and data bus were wired by hand on proto boards. We especially like the sweet looking laser cut keyboard on this project!
Continue reading “Hacklet 70 – Calculator Projects”

Trinket EDC Contest Winners

It’s time to announce the winners of the Trinket Everyday Carry Contest! We’ve had a great 5 weeks watching the projects come together. A team of Hackaday staffers spent their weekend watching videos and selecting their top entries based on the contest rules. We had a really hard time picking the top three – the competition was tight, and there were quite a few awesome projects.

Without further ado, here are the winners!

1337toolFirst Prize: 1337 3310 tool. [Mastro Gippo] really knocked this one out of the park. He built a swiss army knife of a tool out of the iconic Nokia 3310 candybar phone. 1337 3310 tool is a graphing voltage and current meter, an ohmmeter, a continuity tester that plays the original Nokia ringtone, and a gaming machine which can play Tetris.  [Mastro Gippo] is 99% there with TV-B-Gone functionality as well. Amazingly, [Mastro Gippo] kept the Nokia look and feel in his user interface. He spent quite a bit of time grabbing data and bitmaps from the 3310’s original ROM.  [Mastro Gippo] is getting a Rigol DS1054Z scope to help iron out the bugs in his future projects!

pavaproSecond Prize: Pavapro – portable AVR programmer. [Jaromir] built an incredible pocket-sized microcontroller programming tool. Pavapro can read and edit text files, handle serial I/O at 9600 baud, and burn AVR microcontrollers. If that’s not enough, it can actually assemble AVR binaries from source. That’s right, [Jaromir] managed to fit an entire assembler on the Pro Trinket’s ATmega328 processor. Pavapro’s 16 button keypad won’t allow for much in the way of touch typing, but it does get the job done with T9 style text entry. The device is also extensible, we’re hoping [Jaromir] adds a few other architectures! PIC and MSP430 modes would be awesome!  [Jaromir] will be receiving a Fluke 179 multimeter with a 6 piece industrial electronics tip kit! We’re sure he’ll put it to good use.

robohandThird Prize: Robotic 3rd Hand. Let’s face it. We can’t all be Tony Stark. But [Tim] gets us a little bit closer with his awesome wearable entry. Need a tool? Just press the button, and Robotic 3rd Hand will give you a … hand. [Tim’s] creation utilizes the Pro Trinket to drive a servo which moves an incredibly well designed and 3D printed mechanism that lifts a screwdriver off the wearer’s wrist and places it into their hand. [Tim] originally was going to go with Electromyography (EMG) sensors to drive the hand, however he switched to a simple button when they proved problematic. We absolutely think this was the right decision for the contest – it’s always better to have a simpler but working project rather than a complex yet unreliable one. That said, we’d love to see him circle back and give EMG another try! [Tim’s] next project will be soldered up with the help of a Hakko FX888D with a tip kit. If things get a bit wobbly, he can use his new Panavise 324 Electronic Work center to keep everything steady.

If you didn’t make the top three in this contest, don’t give up! We’re going to be having quite a few contests this year. The top 50 entrants will receive custom Hackaday EDC Contest T-shirts. Check out the full list of 50 on Hackday.io!