Over the years many people have made an air quality monitor station, usually of some configuration which measures particulates (PM2.5 & PM10). Some will also measure ozone (O3), but very few will meet the requirements that will allow one to calculate the Air Quality Index (AQI) as used by the EPA and other organizations. [Ryan Kinnett]’s project is one of those AQI-capable stations.
The AQI requires the measurement of the aforementioned PM2.5 (µg/m3), PM10 (µg/m3) and O3 (ppb), but also CO (ppm), SO2 (ppb) and NO2 (ppb), all of which has to be done with specific sensitivities and tolerances. This means getting sensitive enough sensors that are also calibrated. [Ryan] found a company called Spec Sensors who sell sensors which are pretty much perfect for this goal.
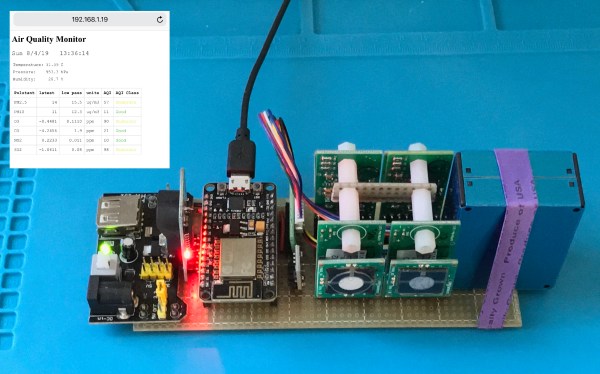
Using Spec Sensor’s Ultra-Low Power Sensor Modules (ULPSM) for ozone, nitrogen-dioxide, carbon monoxide and sulfur dioxide, a BME280 for air temperature, pressure and relative humidity, as well as a Plantower PMS5003 laser particle counter and an ADS1115 ADC, a package was created that fit nicely alongside an ESP8266-based NodeMCU board, making for a convenient way to read out these sensors. The total one-off BOM cost is about $250.
The resulting data can be read out and the AQI calculated from them, giving the desired results. Originally [Ryan] had planned to take this sensor package along for a ride around Los Angeles, to get more AQI data than the EPA currently provides, but with the time it takes for the sensors to stabilize and average readings (1 hour) it would take a very long time to get the readings across a large area.
Ideally many of such nodes should be installed in the area, but this would be fairly costly, which raises for [Ryan] the question of how one could take this to the level of the Air Quality Citizen Science project in the LA area. Please leave your thoughts and any tips in the comments.