Something strange has been going on in the friendly skies over the last day or so. Flights are being canceled. Aircraft are grounded. Passengers are understandably upset. The core of the issue is GPS and ADS-B systems. The ADS-B system depends on GPS data to function properly, but over this weekend a problem with the quality of the GPS data has disrupted normal ADS-B features on some planes, leading to the cancellations.
What is ADS-B and Why Is It Having Trouble?
Automatic Dependent Surveillance-Broadcast (ADS-B) is a communication system used in aircraft worldwide. Planes transmit location, speed, flight number, and other information on 1090 MHz. This data is picked up by ground stations and eventually displayed on air traffic controller screens. Aircraft also receive this data from each other as part of the Traffic Collision Avoidance System (TCAS).
ADS-B isn’t a complex or encrypted signal. In fact, anyone with a cheap RTL-SDR can receive the signal. Aviation buffs know how cool it is to see a map of all the aircraft flying above your house. Plenty of hackers have worked on these systems, and we’ve covered that here on Hackaday. In the USA, the FAA will effectively require all aircraft to carry ADS-B transponders by January 1st, 2020. So as you can imagine, most aircraft already have the systems installed.
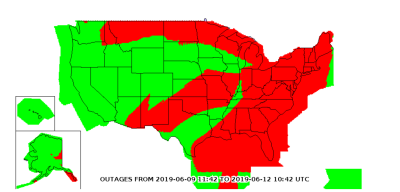 The ADS-B system in a plane needs to get position data before it can transmit. These days, that data comes from a global satellite navigation system. In the USA, that means GPS. GPS is currently having some problems though. This is where Receiver autonomous integrity monitoring (RAIM) comes in. Safety-critical GPS systems (those in planes and ships) cross-check their current position. If GPS is sending degraded or incorrect data, it is sent to the FAA who displays it on their website. The non-precision approach current outage map is showing degraded service all over the US Eastern seaboard, as well as the North. The cause of this signal degradation is currently unknown.
What Hardware is Affected?
GPS isn’t down though — you can walk outside with your cell phone to verify that. However, it is degraded. How a plane’s GPS system reacts to that depends on the software built into the GPS receiver. If the system fails, the pilots will have to rely on older systems like VOR to navigate. But ADS-B will have even more problems. An aircraft ADS-B system needs position data to operate. If you can’t transmit your position information, air traffic controllers need to rely on old fashioned radar to determine position. All of this adds up to a safety of flight problem, which means grounding the aircraft.
Digging through canceled flight lists, one can glean which aircraft are having issues. From the early reports, it seems like Bombardier CRJ 700 and 900 have problems. Folks on Airliners.net are speculating that any aircraft with Rockwell Collins flight management systems are having problems.
This is not a small issue, there are hundreds or thousands of canceled flights. The FAA set up a teleconference to assess the issue. Since then, the FAA has issued a blanket waiver to all affected flights. They can fly, but only up to 28,000 feet.
This is a developing story, and we’ll be keeping an eye on it. Seeing how the industry handles major problems is always educational, and there will be much to learn in the coming days.