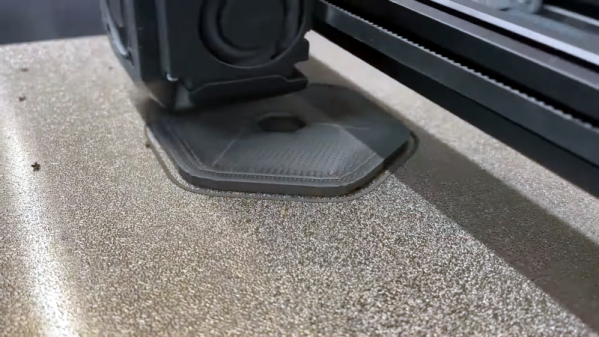
When the people of Earth set up bases on the moon, you can imagine that 3D printing will be a key enabling technology. Of course, you could ship plastic or other filament at great cost. But what if you could print with something you can already find on the moon? Like moon dust. NASA thinks it is possible and has been doing tests on doing just that. Now [Virtual Foundry] wants to let you have a shot at trying it yourself. It doesn’t really contain moon dust, but their Basalt Moon Dust Filamet has a similar composition. You can see a video about the material below.
It isn’t cheap, but it is probably cheaper than going up there to get some yourself. At least for now. The company is known for making PLA with various metal and ceramic materials. Like their other filaments, you print it more or less like PLA, although you need a large hardened nozzle, and they suggest a prewarmer to heat the filament before going to the hot end.
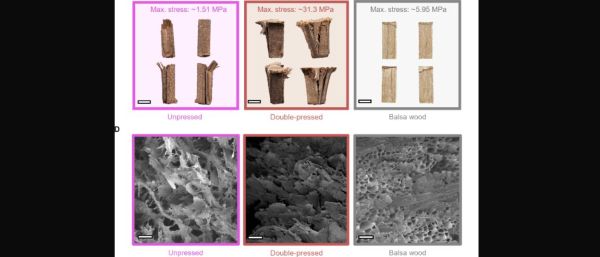
Although the components of wood – cellulose and lignin – are exceedingly cheap and plentiful, combining these into a wood-like structure is not straightforward, despite many attempts to make these components somehow self-assemble. A recent attempt by [MD Shajedul Hoque Thakur] and colleagues as published in Science Advances now may have come closest to 3D printing literal wood using cellulose and lignin ink, using direct ink writing (DIW) as additive manufacturing method.
Microstructures of 3D printed wood after printing and post-printing operations. (Credit: Thakur et al., 2024)
This water-based ink was created by mixing TOCN (tempo-oxidized cellulose nanofiber), a 10.6 wt % aqueous CNC (cellulose nanocrystals) and lignin in a 15:142:10 ratio, giving it roughly the viscosity of clay. The purpose of having both TOCNs and CNCs is to replicate the crystalline and amorphous cellulose elements of wood-based cellulose.
This ink was printed from a syringe head (SDS-60) installed in a Hyrel 3D Engine HR 3D printer. This printer is much like your average FDM printer, just targeting bioprinting and a wide range of heads to print and handle various attachments in a laboratory setting. The ink was extruded into specific shapes that were either freeze dried to get rid of the liquid component, or additionally also heated (at 180°C), with a third set of samples put into a hot press. These additional steps seem to promote the binding of the lignin and create a more durable result.
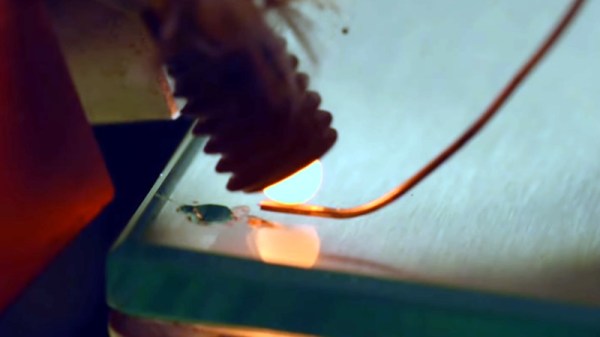
At this point, most readers will be familiar with fused deposition modeling (FDM) 3D printers, and how a plastic filament is pushed through a heater and deposited as liquid through a nozzle. Most of us also know that there are a huge variety of materials that can be FDM printed, but there’s one which perhaps evades us: you can’t load a spool of metal wire into your printer and print in metal, or at least you can’t yet. It’s something [Rotoforge] is working on, with a project to make a hot end that can melt metal. Their starting point is a ceramic diesel engine glow plug, from which they expect 1300 C (2372 F).
The video below the break deals with the process of converting the glow plug, which mostly means stripping off the metal parts which make it a glow plug, and then delicately EDM drilling a hole through its ceramic tip. The video is well worth a watch for the in-depth examination of how they evolved the means to do this.
Sadly they aren’t at the point of printing metal with this thing, but we think the current progress is impressive enough to have a good chance of working. Definitely one to watch.
Contrary to what our readers may think, we Hackaday writers aren’t exactly hacking layabouts. True, we spend a great deal of time combing through a vast corpus of material to bring you the best from all quadrants of the hacking galaxy, but we do manage to find a few minutes here and there to dip into the shop for a quick hack or two.
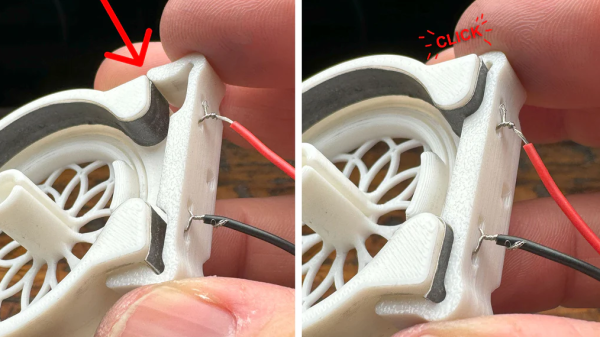
Our own [Jenny List] proves that with this quick and easy vintage microphone revival. The mic in question is a Shure Unidyne III, a cardioid pattern dynamic microphone that has been made in the millions since the 1950s. She’s got a couple of these old classics that have been sidelined thanks to their obsolete Amphenol MC3M connectors. The connectors look a little like the now-standard XLR balanced connector, but the pin spacing and pattern are just a touch different.
Luckily, the female sockets in the connector are just the right size to accept one of the crimp-on ferrules [Jenny] had on hand with a snug grip. These were crimped to a length of Cat 5 cable (don’t judge) to complete the wiring, but that left things looking a bit ratty. Some quick OpenSCAD work and a little PLA resulted in a two-piece shell that provides strain relief and protection for the field-expedient connections. It’s not [Roger Daltry] secure, mind you, but as you can see in the video below the break it’s not bad — nothing a few dozen yards of gaffer’s tape couldn’t fix. Come to it, looks like The Who were using the same microphones. Small world.
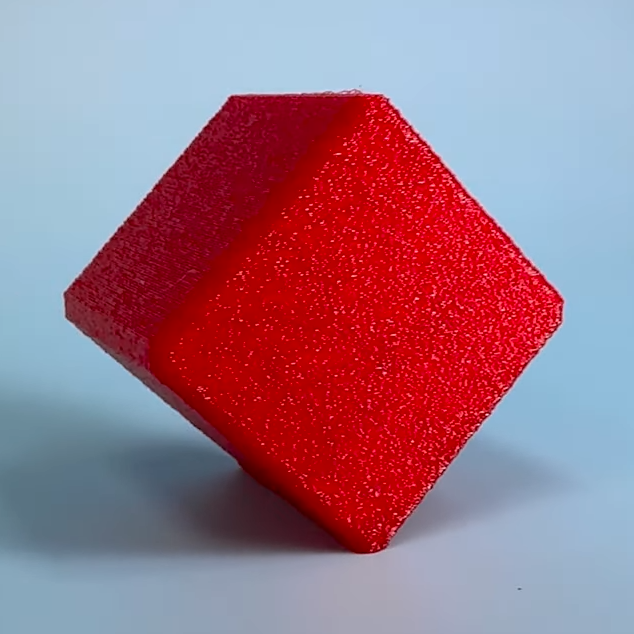
[Slant 3D] knows a lot about optimizing 3D prints so that they can be cranked out reliably with minimal need for post-processing, and in this short video he uses a cube as a simple example of how a few design changes can not only optimize for production, but can even hide layer lines pretty effectively.
Just to be perfectly clear, layer lines cannot be eliminated entirely without some kind of post-processing. But [Slant 3D]’s tips sure goes a long way toward making a part lose that obvious 3D-printed “look”. They also dovetail nicely with advice on how to optimize cranking out high numbers of parts in a print farm.
Adding texture to the outer layer is especially effective when combined with non-traditional part orientations.
One simple way to avoid visible layer lines is to put some kind of texture onto the part. This can be modeled into the part’s surface, or the slicer software can be used to modify the exterior of the print to add a texture such as a geometric pattern or by applying a fuzzy skin modifier.
Printing a texture onto the exterior is great, but the outcome can be even further improved by also printing the object in a non-traditional orientation.
Using a cube as an example, printing the cube on a corner has the advantage of putting the layer lines in a different orientation as well as minimizing the contact area on the print bed. This applies the texture across more of the part, and looks less obviously 3D printed in the process. Minimizing bed adhesion also makes parts much easier to remove, which has obvious benefits for production. [Slant 3D] points out that performing these operations on a 3D-printed part is essentially free.
A few other optimizations for production involve rounding sharp corners to optimize tool travel paths, and putting a slight chamfer on the bottom of parts to avoid any elephant foot distortion (Elephant’s foot can be compensated for, but simply putting a slight chamfer on a part is a design change that helps avoid accounting for machine-to-machine variance.)
Even if one has no need to optimize for high production volume, the tips on hiding layer lines with design changes is great advice. Watch it all in action in the short video, embedded below.
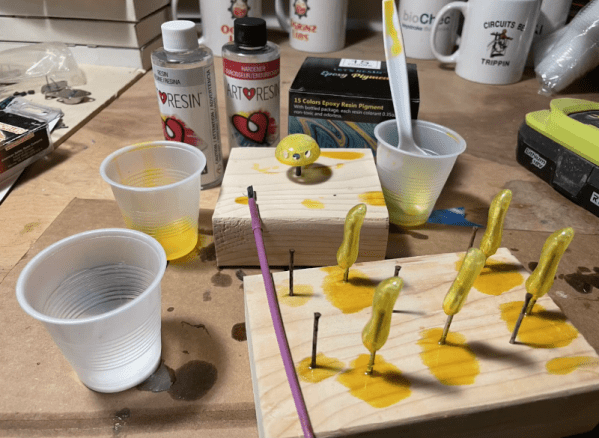
Glow-in-the-dark projects aren’t that uncommon. You can even get glow-in-the-dark PLA filament. However, those common glowing items require a charge from light, and the glow fades very quickly. [Ogrinz Labs] wasn’t satisfied with that. His “Night Blossom” 3D-printed flower glows using radioactive tritium and will continue to glow for decades.
Tritium vials are available and often show up in watches for nighttime visibility. The glow doesn’t actually come directly from the radioactive tritium (an isotope of hydrogen). Instead, the radioactive particles excite phosphor, which glows in the visible spectrum.
Once you have the vials, it is easy to understand how to finish off the project. The flower contains some long tubes inside each petal. There are also a few tiny vials in the center. The whole assembly goes together with glue.
If you need a potentiometer for a project, chances are pretty good that you’re not going to pick up a pencil and draw one. Then again, if you’re teaching someone how a variable resistor works, that old #2 might be just the thing.
When [HackMakeMod] realized that the graphite in pencil lead is essentially the same thing as the carbon composition material inside most common pots, the idea for a DIY teaching potentiometer was born. The trick was to build something to securely hold the strip while making contact with the ends, as well as providing a way to wipe a third contact across its length. The magic of 3D printing provided the parts for the pot, with a body that holds a thin strip of pencil-smeared paper securely around its inner diameter. A shaft carries the wiper, which is just a small length of stripped hookup wire making contact with the paper strip. A clip holds everything firmly in place. The video below shows the build process and the results of testing, which were actually pretty good.
Of course, the construction used here isn’t meant for anything but demonstration purposes, but in that role, it performs really well. It’s good that [HackMakeMod] left the body open to inspection, so students can see how the position of the wiper correlates to resistance. It also makes it easy to slip new resistance materials in and out, perhaps using different lead grades to get different values.
Hats off to a clever build that should be sure to help STEM teachers engage their students. Next up on the lesson plan: a homebrew variable capacitor.