Making The Commodore SX-64 Mini

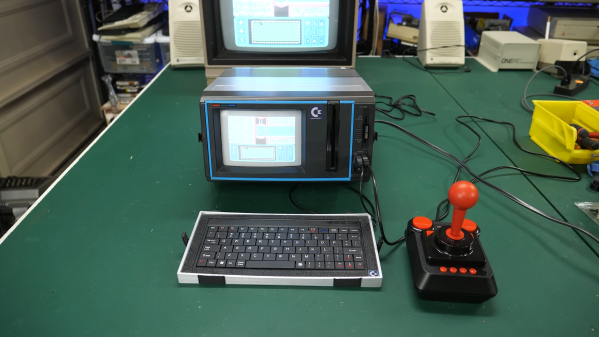
When you find a portable TV from the 1980s, and it reminds you of the portable Commodore 64, there’s only one thing to be done. [Aaron Newcomb] brings us the story of taking an Emerson PC-6 and mating it to the guts of his THEC64 Mini. It’s a bit of a journey, as the process includes modding the TV to include a composite input and trimming some unused PCB off the TV’s mainboard. Then some USB ports and a three-and-a-half inch floppy drive were shoehorned into the chassis, with the rear battery compartment holding the parts from THEC64 Mini.

The build was not entirely without issue. It turns out the degaussing coil connector can plug perfectly into the service port, and Murphy’s law proved itself true again. But no harm was done, and the error was quickly discovered. All that was left was to button the chassis back up and add some paint and 3d-printed trim details. The build looks great! Come back after the break to watch the video from the [Retro Hack Shack] for yourself.

Continue reading “Making The Commodore SX-64 Mini”

ForceGen: Using A Diffusion Model To Help Design Novel Proteins

Although proteins are composed out of only a small number of distinct amino acids, this deceptive simplicity quickly vanishes when considering the many possible sequences across a protein, not to mention the many ways in which a single 1D protein sequence can fold into a 3D protein shape with a specific functionality. Although natural evolution has done much of the legwork here already, figuring out new sequences and their functionality is a daunting task where increasingly deep learning algorithms are being applied. As [Bo Ni] and colleagues report in a research article in Science Advances, the hardest challenge is designing a protein sequence based on the desired functionality. They then demonstrate a way to use a generative model to speed up this process.

They set out to design proteins with specific mechanical properties, for which they used the known unfolding characteristics of various protein sequences to train a diffusion model. This approach is thus more akin to the technology behind image generation algorithms like DALL-E than LLMs. Using the trained diffusion model it was then possible to generate likely sequences of which the properties could then be simulated, with favorable results.

As a large data set aid, such a diffusion model could conceivably be very useful in fields even beyond protein synthesis, automating tedious tasks and conceivably speeding up discoveries.

Watch The OpenScan DIY 3D Scanner In Action

[TeachingTech] has a video covering the OpenScan Mini that does a great job of showing the workflow, hardware, and processing method for turning small objects into high-quality 3D models. If you’re at all interested but unsure where or how to start, the video makes an excellent guide.

We’ve covered the OpenScan project in the past, and the project has progressed quite a bit since then. [TeachingTech] demonstrates scanning a number of small and intricate objects, including a key, to create 3D models with excellent dimensional accuracy.

[Thomas Megel]’s OpenScan project is a DIY project that, at its heart, is an automated camera rig that takes a series of highly-controlled photographs. Those photographs are then used in a process called photogrammetry to generate a 3D model from the source images. Since the quality of the source images is absolutely critical to getting good results, the OpenScan hardware platform plays a pivotal role.

Once one has good quality images, the photogrammetry process itself can be done in any number of ways. One can feed images from OpenScan into a program like Meshroom, or one may choose to use the optional cloud service that OpenScan offers (originally created as an internal tool, it is made available as a convenient processing option.)

It’s really nice to have a video showing how the whole workflow works, and highlighting the quality of the results as well as contrasting them with other 3D scanning methods. We’ve previously talked about 3D scanning and what it does (and doesn’t) do well, and the results from the OpenScan Mini are fantastic. It might be limited to small objects, but it does a wonderful job on them. See it all for yourself in the video below.

Continue reading “Watch The OpenScan DIY 3D Scanner In Action”

Installing SteamOS And Windows On A Google Meet Video Conference Computer

The Lenovo Meet is a collaboration with Google to bring Google Meet to customers in a ready to install kit for conference rooms and similar. Also called the Google Meet Series One, it features a number of cameras, speakers, display and more, along with the base unit. It is this base unit that [Bringus Studios] on YouTube tried to install a different OS capable of running Steam games on in a recent video. Along the way many things were learned about this device, which is – unsurprisingly – just another ChromeOS box.

After removing the rubber bottom (which should have been softened with a hot air gun to prevent damage), the case can be opened with some gentle prying to reveal the laptop-like innards. Inside are an 8th gen Intel CPU (i7-8550U @ 1.8 GHz), a 128 GB SATA M.2, 2 GB DDR4 RAM, along with 2 more GB of DDR4 a MicroSD slot and a Google Coral DA1 TPU on the bottom of the mainboard. It should be easy to install Linux, Windows, etc. on this other than for the ChromeOS part, which locks down the non-UEFI BIOS firmware.

Continue reading “Installing SteamOS And Windows On A Google Meet Video Conference Computer”

Steampipe: All SQL All The Time

Although modern Linux has slightly shifted, the old Unix mantra was: everything’s a file. With Steampipe, a better saying might be: everything’s a SQL table. The official tagline is “select * from cloud” which also works. The open-source program relies on plugins, and there are currently 140 sources ranging from GitHub to Google Sheets and more.

There are command line interfaces for the major platforms. You can also add the system to PostgresSQL or SQLite for even more SQL goodness. Continue reading “Steampipe: All SQL All The Time”

Linux Fu: Forward To The Past!

Ok, so the title isn’t as catchy as “Back to the Future,” but my guess is a lot of people who are advanced Linux users have — at least — a slight interest in retrocomputing. You’d like an Altair, but not for $10,000. You can build replicas of varying fidelities, of course. You can also just emulate the machine or a similar CP/M machine in software. There are many 8080 or Z80 emulators out there, ranging from SIMH to MAME. Most of these will run on Linux or — at the least — WINE. However, depending on your goals, you should consider RunCPM. Why? It runs on many platforms, including, of course, Linux and other desktop systems. But it also will work with the Arduino, Teensy, ESP32, or STM32 processors. There is also experimental support for SAM4S and Cyclone II FPGAs.

It’s pretty interesting to have one system that will work across PCs and embedded hardware. What’s more is that, at least on Linux, the file system is directly translated (sort of), so you don’t have to use tricks or special software to transfer files to and from CP/M. It is almost like giving Linux the ability to run CP/M software. You still have to have virtual disks, but they are nothing more than directories with normal files in them.

Goals

Of course, if your goal is to simulate a system and you want to have 180 kB floppies or whatever, then the direct file system isn’t a benefit. But if you want to use CP/M software for education, nostalgia, or cross-development, this is the way to go, in my opinion.

It isn’t just the file system, either. If you need a quick utility inside your bogus CP/M environment, you can write it in Lua, at least on desktop systems. On the Arduino, you can access digital and analog I/O. Theoretically, you could deploy an embedded Altair for some real purpose fairly cheaply. Continue reading “Linux Fu: Forward To The Past!”

A Classroom-Ready Potentiometer From Pencil And 3D Prints

If you need a potentiometer for a project, chances are pretty good that you’re not going to pick up a pencil and draw one. Then again, if you’re teaching someone how a variable resistor works, that old #2 might be just the thing.

When [HackMakeMod] realized that the graphite in pencil lead is essentially the same thing as the carbon composition material inside most common pots, the idea for a DIY teaching potentiometer was born. The trick was to build something to securely hold the strip while making contact with the ends, as well as providing a way to wipe a third contact across its length. The magic of 3D printing provided the parts for the pot, with a body that holds a thin strip of pencil-smeared paper securely around its inner diameter. A shaft carries the wiper, which is just a small length of stripped hookup wire making contact with the paper strip. A clip holds everything firmly in place. The video below shows the build process and the results of testing, which were actually pretty good.

Of course, the construction used here isn’t meant for anything but demonstration purposes, but in that role, it performs really well. It’s good that [HackMakeMod] left the body open to inspection, so students can see how the position of the wiper correlates to resistance. It also makes it easy to slip new resistance materials in and out, perhaps using different lead grades to get different values.

Hats off to a clever build that should be sure to help STEM teachers engage their students. Next up on the lesson plan: a homebrew variable capacitor.

Continue reading “A Classroom-Ready Potentiometer From Pencil And 3D Prints”