Cat Vs. Human Escalates With Armor-Plated Feeder

Wars generally increase innovation as the opposing sides try to kill each other in ever more efficient ways. Even the soft war waged daily between felines and their human servants results in innovation, to wit we offer this armor-plated automated cat feeder.

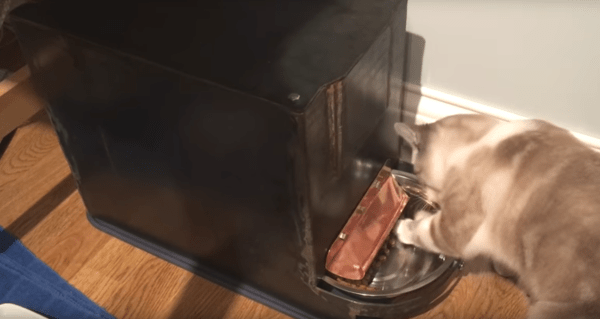
The conflict between [Sprocket H.G. Shopcat] and her human [Quinn Dunki] began with a thoughtfully provided automatic food dispenser. Like human vending machine customers who witness a just-purchased bag of Cheesy Poofs dangling on the end of the dispense auger, [Sprocket] learned that the feeder would dispense a few fishy nuggets when nudged. [Quinn] embarked on an iterative design process to control [Sprocket]’s off-schedule snacking. Fastening the feeder firmly to the floor, and adding obstructions to prevent her from pawing up the dispense chute — nothing seemed to stop the clever feline’s raids. [Quinn] then pulled out all the stops and whipped up a [Sprocket]-safe enclosure for the feeder from 1/8″ plate steel and copper. This seems to have put the cat back on the straight and narrow, and it doesn’t look half bad either.

All kidding aside, [Quinn]’s approach to this problem is pretty instructive. Careful observations informed several cycles of reasonable modifications until it became clear that only the most extreme solution would work. There’ve been tons of cat feeders here before, from the simple to the complex, but we think all would fall prey to the clever [Sprocket] without a little up-armoring.

Continue reading “Cat Vs. Human Escalates With Armor-Plated Feeder”

Bike Saddle As Workshop Stool

It is not uncommon for parts from a particular hobby or pursuit to be repurposed by enthusiasts as furniture. Car nuts will make sofas from the rear bodywork of a saloon car, for example, or coffee tables from engine blocks as you might have seen in the Top Gear studio.

A cycling enthusiast asked [Quinn Dunki] to produce a workshop stool using a bicycle seat, and the resulting piece of furniture is both elegant and functional, if probably comfortable only to those used to a racing saddle.

The stool itself rests on a vertical tube with a tripod at the bottom, each leg of which is fitted with a caster. We are taken through the steps to make the metalwork, in particular the rather tricky 45 degree tubular joint required for each leg. We see the unexpectedly high forces above the casters cracking the initial tack welds, and the resulting more substantial joint. And finally we’re treated to the stool being elegantly modelled by Sprocket the cat, as you can see below the break.

Continue reading “Bike Saddle As Workshop Stool”

Three Of Our Favorite Hackers

It’s one thing to pull off a hack, it’s another entirely to explain it so that everyone can understand. [Micah Elizabeth Scott] took a really complicated concept (power glitching attacks) and boiled a successful reverse engineering process into one incredible video. scanlime-power-smoothing-alterationsWe know, watching 30 minutes of video these days is a huge ask, just watch it and thank us later.

She explains the process of dumping firmware from a Wacom tablet by hacking what the USB descriptors share. This involves altering the power rail smoothing circuit, building her own clock control board to work with the target hardware and a ChipWhisperer, then iterating the glitch until she hones in on the perfect attack.

This, of course isn’t her first rodeo. Also known as [scanlime], she’s been on the scene in a big way for a while now. Check out more of her work, and perhaps congratulate her on recently being scooped up for a Principal Researcher role that we’d like to attribute in part to the hacks she’s been demoing online. You should also thank her for being a Hackaday Prize Judge in 2015 and 2016.

led-handbag-debra-ansel-geekmomprojects-closeup
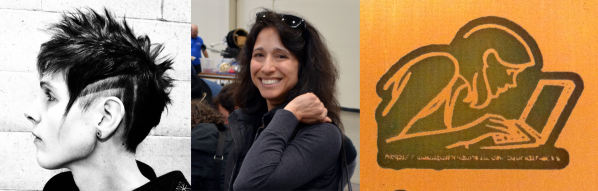
This year we spotted [Debra Ansell] at Maker Faire, not as an exhibitor but an attendee taking her newest creation out in the wild. [Debra’s] LED matrix handbag is a marvel of fabrication — both design and execution are so great it is hard to believe this is not a commercially available product. But no, the one-of-a-kind bag uses woven leather strips spaced perfectly to leave room for WS2812 RGB LED modules to nestle perfectly. Look slike she even posted a tutorial since we last checked! If you don’t recognize her name, you might recognize her company: GeekMomProjects. She’s the person behind EtchABot, a robotic addendum to the diminutive pocket Etch a Sketch which [Debra] sells on Tindie.

troubleshooting-veronica-custom-6502-computer
The custom PCBs of Veronica (in troubleshoot mode)

Our fascination with [Quinn Dunki]’s work goes way way back. She has a software background but her hardware chops are to be admired. Recently we’ve delighted in her efforts to beef up the fabrication abilities of her shop. Want to know how to vet your new drill press — [Quinn] has you covered. We also enjoyed seeing her bring an inexpensive bandsaw up to snuff. There are too many other great hacks from [Quinn Dunki] to start naming them all. We’ll leave you with her amazing work on Veronica, the scratch-built 6502 computer that she brought with her for her Hackaday 10th Anniversary talk. Her avatar at the top is from one of her PCB etching tutorials.

Celebrating Ada Lovelace Day

Today is the second Tuesday in October — it’s Ada Lovelace day, a worldwide celebration of women in science and technology. The hackers above are some of our all-around favorites and we have featured all of their work frequently. Their impact on technology is undeniable, we give them much respect for their skills and accomplishments. We’d love to hear your own favorite examples of women who have incredible game when it comes to hardware hacking. Please let us know in the comments below.

How To Have An Above Average Time With A Cheap Horizontal Bandsaw

[Quinn Dunki] has brought yet another wayward import tool into her garage. This one, all covered in cosmoline and radiating formaldehyde fumes, is a horizontal bandsaw.

Now, many of us have all have some experience with this particular model of horizontal saw. It waits for us at our work’s machine shop, daring us to rely on it during crunch time. It lingers in the corner of our hackerspace’s metalworking area, permanently stuck in the vertical position; at least until someone finally removes that stripped screw. Either that or it’s been cannibalized for its motor, the castings moldering in a corner of the boneyard.

This article follows on the heels of [Quinn]’s other work, a treatise on the calibration of a drill press, and it outlines all the steps one has to take to bring one of these misunderstood tools into consistent and reliable operation. It starts with cultivating a healthy distrust of the factory’s assurances that this device is, “calibrated,” and needs, “no further attention.” It is not, and it does. Guides have to be percussively maintained out of the blade’s way. Screws have to be loosened and adjusted. It takes some effort to get the machine running right and compromises will have to be made.

In the end though, with a high quality blade on, the machine performs quite well. Producing clean and quality cuts in a variety of materials. A welcome addition to the shop.

Creating A PCB In Everything: Eagle DRC And Gerber Files

For the next post in the Creating A PCB series, we’re going to continue our explorations of Eagle. In Part 1,  I went over how to create a part from scratch in Eagle. In Part 2, we used this part to create the small example board from the Introduction.

This time around I’ll be going over Design Rule Check (DRC) — or making sure your board house can actually fabricate what you’ve designed. I’ll also be covering the creation of Gerber files (so you can get the PCB fabbed anywhere you want), and putting real art into the silkscreen and soldermask layers of your boards.

The idea behind this series is to explore different EDA suites and PCB design tools by designing the same circuit in each. You can check out the rest of the posts in this series right here.

Continue reading “Creating A PCB In Everything: Eagle DRC And Gerber Files”

Likely Everything You Need To Know Before Adopting A Drill Press

Oh sure, the thought of owning a happy whirring drill press of your very own is exciting, but have you really thought about it? It’s a big responsibility to welcome any tool into the home, even seemingly simple ones like a drill press. Lubricants, spindle runout, chuck mounts, tramming, and more [Quinn Dunki], of no small fame, helps us understand what it needs for happy intergration into its new workshop.

[Quin] covers her own drill press adventure from the first moments it was borne into her garage from the back of a truck to its final installation. She chose one of the affordable models from Grizzly, a Washington based company that does minimal cursory quality control on import machinery before passing on the cost to the consumer.

The first step after inspection and unpacking was to remove all the mysterious lubricants and protectants from the mill and replace them with quality alternatives. After the press is set-up she covers some problems that may be experience and their workarounds. For example, the Morse taper on the chuck had a few rough spots resulting in an incomplete fit. The chuck would work itself loose during heavier drilling operations. She works through the discovery and repair of this defect.

Full of useful tips like tramming the drill press and recommended maintenance, this is one of the best guides on this workshop staple that we’ve read.


A Game Pad For The Apple II

[Quinn Dunki] has been hard at work building a Teddy Top – an Apple IIc Plus modified for a road warrior. It has a 3.5 inch disk drive, runs at a blistering four megahertz, and has a beautiful integrated color LCD. It would be a shame to have such a great machine and no way to play games as they were intended, so [Quinn] set about building a game pad for her lovable Apple II.

The Apple II joystick port isn’t as simple as an Atari or Commodore joystick port. Where the bog-standard Atari joystick is basically just a bunch of switches connected to pins, the Apple II joystick is analog. Weird, and even weirder is the value of the pots in these joysticks: 150kΩ. Somehow or another, nobody makes pots in this value any more. Luckily the hardware in these joysticks is well documented, and shoehorning in modern components isn’t that bad.

The Apple joystick has a bit of circuitry – a 556 timer chip that reads the values of each pot and converts that into a stream of 0s and 1s for the Apple. The joystick [Quinn] found for her game pad is an analog thumb stick on a neat breakout board manufactured by Parallax. This analog joystick has 10kΩ pots in it, and that just won’t work with the 556 timer chip. However, since this is just resistors and a 556 chip, adjusting some of the values on the original schematics does the trick. [Quinn] added a few capacitors to her circuit, and everything worked beautifully.

With the electronics down, she turned her attention to the case for her Apple II road warrior enclosure. She recently picked up a 3D printer, which means she’s new to 3D printing. After spending a few hours designing a controller in 123D Design, she sent the files over to the printer. Warping happened. She tried an ABS slurry. The part was stuck to the bed. It took a few tries (purple glue sticks are awesome, [Quinn]), but she eventually got her plastic enclosure printed out, and the circuitry installed. The result is a portable computer, with a custom controller, playing Lode Runner. Can’t beat that.